|
|
||||||||||||||||||||||||||||||||||||||||||||||||||||||||||||||||||||||||||||||||||||||||||||||||||||||||||||||||||||||||||||||||||||||||||||||||||||||||||||||||||||||||||||||||||||||||||||||||||||||||||||||||||||||||||||||||||||||||||||||||||||||||||||||||||||||||||||||||||||||||||||||||||||||||||||||||||||||||||||||||||||||||||||||||||||||||||||||||||||||||||||||||||||||||
|
|
|
|||||||||||||||||||||||||||||||||||||||||||||||||||||||||||||||||||||||||||||||||||||||||||||||||||||||||||||||||||||||||||||||||||||||||||||||||||||||||||||||||||||||||||||||||||||||||||||||||||||||||||||||||||||||||||||||||||||||||||||||||||||||||||||||||||||||||||||||||||||||||||||||||||||||||||||||||||||||||||||||||||||||||||||||||||||||||||||||||||||||||||||||||||||||
|
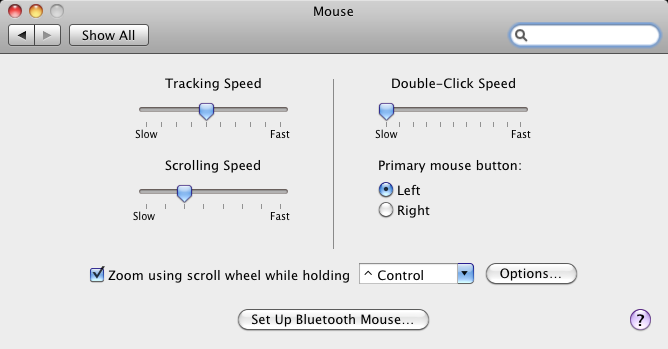
Some features and functions are referenced in the UPDD documentation that requires further explanation. Here it is! Double Click issuesDouble clicking on a touch screen relies on double click related settings set to a tolerance that allows a touch screen to be used to generate the double click. In Windows, for example, there are 3 such settings, DoubleClickSpeed, DoubleClickWidth and DoubleClickHeight. These settings establish the width of the rectangle that Windows uses to detect double-clicks. If sequential clicks are positioned within the rectangle defined by DoubleClickHeight and DoubleClickWidth, and occur within the time specified by DoubleClickSpeed they are interpreted as double-clicks. Otherwise, they are interpreted as sequential single clicks. WindowsWhen UPDD is installed it sets these internal settings (for the user performing the install) to values that cater for finger double click usage. The system mouse settings can be changed in Mouse properties and this dialog can be invoked from the UPDD Console, System Mouse settings, as seen below:
Most of these mouse dialogs allow the double click speed setting to be changed and this must be a slow (ish) setting to allow for touch double clicks. Too fast a setting will prevent double clicks. The other related settings can be found in the registry at HKCU\Control Panel\Mouse. The Width and Height default settings are 4 pixels and the speed is 500 milliseconds. UPDD sets these settings to 32 and 370 respectively. New user issueIf a new user logs in they will get the default Windows double click settings which may make it difficult to double click. With UPDD version 4.1.6, build 1156 and above, the UPDD daemon task monitors the users. When a new user logs in it automatically sets these settings. Settings changed by 3rd party softwareThere have been cases of double click difficulties following the installation of mouse drivers that have set these settings to values that prevent touch double clicks requiring the setting to be reset to ‘touch’ values. Disabling double clickThis is not a driver issue but a system issue. If touch double click is to be disabled we suggest that the settings be set such that it is almost impossible to achieve a double click with touch. Try Height and Width = 1 and Speed = 200 – see below. Register settingsShould you need to manually set the registry for the Double Click Settings these lines can be copied to a .reg file and double clicked to update the registry settings:
Windows Registry Editor Version 5.00 On Windows XP the DoubleClickSpeed ranges from 200 (Fast) to 900 (Slow)
If using UPDD version 5.0.x you can use our command line processor to change these values, such as “tbutils nodevice setting dw DoubleClickHeight 64”. OS double click optionsOne potentially useful setting in Windows, when using the desktop via touch, is to invoke icons, folders and files using a single click rather than double click. This setting is located in the folder options as shown below:
Mac OS XUnder Mac the Mouse dialog is as follows:
UPDD assisted double click settingsAs implemented in UPDD build 5.1.1434 onwards
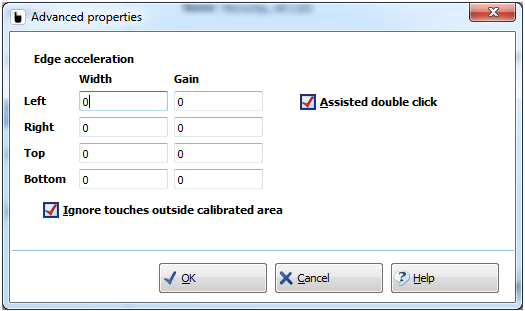
Typically it is more difficult to double click elements with a touch screen than with a device such as a mouse due to the difficulty touching the same location with adequate accuracy twice and movement of the touch during each of the clicks. UPDD supports an “assisted double click” feature that can be set in the Advanced properties dialog:
Two settings control this feature and by default both are set to 500:
doubleclicktimeupdd. This is a time in milliseconds. doubleclickdwellarea. This is a screen measurement in logical units. Each distinct screen device is 65535 x 65535 logical units.
If doubleclicktimeupdd has a non-zero value then when any touch is made any subsequent movement is ignored until either doubleclicktimeupdd milliseconds has elapsed or the point of touch moves more than doubleclickdwellarea units from the original point of touch.
This means that two touches landing in approximately the same location within a short time interval are treated as being at exactly the same spot, making double clicking much easier.
It should be born in mind that this does introduce a small deviation in the input in cases where movement immediately follows touch, e.g. in drawing and in such cases this feature might not be desirable; however in most cases this effect will not be noticeable.
Although the settings allows for fine grained control over this feature in practice setting both values to a nominal value of 0x500 seems to give good results. These can be changed as follows
tbutils setting dw doubleclicktimeupdd 500 tbutils setting dw doubleclickdwellarea 500
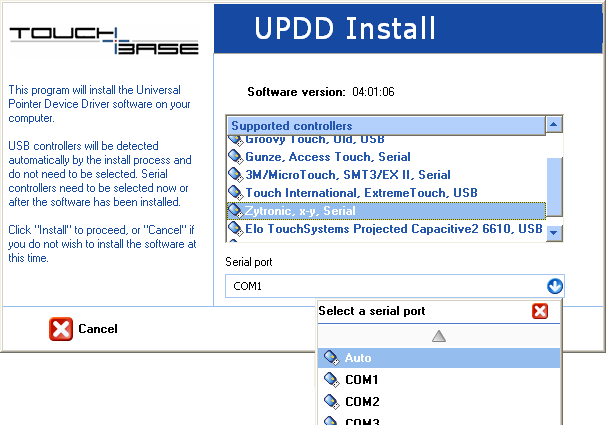
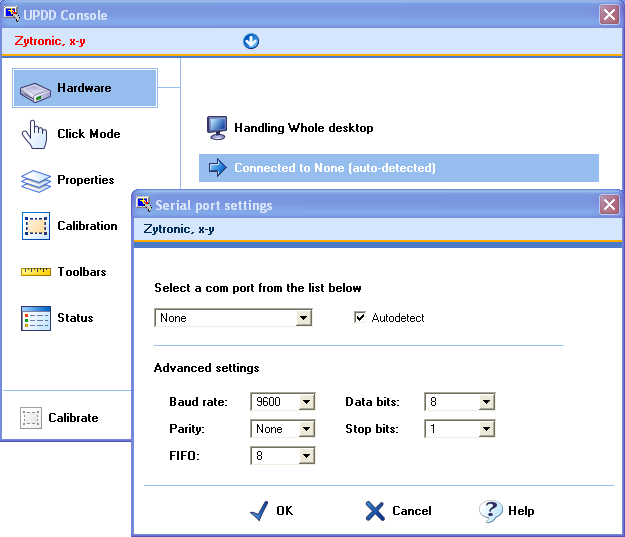
Limitations This feature does not work with the new Pen touch mode. In a multi touch environment it would be a useful improvement to cancel the double click processing once a 2nd touch arrives. Serial port auto detectionSince UPDD 4.1.6, build 1156, a serial controller can be set for auto-detection rather than set to a specific com port. This option is only available, and enabled, where a serial controller can receive and acknowledge a firmware command. Controller commands are held in UPDD macros. Typically a macro sequence used to detect a controller would look like this:
[HEX]0A0141 //Check Controller Activity [ACK]0A0141
In this example the driver sends 0A0141 to the controller which is echoed by the controller by way of acknowledging receipt.
Some macros are needed for controller initialization rather than just containing commands to illicit a response but as long as the controller responds to the received commands then the macro can be used to detect the controller.
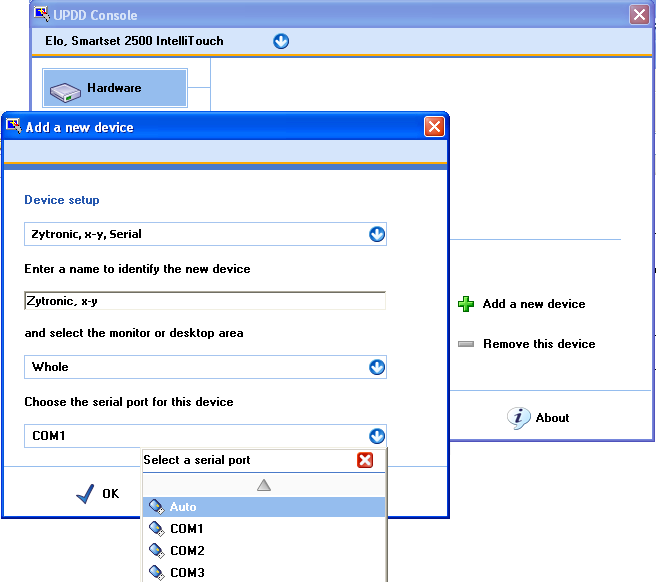
When the controller is set for Auto detect the driver issues the macro to each com port in turn looking for the response. If a response is received then the com port is set accordingly. If no response is seen from any port then the com port is set to ‘None’. Each time UPDD is loaded it will automatically detect the device but on 2nd and subsequent attempts the detection will initially check the current port setting before checking thro each port in sequence. Setting serial controller for auto detectionThere are various ways to indicate a serial controller is to be auto-detected as follows:
Right Click processing
In the majority of cases touching a touch screen or similar device will normally be the equivalent of generating a mouse left click. However, in some cases it is also desirable to be able to generate a right click via touch. With UPDD there are a number of possible methods; Right click trigger in the data stream, the Event Selector (to indicate if the next touch should generate a left or right click), using Interactive Touch mode (which caters for both left and right clicks) or using the right click mechanism built into the operating system; as described below.
Where Extended touch feature is enabled and thus utilising the OS in-built right click functions any UPDD native right click processing is disabled.
Right Click data triggerSome devices, such as a Pen, may have a barrel switch that when pressed will alter the data packet delivered to the driver to indicate the switch is depressed. Our driver can be configured to act upon triggers in the data packet which can be set to perform certain functions, including Right click. If a device is configured in such a way and the data trigger is assigned to a right click function then pressing the switch will generate a right click. Event SelectorSince UPDD 5.1.1143 no longer available The UPDD Event Selector, in its most simple terms is a user controlled trigger that indicates to the driver if the next touch should be a left or right click. Click the link for more details. Interactive Touch
Operating System featureThe operating system may cater for right click generation using a pen or touch device and in some cases this can be utilised by the driver, as discussed below:
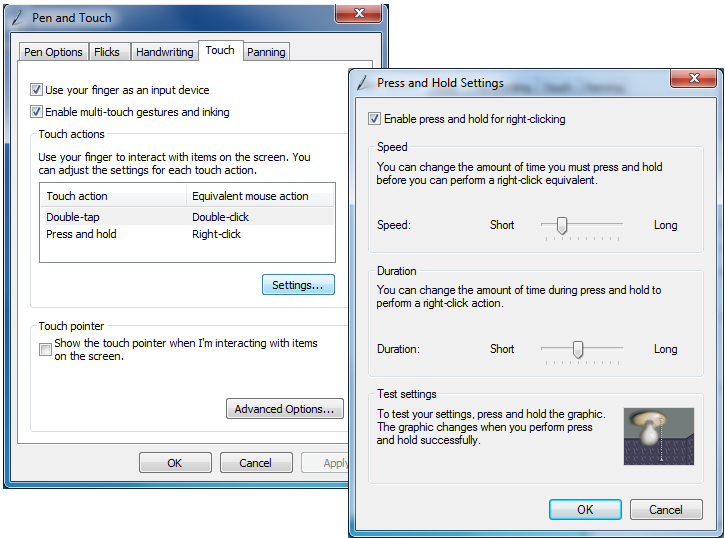
Windows If using UPDD 4.1.8 and above in touch enabled versions of Vista or Windows 7 there is a setting in UPDD, called Extended Touch, that passes touch data to the OS such that all touch features built into the OS are available to the touch user. In the Pen and Touch system settings you will find some settings specific to touch and you can associate a right click to one of the actions as shown in this Windows 7 example:
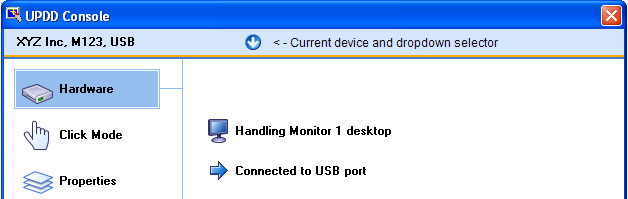
Controller namingIn our controller definition database we allocate default controller names to help identify the manufacturer, model and interface, e.g XYZ Inc, M123, USB or a name as requested by the manufacturer or system integrator.
In the UPDD Console there is a Device list entry that shows the currently selected device and, if more than one device is configured on the system, offers a dropdown list to select other devices.
If another controller of the same type is plugged in then the driver will allocate a unique name based on the name of the controller along with a bracketed number i.e. XYZ Inc, M123, USB (2), XYZ Inc, M123, USB (3) etc
Each controller discovered on the system is allocated a unique bind key to help associate and identify UPDD controller settings with individual controllers as they are unplugged, replugged or rediscovered, such as after a reboot.
In a 3 touch monitor device with all devices connected the device list would be seen as:
XYZ Inc, M123, USB XYZ Inc, M123, USB (2) XYZ Inc, M123, USB (3)
Any PnP devices that are unplugged would have their name displayed in red. So unplugging (2) would result in the device list as follows:
If the controller is subsequently reconnected, then the driver will calculate the bind key to find the previous entry and settings and re associate the device with its previous settings.
However, if the device in red is deleted from the UPDD console (using the ‘Remove a device’ option), leaving two entries:
XYZ Inc, M123, USB XYZ Inc, M123, USB (3)
then the next time the device is connected no previous settings will be found and a new device entry will be created. Given (2) is the next unique device name then the device will reappear as XYZ Inc, M123, USB (2) but will be allocated default settings which may need manually adjusting.
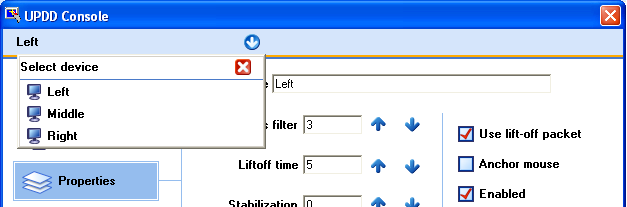
Our recommendation is to not delete devices if they are to be reconnected at some future date. Controller renamingController names can be manually adjusted once the device is listed in the UPDD Console device list. Simply select the device, click on Properties and change the name. In a three touch monitor system you could name the controllers to reflect their position on the desk, say Left, Middle, Right as shown below:
In this instance, plugging in a 4th controller would result in the name of the new controller being XYZ Inc, M123, USB. Daemon taskUPDD utilises a number of daemon (background) processes;
TIdaemonWindows 8.x and above, UPDD version 5.1.1153 and above: Implements the user mode, API based touch interface introduced in Win 8.x. Some Windows 8.x versions, especially, OEM system builds, reject the UPDD Virtual (software) HID interface so UPDD now supports the Win 8.1 user mode touch interface. AidaemonImplements functions that are used across all platforms.
Under Mac and Linux appropriate start-up methods are used.
Under Windows, in non Windows 8 systems, the daemon task is invoked at system startup by way of a registry entry in the Windows run branch HKEY_LOCAL_MACHINE\SOFTWARE\Microsoft\Windows\CurrentVersion\Run.
The daemon task is responsible for the following functions:
TBdaemonNo longer utilised in UPDD 5.1.1143 and above Under Windows desktop version of the driver the software utilizes a daemon (or background) task to implement certain functions related to the driver and user interface. The program is called TBdaemon.exe and resides in the UPDD application folder. In UPDD version 3 this program was called TBsystry.exe.
The daemon task is invoked at system startup due to the ‘tbdaemon’ registry entry in the Windows run branch HKEY_LOCAL_MACHINE\SOFTWARE\Microsoft\Windows\CurrentVersion\Run
The daemon task is responsible for the following functions:
Pen up processingA pointer device generates data packets when in use, such as touch packets whilst a stylus is in contact with a touch screen. When the device is no longer in use then obviously the data packets will stop being generated. A driver or application may need to perform a specific function at this point, such as pen up processing if the device is being used in mouse emulation in an appropriate mouse click mode.
Most touch screen devices, but not all, will indicate in the last data packet that the stylus has left the screen. These data packets are often referred to as the pen up or lift off packet.
If a device has a pen up packet defined in the UPDD controller configuration then there is a UPDD Setting called “Use Lift Off packet”. This setting can be set in the UPDD settings file as appropriate or via the UPDD Console, properties page and is enabled by default.
UPDD will generate a pen up in mouse emulation mode when
either: · the ‘pen up’ packet is seen (and pen up processing is enabled) ·
and/or when data packets cease (if Lift off time processing is
enabled). This approach caters for all methods of ‘pen up’ detection:
· The device generates pen up packets · The device does not generate pen up packets · The device generates pen up packets but due to communication error is not received or is corrupted.
To generate a pen up where data packets cease there has to be a short wait prior to generating the pen up to ensure the data has stopped rather than being a gap between the packets. In UPDD this short wait period is referred to as the Lift Off time settings, as described below. Lift off time settingThe Lift off Time value specifies the time interval
required to register a stylus lift after the last touch packet is received.
Lift off time is defined in units of 20ms. This value is used to perform a
pen up if the ‘Use Lift off’ packet is disabled otherwise Pen ups are
generated as soon as the stylus leaves the pointer device display. Delta mode considerationsDelta mode refers to a pointer device mode whereby data packets with the same X and Y coordinate values (i.e. the stylus it stationary) are not sent by the device. In this mode, UPDD will generate a pen up when the stylus is held stationary. To cater for this situation a lift off time value of zero is defined to disable pen ups based on time. SettingsThe ‘Lift off time’ and ‘Use pen up packets’ settings can be set via the UPDD Console, Properties page or directly in the UPDD settings files:
If the console is not available the setting can be found in the UPDD settings files as follows:
Within the files will be a branch ‘Parameters’. With UPDD 4.0.x this will be followed by a GUID number (a very large number). For each controller there will be a controller number 1,2 etc. Therefore the location for a single controller system will be:
liftofftime=0x0000000n (n = 0 = disabled or lift of time value in units of 20ms) use liftoff bit =0x0000000n ( n = 0 = disabled, 1 = enabled) Advance ConsoleWith release 4.1.10 we hope to release the first version of the UPDD Advance Console.
The standard UPDD Console shows the basic driver settings and allows them to be updated. However, there are many other settings that may occasionally need to be updated and the Advance Console is being created to offer a GUI interface to these settings. Currently these settings need to either be set as required as default or updated manually.
Once this utility is available a separate web document will be created to document features and usage. Live AnnotationWith release 4.1.8 we have implemented Windows Live annotation function. This function allows a touch screen user to annotate over a live desktop. Annotation can be enabled, disabled, paused and erased. The line colour and width can also be defined.
This functionality came about from a project we undertook for a cable television company to allow a presenter to annotate over a live Windows desktop showing financial data. The presenter uses UPDD Toolbars at either side of the larger touch display (with no desktop visual representation – so not seen by the viewer) to invoke the annotate functions as required.
Annotation functions can be controlled via UPDD API calls and we have implemented two user interfaces of our own, as discussed below: Toolbar interfaceThe UPDD toolbar interface implements toolbar cell actions to control all annotate functions. An example of an Annotate toolbar is described in full in the toolbar documentation. UPDD Console interfaceThe UPDD Console, Extensions dialog, exposes a simple UPDD interface to the Annotate functions. Annotate API callsThe annotate settings:
AnnotateThickness Annotate Color AnnotateMode
Are set via the standard api followed by TBApiApply
e.g.
TBApiSetSettingDWORD(0, "AnnotateThickness",3);
Color is a Windows COLORREF value NOT RGB; example
COLORREF cr = RGB(r,g,b); TBApiSetSettingDWORD(0, "AnnotateColour", cr);
There’s no API to clear. This can be achieved as follows (C++ example)
#define WM_DOCLEAR 4365 BOOL CALLBACK _ClearPicture(HWND hWnd, LPARAM lParam) { char className[200];
GetClassNameA(hWnd, className, sizeof(className)); if(!strcmp(className, "TBUPDD_Annotate_Class")) { :PostMessage(hWnd, WM_DOCLEAR, NULL, NULL); }
return true; }
EnumWindows(_ClearPicture, NULL);
The values for mode are
0=pause 1=annotate 2=stop
If annotation is in a stopped state then activedw.exe must be launched to activate annotation. Setting stop will cause activedw.exe to terminate. Touch loggingNot available in Win CE A primitive touch logging facility was added to UPDD 4.1.8 build 1784 to allow for the logging of touch data reported in screen co-ordinates (pixels) with the origin (0,0) at the top left. This logs first and last touches. This facility was added to allow for a customer to match touches against application layout to help track what they considered to be a ‘user usage’ issue rather than an application issue. If any other coordinate data is required (e.g. raw controller coordinates) please let us know.
To enable logging use the following command to define and enable the logging setting in tbupdd.ini: UPDD 4.1.8 - tbcalib Device=0 /settingsz:logging=Y UPDD 4.1.10 – tbutils nodevice setting sz logging Y UPDD 5.x.x – tbutils nodevice setting sz logging Y and restart the computer or restart the driver (tbupddwu process), (e.g. on windows net stop tbupddwu / net start tbupddwu)
Use the same command as above replacing Y with N to stop logging.
recording starts as soon as the driver is loaded. reporting starts as soon as the windows desktop is fully loaded and the screen is touched (i.e. at least one touch is required on an active system to write the log).
C:\Program Files\UPDD>type upddlog_20100718_202531.log 2010-07-18 20:25:31 - left touch down @ x=688 y=619 2010-07-18 20:25:31 - left touch up @ x=688 y=619 2010-07-18 20:25:31 - left touch down @ x=688 y=618 2010-07-18 20:25:31 - left touch up @ x=674 y=438 2010-07-18 20:25:32 - left touch down @ x=475 y=316 2010-07-18 20:25:32 - left touch up @ x=465 y=383 2010-07-18 20:25:39 - left touch down @ x=1180 y=773 2010-07-18 20:25:39 - left touch up @ x=1179 y=771
The name of the log is based on the date and time the log file is created. Each entry is time stamped. Custom settingsWhen the driver is installed it sets up the settings for any configured controller based on the default settings delivered as part of the driver setup or components. In some cases, as an end user, you may wish to configure a system and then capture these settings for use with subsequent installations. In Windows we have a Clone option to clone setting for use with subsequent installs but this has some limitations and has been superseded with this new custom settings file, which is called extra.ini.
For any given touch controller updd custom settings can be defined and embedded in the driver package such that when the controller is configured in the driver any settings defined in the custom settings file will be applied to the controller.
The custom settings file currently caters for the following settings: General driver and system configuration settingsDefine any dword or string scalar driver setting. [updd] Setting name=0x0000000a [updd\parameters] Setting name=0x0000000a
Controller setting Define any dword or string scalar value associated with a controller.
[extra-controller name] – Controller name related to the subsequent settings Setting name=Value – Setting name and value
Example [extra-Quanta Computer, Dual, USB] first touch calibration=0x00000001 Toolbar calibration settingsPre-define toolbar calibration
[extra-toolbar] ntoolbars=N (where N=no of toolbars) and for each toolbar (1st N = 0, 2nd N = 1, 3rd N = 2 etc) CalX0 Toolbar N=0x00000nnn CalY0 Toolbar N=0x00000nnn CalX1 Toolbar N=0x00000nnn CalY1 Toolbar N=0x00000nnn Calibration settingsPre-define calibration data, created from the command tbcalib dump4tba
[extra-Quanta Computer, Dual, USB] calibration styles=Normal,10,4,10,0,0,184,114,194,967,1744,121,1745,973
Other settings will be catered for as the need arises.
Once the extra.ini file is created it can be embedded in to the setup program we supply to you or, since UPDD version 5.1.1434 the setup file can be placed externally with the setup file to be used in subsequent installs.
1) On windows systems extra.ini files can be stored in the subfolder .\updd_ext relative to the working directory at the time of running the setup.allowing most settings to be customised by an integrator. If using a scripted install you might need to explicitly set this before executing the installer 2) On Linux systems the extra.ini file can be embedded in the installer (tgz) file with the path ./opt/tbupddlx/extra.ini to achieve the same. 3) For OS/X the extra.ini file can be combined with the UPDD.pkg file (extracted from updd.dmg) using the ‘disk utility.app’ to create a modified disk image updd.dmg.
During installation extra.ini is appended to tbupdd.ini, creating one or more new sections, e.g. [extra-Quanta Computer, Dual, USB]
When a device is added to the system, either by adding manually or via PnP, the settings in any such section related to the new device type are used instead of the standard defaults.
Example extra.ini [updd\parameters] ignoretouchesoutofrange=0x00000000 autoinstalldevice=1;TRS Star Touch, Serial;;COM5
[extra-TRS Star Touch, Serial] calibration styles=Normal,10,4,10,0,0,923,914,921,114,97,912,98,111
The above example sets one setting to a required default value, automatically adds a serial device set to Com5 and pre-sets calibration data. ConsiderationWhen considering the need for customized settings, please consider the following:
1) Are these settings we can define as the default settings and deliver a package that does not need cloning or extra.ini? 2) Can the settings be supplied to us in extra.ini for use in your delivered software? 3) Under Windows, can you utilize the ‘old’ clone method (until improvements to the extra.ini mechanism are available) 4) Are your
custom settings to do with calibration? If so, there are various ways we can
embed default calibration setting for you and customized settings are not
necessarily the best approach. See, for example, TBcalib dump4tba command. Since UPDD
version 5.1.827 this command now dumps the calibration data in an extra.ini
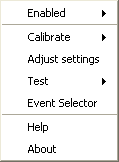
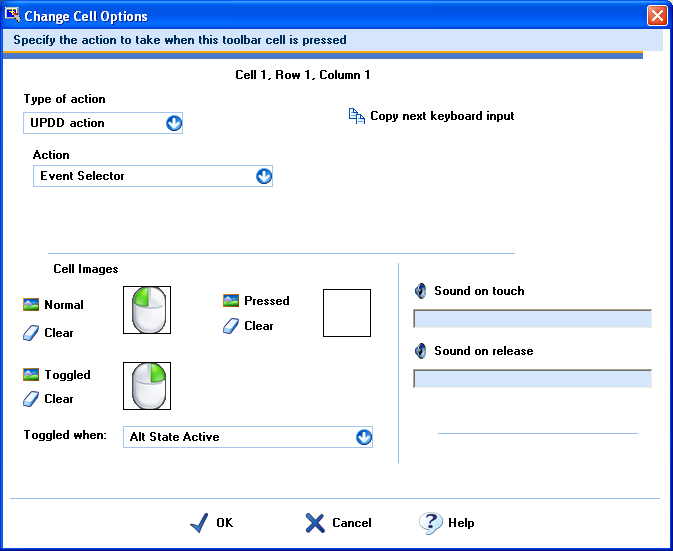
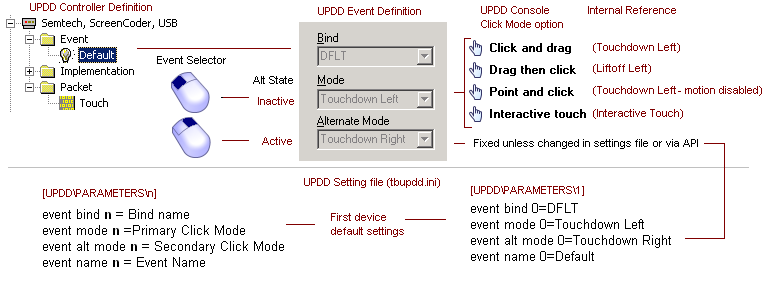
file. Important note: The last line of the extra.ini file must have a new line such that the last entry is a blank line Event SelectorThe UPDD driver is aware of ‘Events’ that can be generated by a device and all devices inherit the default event associated with the touch and release of a stylus on the device. Each Event can have two associated click modes referred to as the Primary and Secondary modes and these modes are described in great detail in the Mouse Emulation document. In standard touch screen usage the primary mode is normally associated with single left click mouse emulation and the secondary action is set to single right click mouse emulation. The current active mode is dictated by an internal setting call the Event State (Alt State) which will be inactive or active. Changing this state value will change the click mode used when the screen is next touched. We have implemented a number of methods/utilities to switch this state. The main utility used to change this state is referred to as the ‘Event Selector’. This section describes how this is implemented in the various operating systems: WindowsExtended touch consideration in Vista and Win 7 With extended touch enabled the Event Selector mechanism is disabled. Under Extended touch, using the systems HID interface we are not aware of an external method of generating a right click request. Extended touch has its own right click mechanism build into the operating system. LinuxCurrently not available. Mac OS XAvailable since UPDD 4.1.10, released 21st Oct 2010. Event Selector UtilitiesNo longer available since UPDD 5.1.1143 We have implemented a number of different Event Selector utilities as discussed below. Some are OS specific as indicated:
Technical overviewThis overview should be viewed in conjunction with the mouse emulation documentation. A controller is defined in the UPDD Controller database. As part of the definition we specify the events that can be generated by the device. Some have more than one event, however, all touch devices have the default event defined which relates to the first and last touch. Each Event can have two click modes associated with the event, the Primary action (Mode) and Secondary action (Alternative Mode). For each device UPDD holds an internal state (Alt State) to indicate the mode to perform when the event occurs. The Event Selector ultimately modifies this internal state. This can be visually represented as below:
Event Selector APIAn application can call the TBApiSetEventSelectorState(n) to switch to the primary or secondary modes as required. n = 0 = Primary or n = 1 = Secondary. When changed any active event selector utility will automatically reflect the state change. Touch MouseThe function has been superseded in UPDD version 5.0.2 with the Touch Pad function below.
A touch screen type device would normally function in absolute mode, that is, the system pointer or touch activation point would be directly under the point of contact. However, in some cases there is a requirement to operate a touch screen in relative mode such that the movement of the system pointer is relative to the point of contact (similar in operation to a touch pad or mouse). However, given that touch screens generate absolute co-ordinates then additional processing is required to convert the absolute touch to a relative movement. Touch Mouse implements a relative pointer device along the lines of a “trackpad” device. This feature currently only works with the system primary monitor.
Newly reinstated in UPDD 4.1.8 build 1948 this function is enabled and configured by the following settings:
By default a click is generated on first touch. Other button modes can be utilised by setting “event mode 0”=<mode>. See Mouse Emulation documentation. For example set this to “none” for no automatic click. In this case a toolbar can be used to implement the mouse buttons. Touch PadThe function was introduced (and only works in) UPDD version 5.0.2 and supersedes the Touch Mouse function above.
Starting with UPDD version 5.0.2 a new option is available to emulate a ‘touch pad’ similar to that found on laptop device using a “touch screen” input device.
When utilising this function the touch screen input device will typically not be attached to a monitor as with a normal touch screen but will still be operating in absolute mode. The absolute co-ordinate input is converted to relative motion as needed for touch pad emulation. There is additional support for multi fingered operation where the device supports it.
This feature replaces the previous “Touch Mouse” option from earlier versions. It supports the same features and more.
The following modes of operation are supported for generating button clicks
Multi touch and gestures When two or more concurrent touches take place the secondary touches are passed to the operating system at a position relative to the current primary touch point based on the vector between the primary and each touch and a predefined metric. This allows full support for gestures using 2 or more fingers. Single touch gestures, such as flicks, are not possible because it is difficult to distinguish between single fingered gestures and normal movement. The reliability of the gestures depends to a large extent on characteristics of the input device. UPDD for the most part is passing this data directly to the OS. When using multi-touch with the Touch Pad in button mode the touches must be outside of the dedicated button area.
Settings The operation of this feature is defined by a number of settings to allow tailoring to a specific device. Some might usefully be adjusted to suite a specific user.
Some of the settings refer to “dwell”. When a primary touch starts it is unknown if this is the start of a single touch or the start of a multi finger gesture.
The software will therefore not pass through mouse events until one of the following occurs.
The period during which events are held in this way is known as the dwell period.
The settings and their meanings are noted below. These settings are held in the UPDD settings file in the standard UPDD device specific section (one per device) and can be changed as documented here.
If using the command line utility to define the settings the ‘Type’ parameter shown against each setting indicates the setting type which is reflected in the tbutils command e.g. ‘tbutils setting dw touchpad 1’ is the command used to enable the touch pad function.
Technical note. This function is effectively utilising the device in two
modes of operation, single touch mouse and multi-touch digitizer. Disabling TouchOccasionally you may wish to, for whatever reason, disable touch for a device or disable the mouse emulation interface.
Device The driver can be prevented from processing any touches from a device. This can be set in a number of ways:
1) Command line interface passing parameters enable or disable 2) UPDD Console, Properties, Enabled checkbox (check or uncheck) 3) Windows - UPDD System Tray, Enabled option – select to toggle setting 4) API TBApiSetSettingDWORD(passedDeviceNumber,_T("Enabled"),0); = Disabled or….. ,1); = Enabled
System Wide The driver can be prevented from passing any touches to the 'mouse interface' of the OS. This will stop mouse emulation from all devices configured in the driver, but will, for example, still allow applications to receive touch data via the API.
1) Command line interface passing parameters pointeron or pointeroff 2) API TBApiMousePortInterfaceEnable(true); or (False); 3) TBupdd.ini
setting “InitialMousePortEnabled” (false = ignores MousePortInterface setting
at startup and starts up with port disabled)
With UPDD 4.1.10 we can supply a driver with InitialMousePortEnabled setting = false as default so that the touch is not functioning after installed and subsequent reboots. Pre 4.1.10 this setting needs to be set manually by one of the methods described above. Sound utilisationPre UPDD 4.1.10 sound (during touch or calibration) was only supported in Windows 32 bit and only available via the system speaker. With UPDD 4.1.10 we have introduced support for sound file playback during touch and calibration.
We have implemented sound playback via a cross platform utility which utilises sound playback mechanisms relevant to the OS in use:
UPDD sound configurationSounds can be associated with touch and calibration events and are configured as follows: TouchConfigured in the UPDD Console, Click Mode dialog, via the Sound option button:
Enter the name of the sound file to play or select the speaker icon to invoke Windows Explorer to located the sound file:
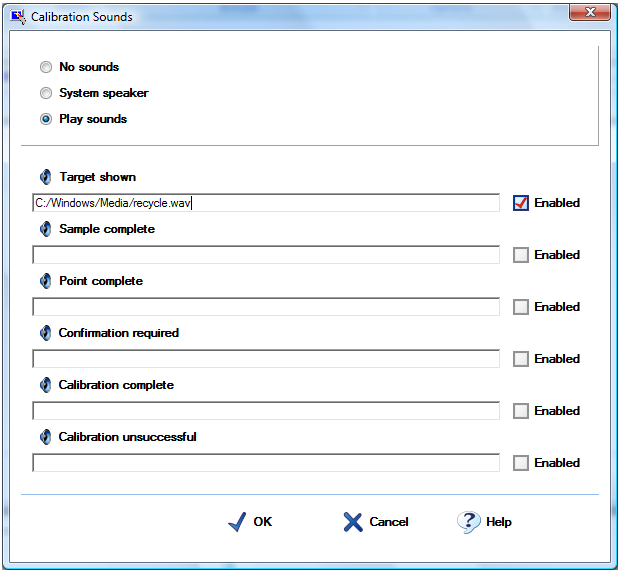
CalibrationConfigured in the UPDD Console, Calibration dialog, via the Sound option button
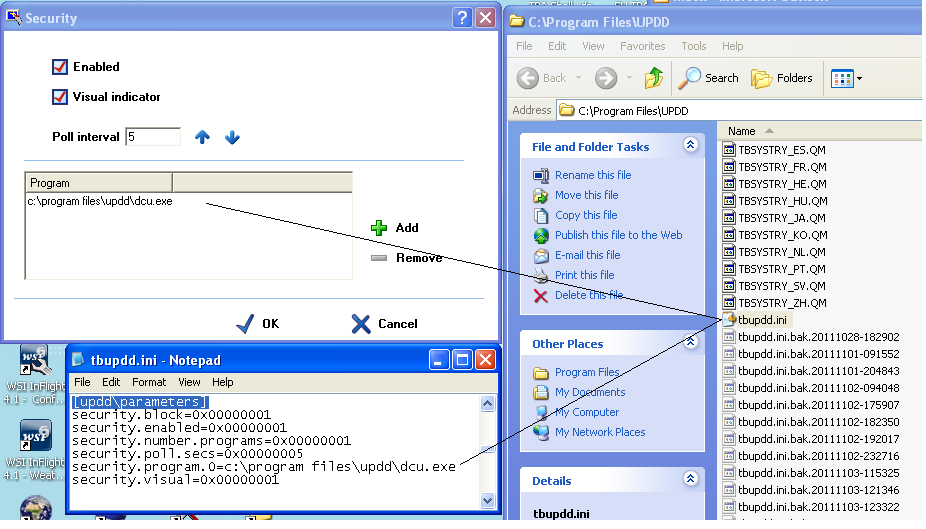
Touch security featureSome touch systems may be configured to run a dedicated touch application such that if the application fails then touch should be disabled to restrict access to the underlying system. This option has been implemented in UPDD 4.1.10, build 2235.
Configuring the security feature can be performed via a GUI interface or via settings in the UPDD settings file. GUI interfaceThe GUI interface is invoked via the command “dcu /security” (dcu is the .exe name of the UPDD Console). This is currently Windows only but a minor change is required for this to work in other OS. Please contact us if required in non – Windows systems.
This will invoke the following security dialog:
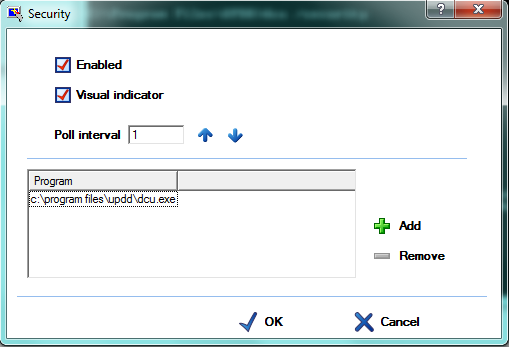
SettingsIf following settings, in the UPDD setting file, parameters branch, are used to implement the security feature:
Settings can be updated using the tbutils command line interface. To replicate the above settings using tbutils would be as follows:
Tbutils setting nodevice dw security.enabled 1 Tbutils setting nodevice dw security.visual 1 Tbutils setting nodevice dw security.number.programs 1 Tbutils setting nodevice sz security.program.0 C:\program files\updd\dcu.exe Tbutils setting nodevice dw security.poll.secs 1 Tbutils setting nodevice dw security.block 0 – needed to create setting as this is for internal use only and value will be set as required. Checking procedureThe UPDD background task invokes the security checking if enabled. If enabled it reviews the list of processes looking for the process associated with the defined program(s). If any are missing from the process list, touches are flagged to be blocked by the driver to the UPDD API or system interfaces. If all the processes are found the touch mechanism is not blocked. The checking is continuous so if a missing process is restored the touches will automatically be unblocked so long as all defined processes are seen.
If a user touches the screen whilst the touches are blocked and the visual indicator is enabled the user sees the following dialog: |
||||||||||||||||||||||||||||||||||||||||||||||||||||||||||||||||||||||||||||||||||||||||||||||||||||||||||||||||||||||||||||||||||||||||||||||||||||||||||||||||||||||||||||||||||||||||||||||||||||||||||||||||||||||||||||||||||||||||||||||||||||||||||||||||||||||||||||||||||||||||||||||||||||||||||||||||||||||||||||||||||||||||||||||||||||||||||||||||||||||||||||||||||||||||


|
Option |
Function |
|
Diagnostic trace tool / Diagnostic trace tool (raw) |
Captures touch data to tbcalib.log as described here. |
|
Export Calibration data |
Exports calibration data to extra.ini. Can be used to embed in driver installations to set default calibration data for a given touch configuration. Can be sent to Touch-Base to embed in delivered installers or placed alongside existing installer to be used in subsequent installations: Windows – place in sub folder UPDD_EXT Mac and Linux – to follow! |
|
Dump settings |
Dumps the current driver settings to tbupdd.ini file. |
|
Calibration debug |
Shows data packet feedback during calibration |
|
Configuration |
Dumps key configuration info to upddconfig.txt |
|
View and edit the controller’s initialisation macro – internal/support use only. |
|
|
Create master backup |
Create a master backup of the settings file tbupdd.ini called tbupdd.ini.master. If this file exists UPDD does not take settings file backups but instead uses this file if tbupdd.ini becomes corrupted. |
Dynamic Monitor Tracking
Starting with version 5.1.656 UPDD supports tracking dynamically attached monitors and automatically adjusting the monitor desktop assignments. This feature is implemented as an extensible framework based around monitor characteristics. Currently the only characteristics supported are Monitor dimensions. Others can be added as the need arises.
This feature is used to automatically configure touch monitors in a system as they are connected and to remove them from the driver’s configuration as they are unplugged with out any user intervention.
This function is portable and supported on all platforms running daemon process Aidaemon.
Current support is for this feature is based on Monitor dimensions (video resolution). The feature also requires eeprom calibration support. With this enabled so long as monitors have different dimensions UPDD will detect insertions, position changes and removals of all monitors and configure itself accordingly.
Prerequisites:
The default settings for touch controllers must be set to “extended touch” OFF.
Default calibration data must be provided for supported controllers through one on the documented methods.
To use monitor dimension tracking a device must be precalibrated using the eeprom storage feature.
Settings used by this feature
Trackmonitors: this must be set to 1 to enable monitor tracking. This setting is not device specific.
Tbutils nodevice setting dw Trackmonitors 1
Trackmonitorsdwell: specifies a delay in seconds that must elapse after detection of a new monitor before the configuration takes place, this allows the system to “settle” avoiding multiple configuration calls in the event that the video layout changes multiple times.
Tbutils nodevice setting dw Trackmonitorsdwell 1
Eepromreadatnewmonitor: this is described in more detail in eeprom settings but should be set to 1 to track monitor dimensions. This setting is not device specific.
Tbutils nodevice setting dw eepromreadatnewdevice 1
eeprom calibration: this is described in more detail in eeprom settings but should be set to 1 to track monitor dimensions. This setting is device specific.
Tbutils device=N setting dw “eeprom calibration” 1
Example:
A system can have either an 800 x 600 and/or 1024 x 768 touch monitor connected such that they should be both correctly calibrated and associated with the correct desktop at the time the monitor is connected to the system. The daemon task will be notified when a new monitor is connected and will detect the video resolution. If it matches the video resolution associated with a touch device then the touch device is associated with the monitor with the detected resolution. Will currently only work if the monitor resolution is unique on the system.
Touch Filtering
Starting with build 1123 a new touchdown filter option is supported.
This addresses some anomalies with the original implementation that was incompatible with some event modes and the new event manager.
If the device specific option “touchdownfilter” has a nonzero value then at the start of a packet stream the specified number of packets are discarded. This is used to ignore touch data packets from controllers that can take one or two data packets to report the correct point of touch, as in this example:
01 74 09 4C 08 – first packet does not contain the correct touch data and needs to be discarded.
01 85 0D 19 08
01 A0 0D 15 08
01 AC 0D 12 08
A packet stream is considered to start when a packet is received more than (LiftOffTime +2) * 20 ms after any previously received packet.
Notes:
1) this option is not suitable for use with controllers with an irregular packet rate where the inter packet interval can exceed the time specified above, in particular delta mode controllers that do not stream data when held steady.
2) Touchdown filter discards n packets regardless of which stylus.
Since updd build 5.1.1203 the build in filters apply to all stylus. With 5.0.2 this only they only applied to the first stylus.
Averaging
Low pass filter
Stabilisation
Deglitch
Sample Rate
These filters now operate independently on each stylus.
Pen Support
Pens are different to touch screens in that they work in proximity to the surface, have a nib that is depressed when in contact with the screen, send back pressure data, have barrel buttons and may also have an eraser function.
As a minimum the driver needs to cater for these differences:
· Move the cursor without clicks when in close proximity
· Left click when nib is in contact
· Right click on one of the barrel buttons
· Calibrate on nib contact, not proximity
In addition, the driver needs to cater for secondary barrel buttons, pressure and erasure functions.
With driver 5.1.1404 we have reserved event bits in the data packet definition to specify pen features as follows
EV00 – pen nib
EV01 – pen right button
EV02 – eraser down
EV03 – eraser in proximity
EV04 – pen additional button (as yet undefined)
Further we can define a device to trigger a calibration point on EV00 event such that co-ordinate data used to perform calibration must have EV00 = 1 (Pen nib touching the screen).
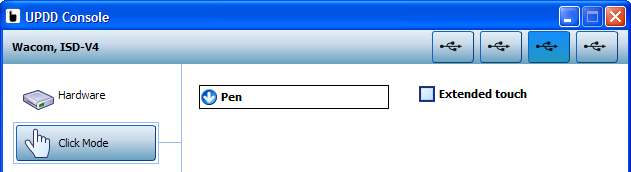
Having defined a Pen device, the driver has a new UPDD Console, Click Mode definition of ‘Pen’ so as to enable the Pen support for the device.
The current implementation requires that UPDD Extended Touch be disabled as Pen functions are posted on the mouse port interface. The means that enhanced gesture feature cannot currently be triggered via a Pen device but changes are planned to allow this in a future release.
Basic Pen support is implemented in the driver. However, the UPDD API passes Pen settings and data on the API such that external applications, such as UPDD Gestures under Max OS X, can implement their own Pen support. In the case of gestures Pen support is triggered on the presence of the EV00 bit definition in the protocol configuration.
Contact
For further information or technical assistance please email the technical support team at technical@touch-base.com