|
|
||||||||||||||||||||||||||||||||||||||||||||||||||||||||||||||||||||||||||||||||||||||||||||||||||||||||||||||||||||||||||||||||||||||||||||||||||||||||||||||||||||||||||||||||||||||||||||||
|
|
|
|
|
|||||||||||||||||||||||||||||||||||||||||||||||||||||||||||||||||||||||||||||||||||||||||||||||||||||||||||||||||||||||||||||||||||||||||||||||||||||||||||||||||||||||||||||||||||||||||||
|
Welcome to UPDD Windows Desktop platform specific installation instructions and related notes.
These notes should be followed to install the UPDD 4.x.x and 5.0.x pointer device driver on Windows Desktops running Windows 2000, 2003, XP/XPe, Windows 64 bit, Vista 32 / 64 bit and Windows 7 32 / 64 bit. The driver will not work on Win 95, 98 or NT as these operating systems are supported with old UPDD version 3.x.x driver (9x/ME/NT) and 4.0.6 (NT).
If using UPDD 5.1.x, please refer to the new Windows desktop installation instructions. Windows driver build history
|
||||||||||||||||||||||||||||||||||||||||||||||||||||||||||||||||||||||||||||||||||||||||||||||||||||||||||||||||||||||||||||||||||||||||||||||||||||||||||||||||||||||||||||||||||||||||||||||
DeliverablesThe software will be delivered in one of three ways:
The UPDD software comprises:
|
||||||||||||||||||||||||||||||||||||||||||||||||||||||||||||||||||||||||||||||||||||||||||||||||||||||||||||||||||||||||||||||||||||||||||||||||||||||||||||||||||||||||||||||||||||||||||||||
System RequirementsWinzip or equivalent is required to decompress the software if received as a .zip file.
The driver supports Serial, USB and PS/2 devices.
Windows 2000 (UPDD 4.1.6 or earlier), 2003, XP - SP3, XPe – SP3, Vista, Windows 7 or 8 – either 32 or 64 bit versions
Important note. XP service pack 3 introduces significant and important updates relevant to USB hardware support and driver interaction that we consider it essential for the correct functioning of our driver. Please ensure any XP systems are upgraded to SP3 before installing our driver.
It is our general recommendation that these operating systems are kept up-to-date with the latest service packs.
The driver requires access to TCP IP port 4141 for internal computer processing only.
|
||||||||||||||||||||||||||||||||||||||||||||||||||||||||||||||||||||||||||||||||||||||||||||||||||||||||||||||||||||||||||||||||||||||||||||||||||||||||||||||||||||||||||||||||||||||||||||||
CD DistributionThe setup.exe program is placed on the CD along with a autorun.inf file (which ships with the driver). Insert the CD and the autorun file automatically invokes the setup.exe program. The autorun.inf file contains: [autorun] OPEN=.\Setup.exe Installation and General Notes1. Uninstall
previous touch drivers 2. USB
consideration
3. The
installation procedure is used to install the software for a single touch
screen / UPDD supported pointer device. In a multi-touch screen or pointer
device environment invoke the UPDD
Console - Hardware dialog to add additional non PnP devices after
installation. USB (PnP) devices, supported by the driver, will be added automatically
as they are connected to the system; however you will need to adjust the
desktop association to newly discovered devices. See the Multi monitor and
multi device documentation for further information. 4. Windows
XPe 5.
Very important 64 bit note: 6.
Very important Vista/Windows7 driver cache note: To empty a driver cache of any UPDD entries perform the following steps WITH ANY TOUCHSCREENS THAT YOU HAVE USED PREVIOUSLY PLUGGED INTO THE COMPUTER: 1) Open the Windows Device Manager 2) Navigate to the "Mice and other pointing devices" section 3) Select
the entry "Universal Pointer Device Driver" 5) You will
be prompted to remove the driver. 6) Hit OK 7) For any other UPDD entries perform steps 4, 5, and 6 8) Repeat Steps 2 thro’ 7 for “Human Interface Devices” section for and UPDD Virtual HID entries. 8) Select the "Action" menu and select "Scan for hardware changes" 9) You may be prompted to install a driver for any touchscreens plugged in. If you are given the option of installing UPDD then do so. If UPDD does not appear as a choice of driver then it has been removed from the cache and there is no need to proceed further. Go to step 7
7. Very
important PS/2 notes: a) The
PS/2 device must be selected during installation; it is not a hot pluggable
device (unlike other PnP devices) and we have difficulties with manual
addition so the PS/2 devices (like other PnP devices) are not shown as a
device that can be added manually. USB PnP devices are automatically added
by the new UPDD PnP interface. b) It is
recommended that the system be booted with the ps/2 device plugged in prior
to install (same as for a normal mouse). We are concerned that some old
BIOS’s will release the PS/2 interrupt if no PS/2 device is seen on the
system. c) During
extensive tests we found that on a couple of occasions the device did not
work after install. We have not been able to reproduce this install issue.
If you do find that the touch screen is not working after install then: 1. Check for a PS/2 UPDD entry in the Device Manager. 2. If a
UPDD entry is not seen use the hardware
wizard to update the driver for the ps/2 touch device to UPDD. Note –
once or twice we got an error “Not enough memory to complete this request”
whilst switching drivers this way. It always worked on the 2nd
attempt. d) We do
not currently support 64bit with PS/2 devices. This can be easily added at
the time it is required. 8.
Very
important BIOS settings issue
9. Vista
and Windows 7 extended touch features
10. Install issues
with previous drivers Installation ProceduresIn the majority of cases the supplied setup program will be invoked to install the driver. In some situations, such as installing the minimum component, you may want to control the files that are installed on the system and this is covered in Manual install section Using the supplied set up programInstallation of the driver must been performed whilst logged on as a user with Administration rights. Please note this is not the same as running as an Admin user. The user account must have Administration rights. If you do not have these rights then in some OS you can right click on the setup.exe program and select ‘Run as administrator’ and enter the appropriated credentials as requested.
Expand the .ZIP file or download the setup program from the http link provided and then run the appropriate setup program. Under version 4 the setup program is called setup.exe. For UPDD version 5 run either the setup32 or setup64 depending on your system’s architecture. The program initially checks that the OS is supported e.g. Win 95, 98, ME NT is not supported by 4.1.x and will issue a notice and cease installation. It then checks that the driver has support for the system’s architecture. E.g. installing a driver only built for 32 bit system will not install on a 64 bit system. In the latter case you need to request a setup with the required support.
If the OS is supported the standard install (running the setup program without any parameters) will show a list of supported controllers in this build. If installing for a non PnP touch device, such as a serial device, you need to select the controller from the list. PnP devices will be automatically discovered by UPDD driver so there is no need to select. If you select a serial controller you will be able to define the serial port. If the serial port list shows ‘Auto’ this can be selected to request that the device be auto-detected by the driver. Additional non-PnP devices can also be added after install as required.
Since version 4.1.6, build 1156, it is our recommendation to install over existing UPDD builds. If for any reason you experience problems or are advised to uninstall previous versions then uninstall, reboot and install latest version Further, from 4.1.10 onwards when installing over a compatible UPDD version the existing controller settings will be retained and carried through to the new installation.
Further, if you suspect the newly installed driver is not being used it may be that the old driver is being cached by the OS, even following an uninstall.
Keyboard hotkeys, via the Alt key, can be used to control the install dialog. Up and down arrow keys can be used to traverse the controller list, Alt C to cancel and Alt I to continue with install.
During install the system may issue certain warning dialogs, such as the installation of a non signed driver (if installing a non signed version of our driver!) and under Window 7 User Access Control dialogs to confirm updates to the system are allowed.
A progress bar shows percentage progress and delays may be seen at certain time as described:
Important installation note: When installing 4.1.8 the delay at 72% should only be for a few seconds. On two heavily used test systems we have observed a delay of 10 minutes. The installation does eventually complete. Further investigation has shown that the 10 minute delay was due to a corrupt System Restore Database preventing a restore point being taken at the time the driver is installed and the deliberate disabling and enabling of the Virtual UPDD HID device (to kick start the device). The system eventually times out and the installation continues to completion. On these systems we can manually flush system restore points and restore points can again be taken but a reinstall or disabling / enabling of the Virtual UPDD HID will again render the system restore database corrupt. We have only seen this on 2 test systems and continue to investigate. Please report any occurrence of this issue.
Following installation the UPDD Console and Calibration utility will be placed in the UPDD applications folder c:\program files\updd, accessible via the Windows Program Manager, UPDD entry.
The UPDD driver often has to compete with other drivers that may also try and control the device. When using USB devices UPDD will take control of a supported device that is not being handled or a device that is being handled by the system’s HID driver. If any other 3rd party driver is in control of the device, manual intervention will be required as follows.
1) Uninstall
the 3rd party driver and reinstall updd 2) Locate the device in device manager, right click, update and use the Hardware Wizard to switch to UPDD.
If all is well the cursor should move when the touch screen is touched and the calibration program should react to touches of the calibration points.
If this is not the case, see the Support document.
If at any time during the install or after the first reboot the system asks for the location of the driver to complete install the folder to be selected is <program files>\updd (this should not occur!). Setup Installation Options |
||||||||||||||||||||||||||||||||||||||||||||||||||||||||||||||||||||||||||||||||||||||||||||||||||||||||||||||||||||||||||||||||||||||||||||||||||||||||||||||||||||||||||||||||||||||||||||||
|
-s |
Silent install mode |
|||||||||||||||||||||||||||||||||||||||||||||||||||||||||||||||||||||||||||||||||||||||||||||||||||||||||||||||||||||||||||||||||||||||||||||||||||||||||||||||||||||||||||||||||||||||||||||
|
|
Running setup –s indicates that no UPDD install dialogs are to be shown. Default settings for the touch controller are used unless a clone file is found in which case the settings in the clone file are used. Note: With 4.1.6 silent install automatically configures the first device from the list of supported controllers, irrespective of hardware type. Since 4.1.8 only the first serial device, if any serial devices are supported, is configured. In both case, PnP devices will be handled as soon as they are discovered by the driver. |
|||||||||||||||||||||||||||||||||||||||||||||||||||||||||||||||||||||||||||||||||||||||||||||||||||||||||||||||||||||||||||||||||||||||||||||||||||||||||||||||||||||||||||||||||||||||||||||
|
-sn |
Running setup –sn indicates that no UPDD install dialogs are to be shown. Default settings for the touch controller are used unless a clone file is found in which case the settings in the clone file are used. The ‘n’ element indicates that there is no default serial controller (if supported in the bundle) configured automatically. In this case PnP devices will be automatically detected but serial devices, if supported in the package, will need to be added automatically. |
|||||||||||||||||||||||||||||||||||||||||||||||||||||||||||||||||||||||||||||||||||||||||||||||||||||||||||||||||||||||||||||||||||||||||||||||||||||||||||||||||||||||||||||||||||||||||||||
|
-sr |
Silent reinstall mode |
|||||||||||||||||||||||||||||||||||||||||||||||||||||||||||||||||||||||||||||||||||||||||||||||||||||||||||||||||||||||||||||||||||||||||||||||||||||||||||||||||||||||||||||||||||||||||||||
|
|
The UPDD installer also supports a silent reinstall option (Setup –sr). The silent reinstall upgrades all software components but leaves all previous settings unchanged. |
|||||||||||||||||||||||||||||||||||||||||||||||||||||||||||||||||||||||||||||||||||||||||||||||||||||||||||||||||||||||||||||||||||||||||||||||||||||||||||||||||||||||||||||||||||||||||||||
|
Important silent install mode considerations: Silent install suppresses UPDD install dialogs. However there is always a possibility that system dialogs will be shown, either because you are installing an unsigned version of the driver or because UAC (Windows 7 user access control) settings dictate that the system seeks permission before changes are made to the system by the installer. Total silent install can only be achieved if the driver is signed and UAC is configured such that no user prompts will be issued or run with the correct administrator privileges. |
||||||||||||||||||||||||||||||||||||||||||||||||||||||||||||||||||||||||||||||||||||||||||||||||||||||||||||||||||||||||||||||||||||||||||||||||||||||||||||||||||||||||||||||||||||||||||||||
|
-np |
No progress bar (4.1.6 onwards) |
|||||||||||||||||||||||||||||||||||||||||||||||||||||||||||||||||||||||||||||||||||||||||||||||||||||||||||||||||||||||||||||||||||||||||||||||||||||||||||||||||||||||||||||||||||||||||||||
|
|
Progress bar suppression |
|||||||||||||||||||||||||||||||||||||||||||||||||||||||||||||||||||||||||||||||||||||||||||||||||||||||||||||||||||||||||||||||||||||||||||||||||||||||||||||||||||||||||||||||||||||||||||||
|
-f |
Operating system check override |
|||||||||||||||||||||||||||||||||||||||||||||||||||||||||||||||||||||||||||||||||||||||||||||||||||||||||||||||||||||||||||||||||||||||||||||||||||||||||||||||||||||||||||||||||||||||||||||
|
|
Depending on the target OS the install will perform different installation tasks. At various stages of the install the software checks what OS is in use and issues a failure if the OS is unknown or unsupported. In some cases this check will fail, especially if installing UPDD as part of an OS image creation where the service called to check the OS returns erroneous data because of the state of the image build process. This option can be used to inform the setup of the target OS, being 2 (2000) X (XP) or V (Vista). If UPDD is installed too early in the OS image build process other OS services calls may fail preventing successful installation. |
|||||||||||||||||||||||||||||||||||||||||||||||||||||||||||||||||||||||||||||||||||||||||||||||||||||||||||||||||||||||||||||||||||||||||||||||||||||||||||||||||||||||||||||||||||||||||||||
|
Clone |
Duplicate (clone) settings |
|||||||||||||||||||||||||||||||||||||||||||||||||||||||||||||||||||||||||||||||||||||||||||||||||||||||||||||||||||||||||||||||||||||||||||||||||||||||||||||||||||||||||||||||||||||||||||||
|
|
Once installed the driver can be configured via the UPDD Console. These setting can be replicated (cloned) to a file in the UPDD Console – Status dialog - Dump settings option. This process will create a .reg file (4.0.x) or .ini file (4.1.x) which, for cloning purposes, should be renamed to upddclon.reg (UPDD version 4.0.x) or tbupdd.ini (UPDD version 4.1.x)
To use this file during UPDD setup, create a folder to hold the updd setup program (setup.exe) and a sub-folder UPDD_EXT within this folder to hold the clone file. E.g. To perform a 4.1.x clone install: C:\temp Setup.exe C:\temp\UPDD_EXT Tbupdd.ini
When setup is invoked it will find the clone file and perform a silent install using the settings within the clone file. The setup.exe should not be in a folder called c:\program files\updd
Note:- This method of cloning has certain limitations and is being replaced with a custom settings file as described here. The limitations with this method are that the clone file is only processed during install for the controllers defined in the clone file. Controllers plugged in after install will not inherit these settings. The settings file also has a fixed link to the location of UPDD application folder which could be different on a different language system, i.e. c:\program files\updd – English, C:\Programme\UPDD – German. There are other issues, hence being superseded. |
|||||||||||||||||||||||||||||||||||||||||||||||||||||||||||||||||||||||||||||||||||||||||||||||||||||||||||||||||||||||||||||||||||||||||||||||||||||||||||||||||||||||||||||||||||||||||||||
|
File |
Starting with UPDD 5.0.2 the setup program will copy any files placed in sub folder UPDD_EXT into the UPDD application folder during install, replacing any that previously existed. This can be used to update files contained within the setup program. |
|||||||||||||||||||||||||||||||||||||||||||||||||||||||||||||||||||||||||||||||||||||||||||||||||||||||||||||||||||||||||||||||||||||||||||||||||||||||||||||||||||||||||||||||||||||||||||||
|
INF |
Make INF file – No longer available - Contact Touch-Base to discuss .INF style install which we can supply on a per request basis. However, should you need to create a .INF type install the basic requirements are shown in the manual install below. |
|||||||||||||||||||||||||||||||||||||||||||||||||||||||||||||||||||||||||||||||||||||||||||||||||||||||||||||||||||||||||||||||||||||||||||||||||||||||||||||||||||||||||||||||||||||||||||||
Manual installThis install could typically be referred to as an .INF type install, that is, using the .INF file to install the kernel device driver and its dependant components. In the case of the UPDD driver a few more elements are required, as discussed below: You will
initially have to install on a system using the setup.exe to extract all the
components from the UPDD installer. You can then follow these instructions to
create a minimum install: 1) Create a UPDD application folder (typically <program files>\updd) 2) Copy all UPDD components (from a working system) to this folder 3) Copy tbupddsu.sys to the Windows driver folder (e.g. <windows>\system32\drivers) 4) Install using the appropriate inf file (e.g. xxxxv3mo.inf) in <program files>\updd folder (by using whatever strategy you use). See list of available .inf files below. 5) Install the tbupddwu service with the command Tbupddwu –i 4141 6) Modify the service entry to “Restart the Service” in an event of a failure. To do this you can run the wuauto.reg file. Notes: 1) In cases where you want to minimize the number of files, leaving the bare minimum to allow the driver to function in the UPDD Application folder we believe you can delete most files in the UPDD application folder and leave:
These files must all be in the same folder. 2) In situations where you need the driver to run from a different folder you can update the setting ‘updd folder’ setting in the tbupdd.ini file (which will eventually be located in the new path!) [updd\parameters] Remember to copy the required files into this alternate path. 3) The .INF files that are used in the UPDD package are as follows. Select the one(s) that is(are) most suitable for your needs:
Driver ComponentsFollowing the standard install the following components are installed:
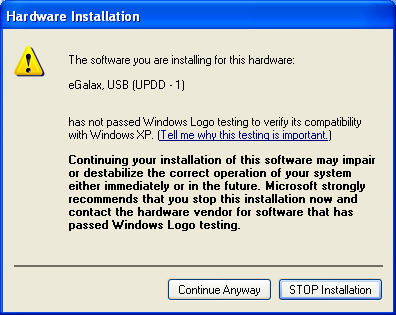
Signed driversOur driver and utility programs carries an Authenticode Certificate. An Authenticode digital signature guarantees that the software was produced by the individual or company named in the certificate, which has been verified by the authority that issued the certificate. However, not all builds of our driver will be WHQL digitally signed. Windows will automatically show a warning dialog if a digitally unsigned driver is installed. Some UPDD installs, that are installing an unsigned driver, have been configured to automatically handle the warning dialog. This results in a ‘dialog flash’ during install. Other UPDD installs have been configured to not handle the warning dialog, leaving the user to handle the dialog, as seen below;
Windows can be configured to not allow the installation of unsigned drivers. Drivers have been identified as one of the major causes for the past instability of Windows. Drivers can be submitted to Microsoft to be approved and ‘digitally signed’ to show that they have passed specific driver acceptance tests. UPDD cannot on its own be submitted for approval. It can only be approved with the pointer device. Where UPDD has been submitted to Microsoft with appropriate hardware it has passed all tests and been approved and digitally signed. You may or may not be installing a signed version of this driver but you should not be unduly concerned if you are installing an unsigned version. For more information the WHQL and digital signature documentation. Given that signing is related to the driver and controller combination we can either supply a driver that only supports a signed controller(s) or the driver may support many controllers, some signed and some not. In this case the driver is only signed when using a signed controller. If a supported controller is used, that has not been signed, the system will indicate that this is not a signed combination. Sysprep utilizationSysprep is a tool that is designed for system administrators, Original Equipment Manufacturers (OEMs) and others who must automatically deploy the Windows operating system on multiple computers. If Sysprep is installing a Windows image which includes UPDD you must use 4.1.8, build 1784 and above and enable the kernel mode operation prior to preparing the system for sysprep. UPDD driver utilitiesThe installation process not only installs the driver but also a number of driver related utilities as discussed below: |
||||||||||||||||||||||||||||||||||||||||||||||||||||||||||||||||||||||||||||||||||||||||||||||||||||||||||||||||||||||||||||||||||||||||||||||||||||||||||||||||||||||||||||||||||||||||||||||
CalibrationCalibration is a procedure used to align the pointer device with the graphically display area or desktop segment. When using the pointer device the mouse cursor should normally position itself under the stylus when it is in contact with the pointer device. If this is not the case then calibration will be required and this is described in full in the Calibration document. The UPDD driver also supports Toolbars, which also require calibrating, and this is covered in full in a separate Toolbar document. |
||||||||||||||||||||||||||||||||||||||||||||||||||||||||||||||||||||||||||||||||||||||||||||||||||||||||||||||||||||||||||||||||||||||||||||||||||||||||||||||||||||||||||||||||||||||||||||||
ConsoleThe driver and device settings can be adjusted with the UPDD Console program and is described in full in the UPDD Console documentation. |
||||||||||||||||||||||||||||||||||||||||||||||||||||||||||||||||||||||||||||||||||||||||||||||||||||||||||||||||||||||||||||||||||||||||||||||||||||||||||||||||||||||||||||||||||||||||||||||
Daemon taskThe daemon task runs in the background and performs a number of functions related to the driver and user interface. The driver will still function for normal touch usage without the daemon task running but may not work as expected when using some of the more advanced features. |
||||||||||||||||||||||||||||||||||||||||||||||||||||||||||||||||||||||||||||||||||||||||||||||||||||||||||||||||||||||||||||||||||||||||||||||||||||||||||||||||||||||||||||||||||||||||||||||
Serial port issuesChange serial port connection The UPDD Console - Hardware tab allows the COM port name to be reassigned after installation. Serial to USB adaptors If using a serial to USB adaptor, select the appropriate name in the COM port selector. Should the serial port connection not be working there are a number of procedures to follow to help identify the problem as described in the knowledge base article here. |
||||||||||||||||||||||||||||||||||||||||||||||||||||||||||||||||||||||||||||||||||||||||||||||||||||||||||||||||||||||||||||||||||||||||||||||||||||||||||||||||||||||||||||||||||||||||||||||
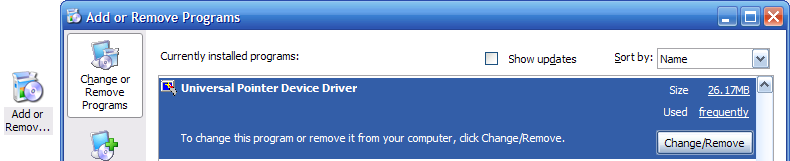
UninstallIMPORTANT NOTES 1. Very important note: With any UPDD version 4.x.x prior to 4.1.8 the uninstall process removes the UPDD entries from the Program Manager menu from the low level updd menu item entry back thro’ the program Manager tree until an error is issued that the top level menu items cannot be removed. Under Win 7 no such error is issued and custom user icons are removed from the high level menu. A system restore is needed to restore the icons. Therefore, please avoid using the automatic uninstall on Window 7 unless using UPDD 4.1.8. 2. Part of the driver is implemented as a system service and in 4.1.6 a change was made to automatically start the service if it failed. As part of the uninstall this service is cleanly stopped to allow associated files to be deleted. If the service does not stop cleanly, which happens rarely, the auto start function sees it in a failed state and restarts the process and prevents some files being removed. This has been fixed in UPDD version 4.1.8. AutomaticThe driver can be removed via the Windows Control Panel, ‘Add/Remove Programs’ or ‘Programs and Features – Change/Remove’ option:
Select the ‘Universal Pointer Device Driver’ entry in the Add/Remove Programs dialog.
The automatic uninstall program can also be invoked by calling the program …\updd\uninstall.exe. For Silent uninstall, with no user dialogs being shown, pass the parameter UNINSTALLS i.e …\updd\uninstall.exe UNINSTALLS. Note – earlier versions of the uninstall program needed the parameter UNINSTALL to be passed to perform the normal uninstall procedure. Running an earlier version without any parameters will invoke an install – don’t ask!
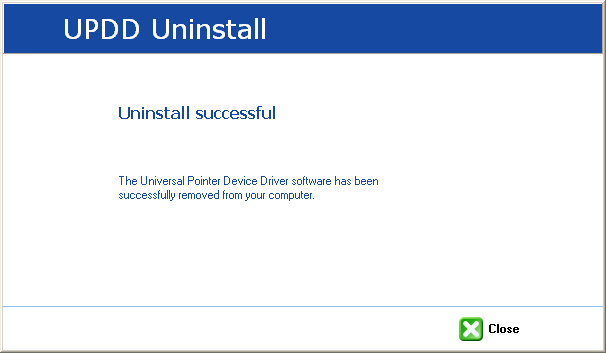
Please note: The uninstall process does not have any progress bar and can take upwards of 1 minute to complete, depending on system speed. On completion the following dialog is shown:
ManualTo manually uninstall the driver components you need to:
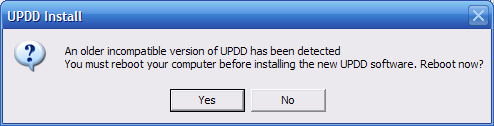
Following the above a reboot is required to remove the driver and daemon processes. Trouble shootingUPDD 4.1.x should install on top of any V4.x.x without error. However, if the install detects an old V3 it will issue the following warning:
At this point you can either manually invoke an uninstall from the Add/Remove programs and run the V4 install again or reboot at which point the V3 uninstall will occur and the V4 install will start automatically. If the V3 uninstall detects an error and asks if you want to remove the UPDD entry in the list of installed programs select ‘yes’. This action will remove registry key:
HKEY_LOCAL_MACHINE\SOFTWARE\Microsoft\Windows\CurrentVersion\Uninstall\TBUPDDV3
UPDD V4.1.x will issue the above warning until this key is removed from the system, preferably as a result of a clean V3 uninstall. If all fails then use Regedit to remove this key manually.
|
||||||||||||||||||||||||||||||||||||||||||||||||||||||||||||||||||||||||||||||||||||||||||||||||||||||||||||||||||||||||||||||||||||||||||||||||||||||||||||||||||||||||||||||||||||||||||||||
Multi-monitor and multi-device supportMulti-monitor and multi pointer devices are supported with this driver and this functionality is covered in full in the multi monitor and device document, Windows section. |
||||||||||||||||||||||||||||||||||||||||||||||||||||||||||||||||||||||||||||||||||||||||||||||||||||||||||||||||||||||||||||||||||||||||||||||||||||||||||||||||||||||||||||||||||||||||||||||
Display rotation considerationsUnder Windows there are various methods for rotating the desktop and UPDD will work with most rotate implementations as explained in detail in the separate rotate documentation. |
||||||||||||||||||||||||||||||||||||||||||||||||||||||||||||||||||||||||||||||||||||||||||||||||||||||||||||||||||||||||||||||||||||||||||||||||||||||||||||||||||||||||||||||||||||||||||||||
System SettingCertain system settings may affect the functionality of the pointer device. This section highlights some of the settings that may need to be changed as required. Mouse settingsDouble click capabilities are affected by the system’s Mouse settings. To achieve a double click using the pointer device these settings need to cater for the type of device in use. A touch screen may well require different settings to that required by a mouse. The main setting that affects the ability to double click is the double click speed. If this is set too fast it may be impossible to produce a double click. Ensure this is set to an appropriate value in the mouse settings to allow for double clicks via a stylus.
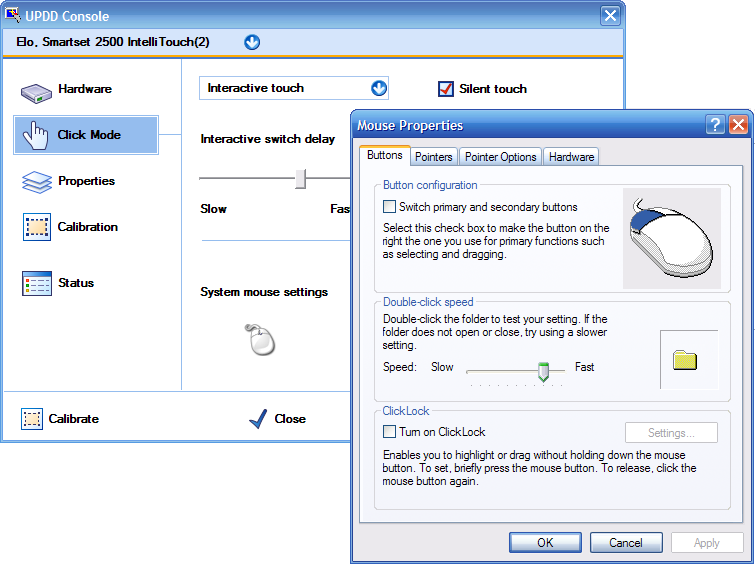
The UPDD Console, Click Mode dialog, System Mouse settings will invoke the Windows Mouse settings as shown in the following example:
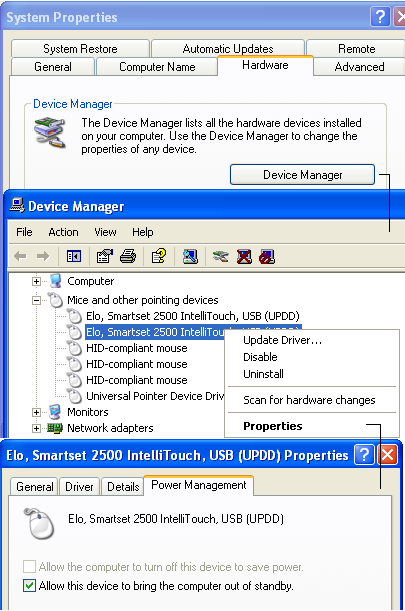
More information on double click settings are available here. Remote Wakeup settingsSome touch devices can be used to bring a system out of sleep/standby/hibernate. These sleep levels are referred to as power states and can range from S1 to S4, whereby S1 is the lightest and S4 the deepest sleep. Our driver supports power states S1 through S3. S4 normally requires the power button to be pressed to resume so external devices are not capable of returning the system from this state. If the device is capable of Remote Wakeup you also need to specify in the Device Manager (Start, Control Panel, System, Hardware tab, Device Manager) that the device can be used for this purpose, as shown below:
In the Device Manager, identify the UPDD device entry, right click to bring up the device menu, select Properties, Power Management and set accordingly.
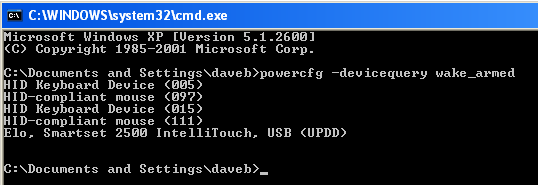
To see the devices able to wake up the system use the command ‘powercfg –devicequery wake_armed’ as below:-
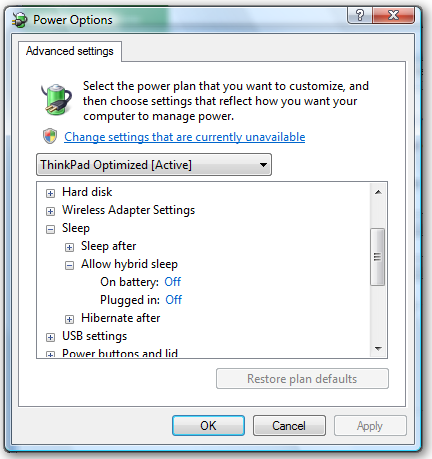
Remote Wakeup notes1) The system must be configured to allow the device to bring the computer out of standby. 2) The device must be capable of interfacing with the system to wake it up. Not all touch screen controllers are able to perform this function 3)
We have found that some environmental settings can affect the ability
of certain devices to return a system from standby. In our tests under Vista
we found that the ability of some devices can be affected by the “hybrid
sleep” setting whereby the device can be used to return a system from
standby, sleep or hibernation but not the new ‘hybrid sleep’ state. |
||||||||||||||||||||||||||||||||||||||||||||||||||||||||||||||||||||||||||||||||||||||||||||||||||||||||||||||||||||||||||||||||||||||||||||||||||||||||||||||||||||||||||||||||||||||||||||||
Touch Utilities
Virtual Keyboards Mouse Cursor
A Windows cursor scheme settings program called TBcursor is shipped with UPDD and installed in the UPDD Application folder which can also be configured from within the UPDD Console, Extensions, Cursor tab. |
||||||||||||||||||||||||||||||||||||||||||||||||||||||||||||||||||||||||||||||||||||||||||||||||||||||||||||||||||||||||||||||||||||||||||||||||||||||||||||||||||||||||||||||||||||||||||||||
ContactFor further information or technical assistance please email the technical support team at technical@touch-base.com
|
||||||||||||||||||||||||||||||||||||||||||||||||||||||||||||||||||||||||||||||||||||||||||||||||||||||||||||||||||||||||||||||||||||||||||||||||||||||||||||||||||||||||||||||||||||||||||||||