|
|
|||||||
|
Welcome to UPDD Linux platform specific installation instructions and related notes for UPDD 4.1.x and 5.0.2. If using UPDD 5.1.x, released in beta form April 2014, please refer to the latest installation instructions. There is no single standard for interfacing touch devices in the Linux environment and there are a number of different ‘touch interfaces’ available. The most standard interface method is via the X (the Linux graphical layer) interface as this offers the low level, mouse emulation type touch support. However, there are other interfaces, such as direct file access to touch hardware (special device files), virtual multi touch device, TSlib, TUIO, Evdev, Evtouch – there may be others. Linux application development kits, such as SDL Multimedia Library , Clutter Library , Pigment Toolkit, GTK etc, may also dictate the touch interface in use. For example, applications written with SDL or Clutter may utilise the Tslib interface if direct access to the touch device is required by the application.
Under Linux we offer UPDD in two forms, UPDD Linux B(inary- pre compiled programs) and UPDD Linux S(ource).
The notes below refer to the UPDD Linux driver supplied in binary form for UPDD Linux B version 4.1.1, initial release April 08 and 4.1.8 and later available since May 2010. The source driver is available to touch manufacturers and integrators that require a source based Linux driver. Notes on the source driver are available here.
The UPDD Linux B driver utilizes either the X interface or, since Dec 2012, a virtual touch device and should satisfy 99% of touch users. However, where applications have been written to utilize other interface methods then please contact us to discuss further as we can modify the driver accordingly.
Very important general note: Linux is an open source environment utilised and supported by highly knowledgeable and capable developers. Many aspects of the Linux system are maintained by Linux groups and communities. Nearly all software created by these Linux groups is made available under open source license agreements, including any touch screen drivers that have been written, mainly by individuals. Linux distributions are many and varied and all have slight subtle differences. Many users, developers and integrators in the Linux community do not expect to pay for software. All of this makes it commercially very difficult to operate in the Linux environment with a niche product such as our touch screen driver products. These notes refer to our Linux driver, supplied in binary form, and is mainly aimed at the non technical Linux users or larger commercial organisations that need a tried and tested touch driver solution that comes with comprehensive support. To this end this driver offers a generalised installation package with basic system requirements and in many cases should work ‘out the box’, especially with the main stream Linux distributions. If you are a Linux technician, with access to open source touch driver code that you can modify and make the necessary system configuration changes then UPDD is unlikely to match your specific requirements particularly as there are license costs involved. Further, given the number of Linux distributions which undergo constant updates and modifications, if UPDD has any issues on distributions not listed and tested we may not be readily able to offer free support as the amount of support needed does not match the commercial viability of Linux sales. License NoticeThe software is licensed software and as such requires a license per system when the production version of the software is installed. Production software is either supplied by pointer device manufacturers or system integrators (who are entitled to distribute the driver) or is available directly from Touch-Base sales. Evaluation software, which is available from our Download Centre has a 100 ‘mouse click’ restriction at which point the driver needs to be reloaded or a calibration performed to gain a further 100 clicks. Copyright NoticeThis software, Universal Pointer Device Driver – TBUPDD, is copyright © 1998 – 2011 by Touch-Base Ltd. All rights reserved. The Linux version utilizes a software library, libusb, which is used under the terms of the GNU Lesser General Public License as published by the Free Software Foundation and under the terms of this license the following applies: Copyright © 2000-2003 Johannes Erdfelt johannes@erdfelt.com All rights reserved. Redistribution and use in source and binary forms, with or without modification, are permitted provided that the following conditions are met: 1. Redistributions of source code must retain the above copyright notice, this list of conditions and the following disclaimer. 2. Redistributions in binary form must reproduce the above copyright notice, this list of conditions and the following disclaimer in the documentation and/or other materials provided with the distribution. 3. The name of the author may not be used to endorse or promote products derived from this software without specific prior written permission. THIS SOFTWARE IS PROVIDED BY THE AUTHOR ``AS IS’’ AND ANY EXPRESS OR IMPLIED WARRANTIES, INCLUDING, BUT NOT LIMITED TO, THE IMPLIED WARRANTIES OF MERCHANTABILITY AND FITNESS FOR A PARTICULAR PURPOSE ARE DISCLAIMED. IN NO EVENT SHALL THE AUTHOR BE LIABLE FOR ANY DIRECT, INDIRECT, INCIDENTAL, SPECIAL, EXEMPLARY, OR CONSEQUENTIAL DAMAGES (INCLUDING, BUT NOT LIMITED TO, PROCUREMENT OF SUBSTITUTE GOODS OR SERVICES; LOSS OF USE, DATA, OR PROFITS; OR BUSINESS INTERRUPTION) HOWEVER CAUSED AND ON ANY THEORY OF LIABILITY, WHETHER IN CONTRACT, STRICT LIABILITY, OR TORT (INCLUDING NEGLIGENCE OR OTHERWISE) ARISING IN ANY WAY OUT OF THE USE OF THIS SOFTWARE, EVEN IF ADVISED OF THE POSSIBILITY OF SUCH DAMAGE. Under the terms of this license we will also make the Universal Pointer Device Driver binaries available to allow the libusb module to be replaced with an alternative version. Please contact technical@touch-base.com for further information. Full details of the LGPL are available here. |
|||||||
Linux driver build history
|
|||||||
|
Release |
Date |
Change |
|||||
|
4.0.2 |
10th Oct 06 |
Initial Version 4 release for X86 systems |
|||||
|
|
22nd Nov 06 |
Support new X interface on Fedora Core 5 |
|||||
|
4.0.4 |
5th Jan 07 |
Added support for Power PC based systems |
|||||
|
|
16th Jan 07 |
Changes required for SUSE 10.1 |
|||||
|
|
17th Jan 07 |
Interactive touch fix. Mouse settings called from Click Mode dialog for KDE and Gnome. |
|||||
|
|
9th March 07 |
Multi-monitor support added |
|||||
|
4.0.6 |
15th Nov 07 |
Linux 64 bit support |
|||||
|
4.1.1 |
25th Apr 08 |
Much improved PnP support based on common code across all platforms |
|||||
|
|
30th July 08 |
Ubuntu 8.04 support with updated X interface |
|||||
|
|
18th Aug 08 |
Slackware 12.1, Fedora Core 8 and 9 support added |
|||||
|
|
26th Sept 08 |
Uninstall utility added |
|||||
|
|
Mar 09 |
Debian Lenny support added |
|||||
|
|
Apr 09 |
Ubuntu 9.04 (Jaunty Jackalope) support added Supports rotation from Ubuntu display control panel X interface via ‘built in’ method – remove need for own X interface module Updated KDE UPDD desktop icon mechanism KDE X interface installation fix |
|||||
|
|
May 09 |
Fedora Core 10 supported added |
|||||
|
|
Aug 09 |
Fedora Core 11 supported added |
|||||
|
|
Oct 09 |
Suse 11.1 64 bit support added (Gnome WM only!) |
|||||
|
|
Jan 10 |
Unbuntu 9.10 support added |
|||||
|
|
Mar 10 |
Suse 11.2 32 bit support added |
|||||
|
|
May 10 |
Fedora Core 12 support added / Linux multi-touch X extensions supported |
|||||
|
4.1.10 |
June 10 |
Ubuntu 10.04 / USB udev support added |
|||||
|
|
July 10 |
Fedora Core 13 support added |
|||||
|
|
Nov 10 |
Install script fixes and added support for ubuntu 10:10 and Suse 11.3 |
|||||
|
|
Dec 10 |
Supported added for Guadalinux and Lliurex. |
|||||
|
|
Jan 11 |
Support Twinview and sound during touch and calibration |
|||||
|
|
Apr 11 |
Reinstate PS/2 device support |
|||||
|
|
Aug 11 |
Support for Cisco DMP 4400G media player device documented |
|||||
|
|
Sept 11 |
Revamped multi-monitor support and fully tested for Twinview, Xinerama, and native multi monitor, with vga splits on any monitor in any of these configurations |
|||||
|
|
Oct 11 |
Added install script for Debian Squeeze. Added install script for MeeGo. Updated ubuntu install script to cater for 11.10 |
|||||
|
|
Nov 11 |
Support for Fedora 15 and 16 added Fix for Debian Squeeze KDE installations |
|||||
|
|
Jan 12 |
Removal of TBlinuxdaemon process – functionality moved to cross platform aidaemon process. |
|||||
|
|
Feb 12 |
Driver priority setting introduced X Windows display setting introduced |
|||||
|
|
May 12 |
Support for ARM processor |
|||||
|
|
Dec 12 |
Initial implementation of Virtual Touch screen device supporting both single and multi-touch interfaces. |
|||||
DeliverablesThe main installation package is held within the compressed file called linuxupdd.tgz. Software requested from Touch-Base to be delivered electronically will be delivered in one of three ways:
General NotesUPDD for Linux has two driver components. A core
processing engine which exists outside the kernel and an X
extension to provide the mouse interface for X based GUI applications. This
architecture allows for maximum portability. As the core driver is not
embedded in the kernel a single compiled module can be executed on any kernel
version. The vast majority of users use X to host GUI applications; however,
UPDD has the flexibility to support other GUI’s by reimplementation of this
minimal module.
The initial UPDD for Linux was developed under Linux 2.4 + X (or X-Windows). With driver version 4.1.10 the driver is developed and built on Centos 4.8. The driver has been tested on various Linux distributions. In theory the driver should install and run on most of the standard, current, Linux distributions. Please contact us if you should experience any difficulties installing or running the driver as it is likely to be a minor issue that is preventing the software from working.
You should be aware that it is possible to load multiple X sessions on a machine and switch between them as required. At any one time an X session will be active on the desktop and the other X sessions will be in the background. The driver can be installed from any X session. Each X session running will receive pointer movements and click requests which might not be desirable as you will not know what is being selected in the hidden, background, X sessions. We believe that in a touch environment most users will only run with one X session and therefore we do not think this is a significant issue. Please contact us if this causes any problems, as it may be possible for us to limit mouse movement and clicks to the active X session if you must run in a multiple X session environment.
As standard the driver is dynamically linked and relies on certain system libraries being available. This is normally not an issue for standard Linux desktop systems but can be an issue in older distributions or specialised, cut down or embedded Linux environments. Please contact technical@touch-base.com if you require a statically linked version of the driver. The driver utilises QT cross platform graphics and therefore the installation does install this required QT graphics library.
If command ldd is used on any of the UPDD binaries to view dependancies please note that some libraries may appear as missing. This is because some libraries are installed into the UPDD installation directory and this isn’t part of the library search path the ldd uses. If you want to use ldd on any UPDD binaries then either run “export LD_LIBRARY_PATH=/opt/tbupddlx:$LD_LIBRARY_PATH” or “ldconfig /opt/tbupddlx” first.
USB
PS/2As of version 4.1.10, 11/04/11 we have reinstated support for PS/2 devices. The development was done for a specific distribution and environment and is not a generic implementation so is supplied with the following caveats.
· This was implemented specifically for, and tested on, ubuntu 10.04 1 and 10.10. It may work with other distributions.
· The driver has a read thread to receive touch data and this thread is terminated when the driver reloads e.g. if a setting is changed in the UPDD Console – and at other times. The request to terminate the thread is only completed when the outstanding read is satisfied. With PS/2 devices which conform to the PS/2 protocol they should respond to a F4 command and this command is sent to the device to force data to be sent to satisfy the outstanding read. Therefore the PS/2 device must support the F4 command otherwise the driver will appear to lock up. Should this occur we may be able to implement another strategy to force the read thread to terminate but in our tests the method works well.
· Untested in a multi touch controller configuration, such as PS/2 and a USB device, but should work.
· Distribution must support the device interface “serio”. The PS/2 device must be registered as /sys/bus/serio/devices/serio1. The serio number assigned to the PS/2 device can be programmatically determined but in our tests is was always seen as serio1.
· The driver requests raw data from the PS/2 device which must appear at location /dev/serio_rawN (where n increments with each use (driver start) until a reboot – the driver looks in the range 1 – 100.
· Currently only 32 bit but 64 bit can be catered for if required.
If you have a distribution or PS/2 device that does not meet these criteria please contact us to discuss your requirements further.
System RequirementsApart from the Linux kernel software our software requires the following components: |
|||||||

|
Processor |
X86 |
Fully supported and tested in-house |
|
|
X86 – 64bit |
Fully supported and tested in-house |
|
|
PowerPC |
Fully supported and tested in-house |
|
|
ARM |
Tested in-house with Debian Lenny on ARM5 processor board |
|
Interface |
|
|
|
X |
This interface is only required if the driver is to emulate mouse movement and clicks. |
|
|
|
Standard XF86config-4 XF86config Xorg.conf |
The driver has been tested with these standard interfaces. The “86” in the config file names refers to the fact that it was originally developed on x86 and doesn’t actually reflect what processor/platform it’s running on. The driver utilises three different types of user mode X interfaces, each superseding the previous implementation. It is our recomemdation to use the most recent implementation where possible. Often the UPDD kernel component needs to be updated to cater for changes made to the X interface with new Linux distributions. It is our hope that the direct interface to the built in module will overcome this issue. |
|
|
Non-standard X11 Kdrive/TinyX |
This implementation of X is usually found on minimized /embedded Linux distributions and does not use xorg.conf configuration files and does not work with standard X modules. UPDD has been tested with this X and as of June 09 we have a working solution via the built in interface. In these environments it is likely that a manual setup is required as described here. |
|
|
Xorg nanoX |
Graphic system for smaller devices and platform – see http://www.microwindows.org/. Untested and listed here for completeness. We would need to build a system using this X interface and test/address any issues that arise. Unlikely to work until this has been done. |
|
|
X is normally enhanced with a Window Manager that sits on top of X. See the Windows Manager installation note below. |
|
|
Virtual |
UPDD creates a Virtual device thro’ which all touch data is posted to the kernel. In theory this interface method should cater for both X and event driven touch applications. |
|
|
UPDD API |
Driver will load and work without X allowing for application UPDD API interface to the driver. |
|
|
|
|
|
|
File utilities |
mkdir, cd etc, Sound utility sox if using calibration beeps, see Hardware requirement below. |
|
|
C |
UPDD V4 uses dynamic linked library calls so requires the C library to be available. UPDD V4 utilises release 6 (libstdc++.so.6). C library version 6 has been available for a number of years and should be shipped as standard in most Linux distributions. For legacy distributions with earlier C libraries either install the V6 lib or use UPDD V3 (uses V5 C library).A C++ version 6 library that may be suitable in some distributions can be found here. If this library is not available in your distribution then we can supply a driver with statically linked components. |
|
|
Hardware |
Sound card |
If calibration beeps are enabled in the UPDD Console a sound card is required as we have not been able to access the internal PC speaker under Linux. |
|
|
USB |
For USB devices the USB file system must be a component of the distribution and enabled. This is now only valid if the uDev interface is not part of the distribution, read on….. |
|
|
USB |
June 10 we added support for uDev interface to cater for the move away from USBFS to uDev interface in newer kernels. This new interface also addresses USB hot plug issues we experienced in FC12. |
|
|
|
The latest driver (released 1st July 2010) now tries to detect the uDev interface and if found is used. If not detected the driver utilises usbfs so it should still work on the older distributions in our supported list. |
|
Access to TCP IP port 4141 |
The driver requires access to TCP IP port 4141 for internal computer processing only. |
|
If you need a driver for other environments, such as a different graphics manager or different processor we can update our driver to match your requirements but there will be a cost involved on a time and materials basis.
UPDD Linux has been around many years and used on many distribution and the old Linux documentation lists previous distributions tested. The following table shows the distributions tested since 4.1.1 release:
Important Note – The table below shows the list of distributions that have been tested or reported as ok. However, given the number of Linux distributions it is impossible to guarantee that our install and/or driver will work in all environments or in all distributions, even if the same underlying kernel, X interface and desktop manager is in use or if a distribution is based on one of the supported distributions. To this end we have selected a number of main stream distributions to regularly test our latest driver and to try and keep the driver current, these being ubuntu, Fedora-Core, Redhat and Suse. Issues with our driver in any other distribution may incur a cost to investigate.
|
Release |
Ver |
Proc |
UPDD |
Date |
Test status |
||
|
Generic |
Distributions not listed may be able to utilize these two generic install scripts |
||||||
|
|
Oldish kernels! Pre Xorg 1.7 |
Uses an X11 driver to provide input to the X server (Kernel version dependent) |
Other-Legacy |
||||
|
|
Newish Kernels! Xorg 1.7 and above |
Uses a user mode daemon to inject X Input events (kernel version independent) |
Other |
||||
|
New releases of the following distributions will automatically be supported with the current UPDD driver as they are released. Support for listed releases are only guaranteed to work with the UPDD version listed albeit the current driver may work. |
|||||||
|
|
Enterprise |
4.x
|
x86 X64
|
4.1.1 4.1.1 4.1.10 |
Apr 08 Sept 09 July 11 |
Tested in-house
|
Redhat
Redhat-4.6-and-earlier |
|
|
|
4.8 |
X86 |
4.1.10 |
July 11 |
Tested in-house |
Redhat-4.8-and-later |
|
|
|
5.5 |
X64 |
4.1.10 |
Jan 11 |
Customer tested |
Redhat-4.8-and-later |
|
|
|
6.0 |
X86 |
4.1.10 |
May 11 |
Tested in-house |
Redhat-6.0 |
|
KDE Desktop Manager is the default desktop for Kubuntu. |
|||||||
|
|
Jaunty Jackalope |
9.04 |
X86 |
4.1.1 |
Apr 09 |
Tested in-house |
Kubuntu-Jaunty-Jackalope |
|
Utilises the XFCE desktop environment. Designed for low-specification computers. |
|||||||
|
|
Linutop - mini PC |
8.04 |
X86 |
4.1.1 |
May 09 |
Reported OK |
Ubuntu-Hardy-Herron |
|
GNOME Desktop Manager is the default desktop for Ubuntu. |
|||||||
|
|
EEEbuntu - EeePC |
2.0 |
X86 |
4.1.1 |
Feb 09 |
Reported OK |
|
|
|
Feisty Fawn |
7.04 |
X86 |
4.1.1 |
Apr 07 |
Tested in-house |
Ubuntu-Feisty-Fawn |
|
|
Gutsy Gibbon |
7.10 |
x86 |
4.1.1 |
Apr 08 |
Tested in-house |
Ubuntu-Gusty-Gibbon |
|
Hardy Heron |
8.04 |
x86 |
4.1.1. |
July 08 |
Tested in-house |
Ubuntu-Hardy-Herron |
|
|
|
Intrepid Ibex |
8.10 |
X86 |
4.1.1 |
Jan 09 |
Tested in-house |
Ubuntu-Intrepid-Ibex |
|
|
Jaunty Jackalope |
9.04 |
X86 |
4.1.1 |
Apr 09 |
Tested in-house |
Ubuntu-Jaunty-Jackalope |
|
|
Karmic Koala |
9.10 |
X86 |
4.1.1 |
Jan 10 |
Tested in-house |
Ubuntu-Karmic-Koala |
|
Lucid Lynx |
10.04 |
X86 |
4.1.8 |
June 10 |
Tested in-house |
Ubuntu-Lucid-Lynx or Ubuntu-Lucid(10.4)-and-later |
|
|
|
|
10:04 |
X64 |
4.1.10 |
Aug 10 |
Tested in-house |
Ubuntu-Lucid(10.4)-and-later |
|
|
Maverick Meerkat |
10:10 |
X86 |
4.1.10 |
Nov 10 |
Tested in-house |
Ubuntu-Maverick-Meerkat or Ubuntu-Lucid(10.4)-and-later |
|
|
Natty Narwhal |
11:04 |
X86 |
4.1.10 |
May 11 |
Tested in-house |
Ubuntu-Lucid(10.4)-and-later |
|
|
Oneiric Ocelot |
11:10 |
X86 |
4.1.10 |
Oct 11 |
Tested in-house |
Ubuntu-Lucid(10.4)-and-later |
|
Precise Pangolin |
12:04 |
X86 |
4.1.10 |
Jan 12 |
Reported as OK |
Ubuntu-Lucid(10.4)-and-later |
|
|
|
Quantal Quetzal |
12:10 |
X86 |
5.0.02 |
Nov 12 |
Reported as OK |
Ubuntu-Lucid(10.4)-and-later |
|
|
Raring Ringtail |
13:04 |
X86 |
5.0.02 |
Jan 12 |
Untested |
Untested |
|
|
Saucy Salamander |
13:10 |
X86 |
5.1.xxx |
Jan 14 |
Untested |
Untested |
|
Moonshine |
7 |
x86 |
4.1.1 |
Apr 08 |
Tested in-house |
Fedora-Core |
|
|
|
Werewolf |
8 |
x86 |
4.1.1. |
Aug 08 |
Tested in-house |
Fedora-Core-8 |
|
|
Sulphur |
9 |
x86 |
4.1.1. |
Aug 08 |
Tested in-house |
Fedora-Core-9 |
|
|
Cambridge |
10 |
X86 |
4.1.1 |
May 09 |
Tested in-house |
Fedora-Core-10 |
|
|
Leonidas |
11 |
X86 |
4.1.1 |
Aug 09 |
Tested in-house |
Fedora-Core-11 |
|
|
Constantine |
12 |
X86 |
4.1.8 |
May 10 |
Tested in-house. Also used for multi touch testing |
Fedora-Core-12 |
|
|
Goddard |
13 |
X86 |
4.1.10 |
April 11 |
Tested in-house |
Fedora-Core-13 |
|
|
Laughlin |
14 |
X86 |
4.1.10 |
April 11 |
Reported OK |
Fedora-Core-14 |
|
|
Lovelock |
15 |
X86 |
4.1.10 |
Nov 11 |
Tested in-house |
Fedora-Core-15-and-later.xns |
|
|
Verne |
16 |
X86 |
4.1.10 |
Nov 11 |
Tested in-house |
Fedora-Core-15-and-later.xns |
|
|
Beefy Miracle |
17 |
X86 |
5.0.2 |
Mar 13 |
Fedora-Core-15-and-later.xns |
|
|
|
|
Testing of the new Virtual device interface worked for this distribution but the TBlinuxmouse interface did not work. TBlinuxmouse needs to be invoked as a GDM process and this is failing in this distribution. Tesing with the alternative mouse interface works fine. |
|||||
|
|
Spherical Cow |
18 |
X86 |
5.0.2 |
|
Untested |
Untested |
|
|
10.3 |
x86 |
4.1.1 |
Apr 08 |
Tested in-house |
SuSE |
|
|
|
(KDE WM only!) (Gnome only!) |
11.1 11.1 |
X86 X64 |
4.1.1 4.1.1 |
Mar 09 Oct 09 |
Reported OK |
SuSE-11 SuSE-11-64-bits |
|
|
|
11.2 |
X86 |
4.1.8 |
Mar 10 |
Tested in-house |
SuSE-11.2 |
|
|
|
11.3 |
X86 |
4.1.10 |
Nov 10 |
Tested in-house |
SuSE-11.3 or SuSE-11.3-and-later |
|
|
|
11.4 |
X86 |
4.1.10 |
Sept 11 |
Tested in-house |
SuSE-11.3 or SuSE-11.3-and-later |
|
|
|
12.1 |
X86 |
5.0.2 |
July 12 |
Reported OK |
SuSE-11.3-and-later |
|
|
|
12.2 |
X64 |
5.0.2 |
Dec 12 |
SuSE-11.3-and-later |
|
|
|
|
Testing of the new Virtual device interface worked for this distribution but the TBlinuxmouse interface did not work. |
|||||
|
SLED |
|
11 |
X86 |
4.1.10 |
Aug 10 |
Reported OK |
SuSE-11.3 or SLED-11 |
|
|
SLED 11 (SUSE Linux Enterprise Desktop 11) has been tested by a customer and reports it works OK with Installation script SuSE |
|
|||||
|
Based on RedHat Enterprise Linux |
4.6 |
X86 |
4.1.1 |
Apr 09 |
Reported OK |
CentOS-4.6-and-earlier |
|
|
|
|
4.8 |
X86 |
4.1.10 |
July 11 |
Tested in-house |
CentOS-4.8-and-later ** |
|
|
|
5.1 |
X86 X64 |
4.1.1 4.1.1 |
Jun 08 Sept 09 |
Reported OK |
CentOS-4.8-and-later ** |
|
|
|
5.7 |
X64 |
5.2.0 |
July 12 |
Tested in-house |
CentOS-4.8-and-later ** |
|
|
|
6.0 |
X86 |
4.1.10 |
June 11 |
Tested in-house |
Centos-6.0 |
|
|
|
6.2 |
X86 |
5.0.2 |
July 12 |
Reported OK |
Centos-6.0 |
|
|
|
** A customer reported that touch did not work on CentOS 4.8 using the "CentOS-4.8-and-later" script but did work when they selected "CentOS-6.0". |
|||||
|
New releases of the following distributions will not automatically be supported with the current UPDD driver as they are released. Support for listed releases are only guaranteed to work with the UPDD version listed albeit the current driver may work. To add support for new releases of these distributions or any other not currently listed may incur costs to cover the work involved in preparation and testing. |
|||||||
|
|
12.1 |
x86 |
4.1.1 |
Aug 08 |
Tested in-house |
Slackware-12.1 |
|
|
Maya |
13.0 |
X86 |
5.0.2 |
July 12 |
Reported OK |
Ubuntu-Lucid(10.4)-and-later |
|
|
Etch |
4.x |
x86 |
4.1.1 |
Aug 08 |
Reported OK |
Debian-Etch |
|
|
|
Lenny |
5.x |
X86 |
4.1.1 |
Mar 09 |
Tested in-house |
Debian-Lenny |
|
|
|
5.x |
ARM |
4.1.10 |
May 12 |
Tested in-house |
Debian-Lenny |
|
|
Squeeze |
6.x |
X86 |
4.1.10 |
Oct 11 |
Tested in-house |
Debian-Squeeze |
|
|
Wheezy |
7.x |
X86 |
5.0.2 |
Dec 12 |
Tested in-house |
Debian-Wheezy |
|
Guardlinux |
|
|
X86 |
4.1.8 |
Feb 10 |
Tested in-house |
Guada-Linux |
|
|
|
7.x |
X86 |
4.1.10 |
Dec 10 |
Tested in-house |
Guada-Linux-7 |
|
Lliurex |
Based on ubuntu |
|
X86 |
4.1.8 |
Mar 10 |
Reported OK |
Ubuntu-Jaunty-Jackalope |
|
|
|
10.09 |
X86 |
4.1.10 |
Dec 10 |
Tested in-house |
Lliurex-10.09 |
|
2008 |
|
X86 |
4.1.1 |
Jan 09 |
Reported OK |
|
|
|
2009 |
|
X86 |
4.1.1 |
Mar 09 |
Reported OK |
|
|
|
(Kernel 2.6.24) |
10.1 |
X86 |
4.1.1 |
Jan 10 |
Reported OK |
||
|
|
1.2 |
X86 |
4.1.10 |
Oct 11 |
Tested in-house |
MeeGo |
|
|
|
|||||||
Linux NotesWe have observed some general and distribution specific issues that are documented below. If you are using the graphical install on ‘tested distributions’ then, where possible, we have catered for the known issues in the individual Linux distribution setup scripts. If you are manually installing, or installing on untested distributions or there are issues after install on tested distributions then please read the appropriate section below for your distribution:
|
|||||||
General |
Issues |
|
General |
Window management issue – first noted on Fedora Core 5 and 6 and also reported on Suse 10.1 but could effect other distributions: Generating a click via touch is sometimes ignored. In some areas of the Linux menu system we have found that unless the mouse is moved to the position of the click the click is ignored, such as the 2nd level of menus from the Application start menu option:
Some items within the applications menu will expand to a 2nd level menu. Lifting the stylus off the first menu and clicking into the second menu item will not activate the selected item. You need to slide your finger from the first menu to the second menu and lift the stylus off when over the desired item. This problem can also be seen with a mouse by having the mouse at the position of the second level item and clicking when it is shown. With no mouse movement prior to click, the click is ignored. |
|
Calibration issues |
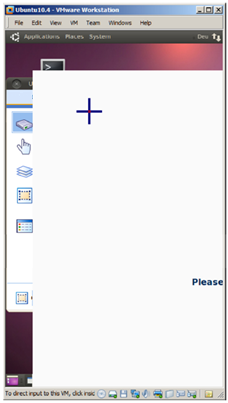
Full screen calibration error Correct operation of the calibration requires the calibration screen to be displayed in full screen mode. Some Linux distributions, virtualized environments or certain visual effect settings cannot handle the method used by our graphical calibration program to force full screen with unpredictable results.
To date we have seen this with VMWare tilizedation, Linux distribution Maemo and main stream distributions with certain visual effects enabled. On systems where the full screen issue occurs, one of the following actions will be necessary: 1) Configure the system to allow full screen · For example if a window manager is preventing full screen mode try running without the window manager active. (This has been necessary on systems using the TWM window manager) or · Where visual effects are preventing full screen temporarily disable the effect. We have had reports that on some Ubuntu systems the calibration screen is windowed (having a titlebar) instead of taking up the entire desktop. This is due to the desktop effects interfering with the window manager. If this effect is experienced then follow these instructions to temporarily disable desktop effects for the duration of the calibration. |
|
|
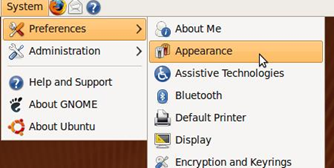
Open the “Appearance” application as shown below
|
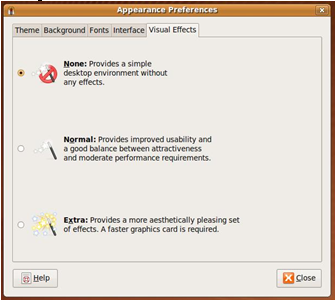
Navigate to the “Visual Effects” tab
|
|
If “Normal” or “Extra” is selected
then select “None” and now try calibrating the touchscreen |
|
|
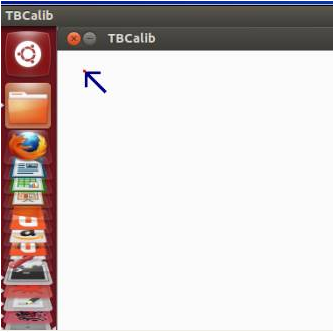
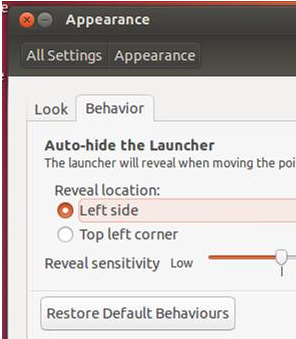
Here the auto-launcher is preventing the calibration screen covering the left-most side of the screen. This can be hidden to allow for calibration. |
|
|
|
|
|
|
|
|
2) Full screen not possible In cases where full screen is not possible, such as the VMWare virtualized dialog to the right we have tilized UPDD calibration styles, named Custom2Point and Custom4Point, whereby calibration does not attempt full screen mode (and therefore cannot draw accurate calibration points) but instead requests that corners (2 or 4) of the calibration area be used as the calibration reference points. No other calibration patterns are catered for. Either request a build from Touch-Base with this calibration style pre-defined or use the UPDD Console, calibration dialog to add the style (deleting the existing style) and then calibrate to invoke corner calibration.
As of 5.0.2, May 13, we now calculate this offset and cater for this by adjusting the positioning of the crosses on the calibration screen.
In version 5.1.0 we have employed an updated graphics library and have seen that this overcomes this issues and shows the calibration program in full screen. |
|
|
Changing desktop resolution The driver does not automatically monitor desktop resolution and the resolution is captured at the point calibration is performed and used as part of the X interface. If resolution is changed a new calibration will be required. |
|
Openbox |
If using Openbox Windows manager without using Gnome / KDE desktop manager and using UPDD component TBLinuxMouse for mouse emulation then you need to invoke TBLinuxMouse from the OpenBox “autostart” file: Add the following line to “/etc/xdg/openbox/autostart”:
“/opt/tbupddlx/tblinuxmouse &”
|
|
TWM window manager |
In order to calibrate you must run the calibration program (tbcalib) without the TWM window manager active so that the entire screen area is used. If this is not possible see calibration issue notes above. |
|
Driver background process |
The driver uses a background process to monitor video rotation and regularly calls xrandr for this purpose. One customer reported that this process caused their animated graphics to temporarily freeze every time xrandr was called. Should the background task cause issues on your system you can safely kill the process “tblinuxdaemon” to stop xrandr getting called. To disable it permanently remove the line “/bin/bash /opt/tbupddlx/startdaemon #UPDD” from the file /etc/profile. Update – since UPDD 4.1.10 xrandr is no longer used to detect rotation so this issue has been resolved. The video rotation monitoring code has also moved to aidaemon so Tblinuxdaemon no longer exists. |
|
Fluxbox window manager |
The latest user to try our driver with the WM reported…. 1) Manual install was required 2) Double clicks were needed to activate. The first touch moved the pointer (and got focus) the second touch activated the mouse click. Until this is investigated further our ‘temporary’ suggestion was to set the UPDD click mode to double click by running the command /tbupddlx/upddcalib “/settingsz:event mode 0=Touchdown Double Click Left” |
|
Driver priority |
With driver 4.1.10, 2340 and above, we have introduced a perl script ‘tbrenice’. This executes shortly after the tbupddwu process is launched and sets the priority of the driver components tbupddwu & tblinuxmouse to -5 (quite high). The script is shown below for reference. The priority can be changed to that required by changing the two lines that each read. `renice -5 @toks[0]`;
Script content #!/usr/bin/perl strict; sleep(10); { my @res = ` ps ax | grep “tbupddwu” | grep –v grep`; my $cnt = @res; if($cnt == 1) { my $line = @res[0]; $line =~ s/^\s+//; my @toks = split(/ /,$line) ; print “setting priority for process “ . @toks[0] . “\n”; `renice -5 @toks[0]`; } } { my @res = ` ps ax | grep “tblinuxmouse” | grep –v grep`; my $cnt = @res; if($cnt == 1) { my $line = @res[0]; $line =~ s/^\s+//; my @toks = split(/ /,$line) ; print “setting priority for process “ . @toks[0] . “\n”; `renice -5 @toks[0]`; } }
|
|
Distribution |
Issues |
|
ARM based |
With the initial release of the ARM driver the UPDD utility programs (graphics based programs) do not run correctly and this is being investigated. To calibrate in ARM run the UPDD program ‘tbutils calibrate’ to perform a 2 point text based calibration. This issue also affects the GUI install so a manual installation needs to be performed but will need to be tailored to the distribution in question. |
|
MeeGo |
There is a problem running tblinuxdaemon daemon process in this distribution so its been omitted for the time being. We will look at this issue if the need arises. |
|
Ubuntu 8.04, 8.10 and others |
Some users of these Linux distros have reported that after calibrating, the cursor tracks incorrectly on the X axis (increasingly out to the right of the screen – we do not see this issue on any of our systems!). When this is seen we believe the driver has not correctly determined the X element of the screen resolution. To correct the problem it is necessary to store the screen resolution values in the X configuration file. Follow the instructions below to configure this:- Either login as the “root” user OR open a terminal and type “su” to become the root user (entering the root pasword when prompted), or type “sudo bash” (entering your pasword when prompted) to get access to a root shell Open /etc/X11/xorg.conf in a text editor (eg. by typing “emacs /etc/X11/xorg.conf” or “vi /etc/X11/xorg.conf” or use any other text editor) Navigate to the section that reads:
Section "InputDevice" #UPDD Identifier "Updd0" Driver "xf86_tbupddlx" Option "SwapXY" "0" Option "Device" "/opt/tbupddlx/comReadPipe" EndSection #UPDD
Modify it to read
Section "InputDevice" #UPDD Identifier "Updd0" Driver "xf86_tbupddlx" Option "SwapXY" "0" Option "Width" "1024" Option "Height" "768" Option "Device" "/opt/tbupddlx/comReadPipe" EndSection #UPDD
Save the file Now either reboot the computer OR shutdown the X server and then restart it Replace the values of 1024 and 768 in the modified section to reflect the resolution that you are using. If this fix is used then it is important to remember to update these values if a different screen resolution is used. |
|
Slackware 10 |
We found two issues with this distribution: 1. The Linux files are installed in a different file structure so UPDD install does not locate the configuration file and therefore there is some extra work to do after installation, as follows: Install UPDD as normal. Then create a file called “rc.updd” in the “/etc/rc.d” directory with the following content:-
#!/bin/sh
if [ “$1” = “stop” ]; then echo “Stopping updd…” killall tbupddwu elif [ “$1” = “restart”]; then echo “Restarting updd…” killall tbupddwu sleep 1 /opt/tbupddlx/tbupddwu & else # assume $1 = start: echo “Starting updd: /opt/tbupddlx/tbupddwu” /opt/tbupddlx/tbupddwu & Fi
It should be marked executable by typing “chmod +x /etc/rc.d/rc.updd”
The file “/etc/rc.d/rc.local” should be modified to include the following 3 lines (the location of these lines is not significant so long as they do not split an existing code block):-
if [ -x /etc/rc.d/rc.updd –a –x /usr/sbin/syslogd –a –d /var/log ]; then . /etc/rc.d/rc.updd start fi The system should then be rebooted. We will automate this installation in a forthcoming UPDD release.
2. The default Linux kernel provided with Slackware 10.1 has problems with USB that prevent UPDD communicating with a USB device. However there is a 2.6 kernel supplied on CD2 of the distribution which functions correctly. To install and use this kernel follow the instructions located in mountpath>/testing/packages/linux-2.6.10/README.initrd. |
|
|
Mandrake 9.2 |
Installs X 3.n.n. X needs to be upgraded to 4 to work. |
|
|
Elinos Embedded |
Ships with X3.3.6 to keep embedded components as small as possible. |
|
|
KNOPPIX |
KNOPPIX is a live variant of Linux that is run completely off a CD by creating a RAMDrive. It is used a great deal for kiosk stations. This may require a manual install because KNOPPIX normally runs out of a RAMDrive and some of the storage areas are read-only which prevents the automatic installer writing files. In this environment the driver needs to be embedded into the Knoppix disk image and the file “/tbupddlx/tbupdd.reg” needs to be a symlink to this file on the RAMDrive. It also important that the files retain their case. The files norm*.gif and logo.gif should all be in uppercase. |
|
|
Yellowdog |
The UPDD Linux version 3 driver supports both USB and serial devices. However, given the lack of serial ports on the Macs, hardware serial support depends on the availability of a suitable serial to USB adaptor such as the Keyspan interface. We do not believe that the Keyspan or any other adaptor is available for Yellowdog (due to lack of required drivers), so to all intent and purpose there is no serial support. Work is required to produce a UPDD Version 4 power pc version. |
|
|
Fedora Code 3 |
Fedora Core 3 has a built in HID driver that will take control of HID compatible touch controllers. For our driver to work with this distribution when using an HID compatible touch controller you will need to rebuild the kernel to make HID a loadable module. With UPDD Version 4 this should now be resolved! |
|
|
SUSE 9.1 |
We have found that Suse 9.1 has a non-standard implementation of HID and this stops our driver working with HID controllers. Although we could cater for this in UPDD we have found that SUSE 9.3 reverts back to a standard HID implementation and all is well. |
|
|
One customer reported that the driver would not work with their USB touch controller and we asked for a USB device listing (as documented in our Support Document). To produce the device list the USB file system needed to be enabled and in doing this the driver worked OK. In other Suse 10.1 implementations it has not been necessary to do this so the UPDD installation does not automatically enable the USB file system. If you find that the driver does not work in Suse 10.1, enable the file system and test again. If it still does not work produce the Linux info as specified in the Support Document and we will investigate further To enable the file system edit
the file “/etc/fstab” and change the line that says: and then reboot the system.
Another customer reported “In Suse 10.2 there’s no USBFS, meaning with default Suse 10.2 kernel your driver cannot access USB devices as there is no /proc/bus/usb. In this case the usbfs system will have to be enabled. This particular customer used a non-default (but still Open-SUSE) kernel that gave backward compatible libusb access on /proc/bus/usb!
10.3 was tested 21st April 2008 and all was found to be OK. |
||
|
SUSE 11.1 – X64 |
GNOME Window manager support only until we investigate driver issues when KDE is in use. |
|
|
Perl
needs to be installed (emerge –av perl) Install driver as per the installation instructions The three lib files (libTBapi.so libACE.so.5.6.0 and libhbutton.so) need to be copied or symlinked to the /lib directory Create file: /etc/init.d/updd with the following contents:
#!/sbin/runscript # Copyright 1999-2006 Gentoo Foundation # Distributed under the terms of the GNU General Public License v2 # $Header: $
depend() { use hotplug logger }
start() { ebegin “Starting UPDD” /opt/tbupddlx/tbupddwu & eend ${?}
}
stop() { ebegin “Stopping UPDD” killall –quiet tbupddwu eend ${?} }
Make the file above startable (chmod +x /etc/init.d/updd) Start updd (/etc/init.d/updd start) Include updd at startup (rc-update add updd default) Running up the xsession will allow you to run the UPDD Console and calibrate the touchscreen. |
||
|
Ubuntu 7.10 |
The USB files system needs to be enabled: Edit the file: /etc/init.d/mountdevsubfs.sh e.g gksudo gedit
/etc/init.d/mountdevsubfs.sh |
|
|
Ubuntu 10:04 LTS |
Customer reported that after driver install and system restart and autologin to the admin account then the touch doesn't work but if you logout the admin the touch then works at the login screen. After re-login to admin the touch works. This issue was observed with kernel 2.6.32-21.generic. Once they updated to 2.6.32-28 the admin autologin issue was resolved and touch worked as expected!. |
|
|
Controllers |
Issues |
|
|
ELO |
“If using an ELO controller and it doesn’t work with UPDD then check the contents of your /etc/X11/xorg.conf file for the following lines:
Section "InputDevice" Identifier "elo" Driver "elo" Option "Device" "/dev/input/elo_ser" Option "SendCoreEvents" "true" EndSection
If they exist then delete them and also delete the corresponding line “Inputdevice "elo"” in the “ServerLayout” section of your /etc/X11/xorg.conf file. The system should then be rebooted.”
|
|
|
Linux devices |
|
|
|
UPDD must be manually installed on this device as per these instructions. |
||
CD Distribution
We believe the best approach is to expand the contents of the linuxupdd.tgz file to the CD ensuring the permissions on the extracted files are preserved. The end user should then be able to run the installer directly from the CD. Please test before creating many copies!
Installation
We highly recommend you uninstall any previous UPDD installations, see note 1 below.
This section describes the different installation options and the changes made to the system as part of the installation and covers the following topics:
|
Install the driver using the supplied GUI installation program and install script |
||
|
Installation notes |
||
|
Manual installation steps for standard Linux distributions |
||
|
Manual installation steps for embedded (cut down) distributions |
||
|
Installation of multi-touch extensions |
||
|
UPDD processes following successful installation |
||
|
Folder structure used by UPDD |
||
|
Specialist installs |
UPDD must be manually installed on this device as per these instructions. |
|
UPDD provides a number of installation scripts for most common platforms and these are referenced by the GUI installation program. These scripts provide tailoring of the default package to the specific requirements of a given distribution. Typically this will deal with aspects such as launching the various processes, placing icons on the desktop and so on.
As Linux is very flexible and can be used in many different ways, these scripts are intended for only the most straightforward “out of the box” cases, where a standard Linux installation is performed, with default selections. If you use a non-standard installation you might need to implement a strategy to run the updd software as required. The post installation scripts (*.xns) are provided in the updd installation package and these can be used as a guide. You can of course repackage these to provide a customized UPDD package.
In most cases you will need to launch
Tbupddwu – the user mode driver
tblinuxmouse – the user mode X interface module or Virtual Device touch interface
aidaemon – the daemon process used to detect rotation automatically and adjust calibration.
It is suggested that you refer to the supplied scripts for examples of how to run these as this area is currently subject to change.
GUI installation Procedure
Ensure you have the correct setup file to match your
processor’s architecture, being 32 or 64 bit. An error will be issued if you
have the incorrect setup file:
Installation of the driver must be performed as the "root user". It is usually possible to run with root privileges by typing command "su root" or preceding the setup command with “kdesu” or “sudo” as described here but we have found on some systems this is not sufficient in which case you must log on at system start as root. Note that on SuSE 10.3 and SLED 11 “sudo” does not allow the installer to work and you must use either “su” or, optionally on SuSE 10.3, “kdesu”. In cases where the installer fails because the installer dialogs do not open try the command ‘Sux’ as this utilises a wrapper around su that transfers a user’s X credentials.
The main installation package is held within the compressed file called linuxupdd.tgz. Copy the file into a directory other than “/opt” or “/” such as a users home directory on the Linux system, change to that directory, then decompress it by using the command “tar zxvf linuxupdd.tgz”.
Important - Do not decompress the software in the root directory or “/opt/” as the install will fail.
To install the software open a terminal window and either use “su” or “kdesu” to become the root user then type “./setup”. Alternatively type “sudo ./setup” and enter your password (not on SuSE10.3 and SLED 11; see note above). This will launch the setup program: Important note: the ‘setup’ program is extracted directly into the extraction directory and is not located in the ./opt/tbupddlx subdirectory just created.
- From the device list dialog select the touch device or, if it is a PnP device, optionally leave the PnP mechanism to pick up the device(s).
- From the distribution list dialog select the distribution script if it is listed. Select the script that most closely matches your distribution. In no script matches select either “Other” or “Other-Legacy. E.g. If an exact match is listed, say Ubuntu Gusty Gibbon (Ubuntu 7.10), select that.
- Install scripts can invoke question dialogs, such as ‘OK to enable USB file system’. Answer these dialogs as appropriate.
Following installation you must reboot the system for the driver to load
If the install fails please refer to the note below to see if there is a solution to your problem:
Installation notes
1.
If installing on a system with UPDD installed
and selecting a different installation script from the one used previously it
is possible that some components will be installed and running from different
locations and this will definitely cause touch failures: e.g.
The RedHat 4.8 script adds an entry to "/etc/gdm/Init/Default" for
tblinuxmouse
The RedHat 6.0 script adds an entry to
"/etc/X11/xinit/xinitrc.d/runtblinuxmouse.sh
In this case 2 x TBLinuxmouse processes will be running and this will cause
touch to fail.
To avoid this issue it is recommended that you uninstall any previous UPDD
drivers
2.
The installation procedure is used to install
the software for a single touch screen / UPDD supported pointer device. In a
multi-touch screen or pointer device environment invoke the UPDD Console - Hardware dialog to add
additional devices after installation. See the Multi monitor and multi
device documentation for further information.
3.
After installation it is a requirement
to reboot the system as the graphical subsystem needs to be reloaded for any
new drivers to work.
4.
Utility shortcuts (symlinks): If the distribution uses KDE or Gnome windows manager the
installation procedure will attempt to** create desktop shortcuts
to UPDD utility programs. ** The method used to create the shortcuts may
not work in all distributions
When the system has restarted and user log in is complete there are a number of
ways to configure the driver.
o - There may
be two new icons on the desktop, Console and Calibrate,
which can be used to change driver settings and calibrate the touchscreen
respectively.
o - On systems where the icons are not seen then a Terminal program should be
executed and the user should type “/opt/tbupddlx/upddconsole” to run the
Console, and “/opt/tbupddlx/upddcalib” to run the Calibration program.
o - Alternatively manually create Linux shortcuts to the UPDD Console and
Calibration program.
If it is preferred that no shortcuts are created on the desktop use the ‘ns’
install parameter to indicate that none are created i.e. “./setup ns”
5. Root User: Calibration can not be activated when running as a root user. The problem is that when starting an X session, the user is authenticated by X and given permission to connect to the server. When switching users by using "su", the new user no longer has permission to connect to the X server and as a consequence cannot run graphical programs.
6. UPDD for Linux uses components of the kernel to provide access to the various hardware ports, such as USB, PS/2 and serial ports. In order to access controller hardware using a distribution that does not implement or mount these sub-systems by default the integrator will need to use the kernel documentation for the distribution in question to enable the appropriate interface.
7. For serial devices the driver handles the serial device via standard COM port names (/dev/ttySnn) or USB to serial adaptors (/dev/ttyUSBn), so to use a serial device with a different name it is required to create a symbolic link to one of these port types. In the UPDD serial dropdown you have a choice of COMn for hardware serial ports (maps to /dev/ttysnn-1 (e.g COM1 = TTYS0)) or Adaptorn for virtual serial ports (maps to /dev/ttyUSBn-1 (e.g Adaptor1 = TTYUSB0)) created via a Serial to USB adaptor. See Serial Port notes for more information.
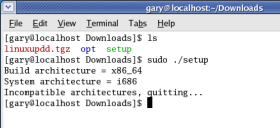
8. Different
drivers exist for 32 and 64 bit processors. Ensure you have the correct build
to match your processor otherwise an error will occur. Installing 64 bit on 32
bit processor gives:
$sudo
./setup
Processing...
Install failed
9. The
driver software has a number of dependencies, such as the NAS sub system for generating sounds on touch
or during calibration. If these are missing the install may fail and display
$sudo
./setup
Processing...
Install failed
We have seen this on ubuntu 10.04 LTS. In this case run ‘sudo apt-get install
–qq nas’ to install nas and then try the install again.
Manual Install
These instructions are not distribution-specific and locations of directories or files often differ between variants; for this reason use of the automated setup program is strongly recommended and manual installers should anticipate the need to adjust these instructions to account for these differences.
Several instructions will require root access so failed commands may require use of sudo.
Step 1 - Unpacking updd
- Download linuxupdd.tgz to some dir (e.g. Your home)
- tar –zxvf /linuxupdd.tgz
- rm ./setup
- mv ./opt /
- cd /opt/tbupddlx (from this point, commands should be run from this location)
Step 2 – Setting attributes and copying files
This stage involves making various files executable and copying and linking them for execution; note that in step 5 the file name changes and that steps 6-8 create links in the run level directories (which may differ in location) to that copied and renamed file. Steps 10-12 may require different directories for the /usr/lib directory if /usr/local/lib does not exist. Finally, step 12 makes use of the ldconfig program bundled with most distributions of linux, if this program is not on your system you may need to download the package libc-bin using yum or apt-get
- chmod +x S90tbupddlx
- chmod +x tbcalib
- chmod +x dcu
- chmod +x xins
- cp S90tbupddlx /etc/init.d/tbupdd
- ln –s /etc/init.d/tbupdd /etc/rc2.d/S90tbupdd
- ln –s /etc/init.d/tbupdd /etc/rc3.d/S90tbupdd
- ln –s /etc/init.d/tbupdd /etc/rc4.d/S90tbupdd
- ln –s libACE.so.5.6.2 libACE-5.6.2.so
- cp libhbutton32_tb.so /usr/local/lib
- cp libqt-mt.so.3 /usr/local/lib
- /sbin/ldconfig /usr/local/lib
Step 3 - Modifying xins script
- Find / -name .depend.start –print
- Note the location of the file
- Open the xins script for edit (using gedit, vi, nano, etc..)
- Find all four mentions of the location of .depend.start (near the top of the file)
- Edit the path to match your system setup (Debian 6.0 has the file in etc/init.d/)
- Save and close xins
For USB/PS2 device
1. Run ./xins
For Serial device
- Run ./xins COM<X>
Step 4 - Setting up the mouse control
Enable one of the X interfaces.
Do not use X11R6 and X11R7 together; if in doubt try the newer X11R7 first and undo changes if necessary.
For X11R7 systems
Locate the Default file for Gnome (Debian location is /etc/gdm3/Init/Default)
- chmod +x tbxuser.pl
- chmod +x tblinuxmouse
- perl tbxuser.pl /etc/gdm3/Init/Default (or your Default file)
- cp tblinuxmouse /usr/bin
For 32-Bit
- mv xf86_tbupddlx_drv.so /usr/lib/xorg/modules/input
For 64-Bit
- mv xf86_tbupddlx_drv.so /usr/lib64/xorg/modules/input
Please note that there is now an alternative to tblinuxmouse with the introduction of a virtual device interface.
For X11R6 systems
- chmod +x xf86_tbupddlx.o
For 32-Bit
- mv xf86_tbupddlx.o /usr/X11R6/lib/modules/input
For 64-Bit
- mv xf86_tbupddlx.o /usr/X11R6/lib64/modules/input
Important note: The xf86_tbupddlx.o interface is a very old kernel mode interface only needed for very old distributions. If enabled on newer distributions you will get an error message due to a deprecated API call:
load /usr/lib/xorg/modules/input/xf86tbupddlx_drv.so: /usr/lib/xorg/modules/input/xf86tbupddlx_drv.so: undefined symbol: xf86GetMotionEvents
Step 5 – Finally
- mkfifo comReadPipe
- Restart system
- Run /opt/tbupddlx/upddconsole to adjust touchscreen settings, test and calibrate
It is important to note that tbupddwu (the user mode driver) has to run under root and that tblinuxmouse (user mode X interface) runs under X.
Manual install - Embedded Linux systems
Given the nature of embedded Linux systems, such as those utilising Tinyx/Kdrive, it is possible that our standard install scripts may not set up the driver requirements correctly, especially the launching of the daemon processes. To this end it is recommended that the individual driver modules be manually installed in these environments.
Basic instructions to manually install and run these programs follow and should be read in conjunction of the full manual install section above. These instructions are for the use of personnel familiar with the Linux command line interface. The commands should be issued by a user logged on as root. We cannot provide detailed instructions without details of the specific target system but we hope these basic instructions will suffice. We can of course answer any specific questions you might have.
-Copy the driver package (linuxupdd.tgz) to the root (“/”) directory on the target system. i.e. “cp <location of tgz>/linuxupdd.tgz /”
-Type the following commands:-
-cd /
-tar zxvf linuxupdd.tgz
-rm /setup
-cd /opt/tbupddlx
-touch usermodemouseport
-mkfifo comReadPipe
This will copy the components to the correct locations. You will also need a copy of “libusb-0.1.so.4” which should be copied into the directory “/opt/tbupddlx”. If you don’t have a copy then we can provide it.
You then need to start two daemons: tbupddwu, and tblinuxdaemon. The standard place to start them from is from your “rc” files so that they will run automatically when the system starts. You will also need to set the LD_LIBRARY_PATH environment variable to include “/opt/tbupddlx” in your “rc” script. Note that tbupddwu must be launched before tblinuxdaemon.
To calibrate you need to run the script “/opt/tbupddlx/upddcalib”.
To run the UPDD Console (settings) you need to run the script “/opt/tbupddlx/upddconsole”. Please note - in some embedded systems we have seen that the UPDD Console and it's related test utility (updddraw) does not load due to missing font files. Only when the dependant modules are available will these programs load without error.
Spawned processes
Following installation the following processes should be seen from the command “ps aux | grep tb”:
root 1209 0.0
0.0 11324 1360 ?
S 08:32 0:00 /bin/sh /opt/tbupddlx/startupdd
root 1211 0.0 0.0
3780 296 ? Ss
08:32 0:00 startpar -f -- tbupdd
root 7477 0.4 0.3 97064
7156 ? Sl
08:59 0:00 /opt/tbupddlx/tbupddwu
canto 7633 0.0 0.0 25368
944 ? S
08:59 0:00 /opt/tbupddlx/tblinuxmouse (if using user mode X
interface)
canto 7635 0.1 0.3 88720 7076
? Sl 08:59
0:00 /opt/tbupddlx/aidaemon
Folder structure
Following installation the following folder structure will have been created/updated on your Linux system:
/opt/tbupddlx/*
Contains the ini file, calib gif files, etc
/usr/local/lib or /usr/lib
libTBApi.so
libhbutton.so
libqt-mt.so.3
libACE.so.5.6.0
Libraries used by the driver
/usr/X11R6/lib/modules/input/xf86_tbupddlx.o
This is the X module for systems using X11R6 based X Window Systems such as Xfree86 and early versions of x.org
/usr/lib/xorg/modules/input/xf86_tbupddlx_drv.so
This is the X module for systems using X11R7 based X Windows Systems such as the latest x.org
/etc/init.d/tbupdd
/etc/rc2.d/S90tbupdd
/etc/rc3.d/S90tbupdd
/etc/rc5.d/S90tbupdd
These automatically load the daemon on system boot
/etc/X11/XF86Config-4 or /etc/X11/XF86Config or /etc/X11/xorg.conf
(depending on X version used)
This pre-existing file gets modified to add a section to load the UPDD XFree86 module
Virtual Device and multi-touch interface
Introduced in Dec 2012 as part of our multi-touch investigations, UPDD version 5.0.2 build 2372 now creates a virtual touch device that is registered with the system as a multi-touch capable device. This device fits in to the Linux input stack schematic as follows:
|
The Linux input stack |
Description |
|
Applications |
End user multi-touch applications |
|
Multi-touch libraries |
Development tools that utilise Linux touch event interface, such as |
|
Xorg |
Linux graphics layer |
|
Linux kernel |
Linux kernel with multi-touch capabilities (uinput, evdev etc) |
|
Virtual touch device |
UPDD created virtual touch device – with multi-touch capabilities |
|
UPDD driver hardware interface |
UPDD USB or serial interface |
|
Touch Hardware |
UPDD supported single and multi-touch hardware |
The utilisation of the virtual touch device replies on ‘uinput’ support (path /dev/uinput should exist) being part of the Linux kernel and enabled at startup. This function will be part of most recent standard distributions but may need to be added to custom Linux builds. The driver issues the error ‘CLXMousePort failed to open virtualinputpath’ (in a terminal window) if uinput is not available.
Given this is a new interface, currently only proven to work in our own internal tests on a few recent Linux distributions, we have not enabled this interface by default and a command line must be used to enable the interface. Once we are satisfied this is a stable implementation and works as expected this will become the standard, default interface for posting touch data into the kernel.
To utilise this interface, open up a command window and run the commands:
|
cd /opt/tbupddlx |
Change to UPDD application folder |
|
export LD_LIBRARY_PATH=/opt/tbupddlx:$LD_LIBRARY_PATH |
Prepare the environment for the command or use upddenv script to invoke tbutils – see below |
|
./tbutils nodevice setting dw usevirtualtouch 1 Or alternatively (if upddenv script exists) ./upddenv tbutils nodevice setting dw usevirtualtouch 1 Note: TButils will not run unless tblinuxmouse is running (to be fixed in next release). If this is not running (i.e. in FC17 or SuSe 12.2) use the command ./tblinuxmouse or edit the tbupdd.ini file manually and update the setting as shown >> |
Set the setting in the UPDD tbupdd.ini file and reload the driver to read the file. This sets the following setting:. [updd\parameters] usevirtualtouch=0x00000001 |
|
Sudo killall tbupddwu |
Kill the driver which will reload and use new interface |
With this enabled, UPDD driver posts all received touch data into the Linux kernel via the virtual touch device rather than the user mode X interface TBlinuxmouse.
Using the lsinput command you can view the UPDD virtual multi-touch input device. On most systems LSinput is not installed by default. Under ubuntu/debian lsinput is part of the input-utils package. To install it, run the command “sudo apt-get install input-utils”. Under other Linux distributions the command for installing LSinput may be different.
Now run ‘sudo lsinput’ to list the devices (note the event number will vary between systems):
/dev/input/event13
bustype : BUS_VIRTUAL
vendor : 0x1
product : 0x1
version : 1
name : "updd"
bits ev : EV_SYN EV_KEY EV_ABS
To ensure touch is being handled by the virtual device and not tblinuxmouse you can terminate tblinuxmouse with the command sudo killall tblinuxmouse entered in a Terminal window.
In theory this interface method should satisfy both X and touch event driven services and applications. The current implementation posts both single and multi-touch input via the multi-touch interface and therefore to utilise this virtual device the Linux distribution must support native multi-touch. The virtual device interface does cater for a different method of posting single touch touches and this may be supported in a future release of our driver to cater for legacy or non multi-touch distributions.
Our tests were conducted with ubuntu 12:10 and the gesture aware Unity Windows Manager (https://wiki.ubuntu.com/Multitouch). In this distribution, using kernel 3.5, device test software showed the touch device and reported single and multi-touch input and both X and Unity gestures worked as expected.
Testing in Suse 12.2, kernel 3.4, the supplied test software did not show single or multi-touch input albeit the single touch X interface worked well which implies that this interface is likely to be working in this distribution.
There are utilities, such as evtest and mtdev-test, which can be used to show certain device information handled by the multi-touch device.
It is important to acknowledge that the virtual device implements a solution for native multi-touch support not MPX. MPX provides multiple independent pointers (mouse cursors) at the windowing system level. Please contact us if you require MPX support.
Calibration
After the restart and if using the KDE or Gnome window manager, there should be an icon on the desktop to calibrate (unless the installer requested no shortcuts):
![]()
If using a different window manager, open up a shell and type:-
/opt/tbupddlx/upddcalib
or
cd /opt/tbupddlx
./upddcalib
or alternatively create a link to it using the window manager.
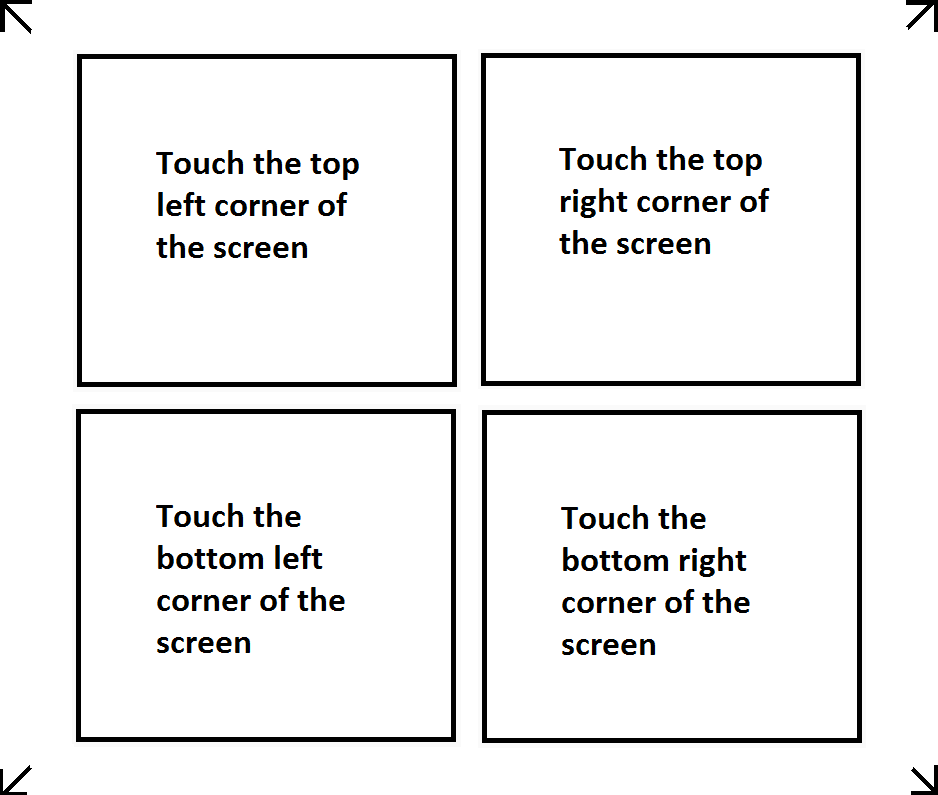
To calibrate, double click the calibration icon on the desktop or run the calibration program and touch the calibration crosses, or arrows, as they appear. Important note: If the calibration screen does not cover the full desktop area see calibration notes above. Full calibration procedure information can be found in the Calibration document.
Calibration can be performed in any screen resolution and the calibration data held is relative to the screen resolution. However, if the screen resolution is changed then a new calibration will be required as currently we do not automatically track screen resolution changes.
Driver/Controller settings
The UPDD Console defines the functionality of the pointer device(s) and the UPDD driver environment.
If using the KDE or Gnome window manager, there should be an icon on the desktop to invoke the UPDD Console (unless the installer requested no shortcuts).
![]()
If using a different window manager, open up a shell and type:-
/opt/tbupddlx/upddconsole
or
cd /opt/tbupddlx
./upddconsole
or alternatively create a link to it using the window manager.
To configure the UPDD settings invoke the UPDD Console program and change the setting as required.
See the UPDD Console documentation and on-line help for further information.
All settings, including calibration data, are held in the UPDD settings file.
Serial port notes
Change serial port connection
The UPDD Console - Hardware tab allows the COM port name to be reassigned after installation.
Standard serial ports
If using a standard serial port, Select Com1, Com2 etc in the COM port selector. Serial ports should be registered in the system as ttySn which is mapped to our driver to COMn+1 (e.g. COM1 = ttyS0)
Serial to USB adaptors
If using a serial to USB adaptor, select Adaptor 1, Adaptor 2, etc in the COM port selector. This has only been tested with the Keyspan adaptors so far but the Linux documentation states that the interface is the same for all serial adaptors; hence UPDD should work for all serial/USB adaptors. Serial to USB adaptors should be registered within the system as ttyUSBn which is mapped by our driver to Adaptor n+1. (e.g Adaptor1 = ttyUSB0)
Serial port reassignment
The driver handles serial devices via standard COM port names (/dev/ttySnn) or USB to serial adaptors (/dev/ttyUSBn), so to use a serial device with a different name it is required to create a symbolic link to one of these port types.
Example: Assuming you have a serial port referenced as ttyC1P3 to be reassigned. You need to open a terminal with root privileges and type the following:
ln -s /dev/ttyC1P3 /dev/ttyUSB0 (for Adaptor 1)
or
ln -s /dev/ttyC1P3 /dev/ttyS0 (for com port 1)
You will then need to open up the UPDD Console and change the COM port for your device to "Adaptor 1" or “Com 1”.
Serial port testing
Should the serial port connection not be working there are a number of procedures to follow to help identify the problem as described in the knowledge base article here.
Serial port issues
One customer reported that the serial touch screen stopped working after the initial boot. Further investigations showed that the root cause was the Bluetooth manager using the modem-manager to close all serial ports even though they had no Bluetooth devices on their system!!!
Uninstall
Automatic (4.1.1 - 26th Sept 2008 onwards)
Note: The automated uninstall will only fully remove installations that have been installed from this build and later. If installing this build over an earlier build and then uninstalling using the “uninstall” program the changes to /etc/X11/xorg.conf will not be removed correctly. In the case of installing this build on a system which has had another build on it, the best scenario is to manually remove the old software and then install the new.
Removal of the driver must be performed as the "root" user. It is usually possible to "become" the root user by typing command "su root" or preceding the setup command with “kdesu” or “sudo”, but we have found on some systems this is not sufficient in which case you must log on at system start as root. Note that on SuSE 10.3 and SLED 11 “sudo” does not allow the uninstaller to work and you must use either “su” or, optionally on SuSE 10.3, “kdesu”.
To uninstall the software open a terminal window and either use “su” or “kdesu” to become the root user then type “/opt/tbupddlx/uninstall”. Alternatively type “sudo /opt/tbupddlx/uninstall” and enter your password (not on SuSE 10.3 and SLED 11; see note above). This will launch the uninstall program:
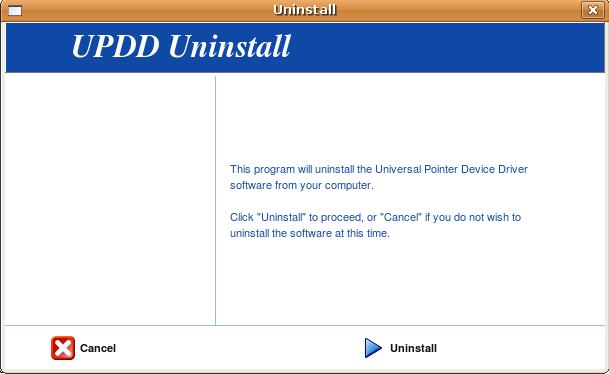
To continue and remove the software click on “Uninstall”. To cancel, click “Cancel” and the system will remain unmodified.
Manual Uninstall
Type the following commands being careful to use the same case and spacing.
su
*Enter the root password*
rm -rf /tbupddlx *If this is mistyped, the whole system could be wiped.
rm /usr/X11R6/lib/modules/input/xf86_tbupddlx.o
For Systems using X11R6
rm /usr/X11R6/lib/modules/input/xf86_tbupddlx.o
For Systems using X11R7
rm /usr/lib/xorg/modules/input/xf86_tbupddlx_drv.so
rm /etc/rc.d/init.d/tbupddlx
rm /etc/rc.d/rc2.d/S90tbupddlx
rm /etc/rc.d/rc3.d/S90tbupddlx
rm /etc/rc.d/rc5.d/S90tbupddlx
Edit the file "/etc/X11/XF86Config-4" for Xfree86, or “/etc/X11/xorg.conf” for x.org and remove the following section:-
Section "InputDevice""
Identifier "Updd0"
Driver "xf86_tbupddlx"
Option "Device" "/tbupddlx/comReadPipe"
EndSection
In the section that begins with:-
Section "ServerLayout"
Remove the line:-
InputDevice "Updd0" "SendCoreEvents"
Multi-monitor and multi-device support
Support for multiple monitors was added in UPDD Version 4.0.4 and is covered in full in the multi-monitor and device document, Linux section.
Display rotation considerations
Linux supports rotated video modes for supported video cards under both Xfree86 and X.org. UPDD will work with rotated video and this is explained in detail in the separate rotate documentation.
Display resolution / calibration considerations
The calibration mapping is based on the screen resolution setting at the time of calibration so if the resolution is changed the calibration will be inaccurate. To cater for this you will need to manually recalibrate after changing video resolution.
Future releases of the driver may well introduce a daemon process to automatically monitor video resolution and adjust automatically but until such times as this is available manual intervention is required.
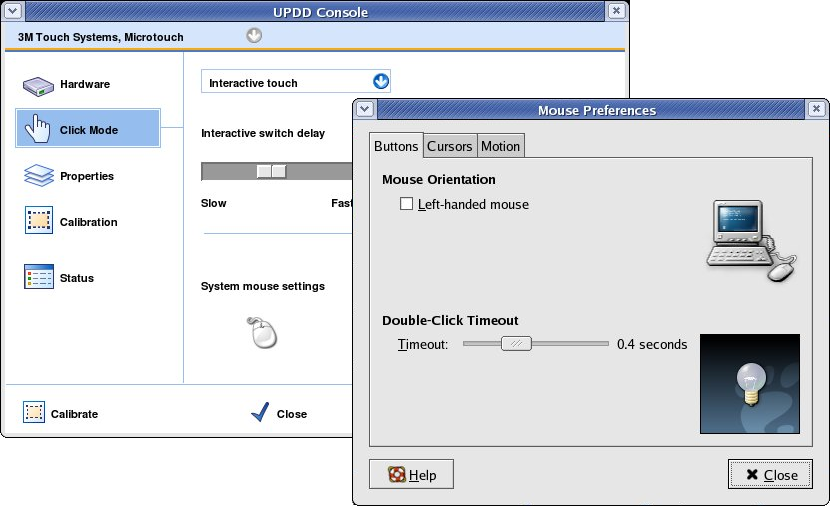
Mouse settings
Double click capabilities are affected by the system’s Mouse settings. To achieve a double click using the pointer device these settings need to cater for the type of device in use. A touch screen may well require different settings to that required by a mouse. The main setting that affects the ability to double click is the double click speed. If this is set too fast it may be impossible to produce a double click. Ensure this is set to an appropriate value in the mouse settings to allow for double clicks via a stylus. In this example the mouse settings screen is from the KDE Control Centre. Other window managers will have different ways of configuring the settings.
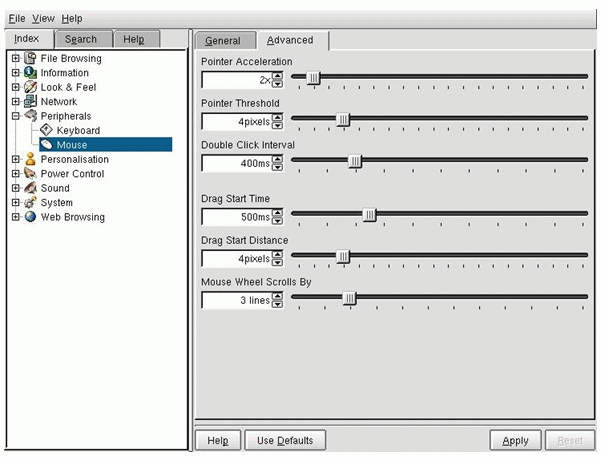
The UPDD Console, Click Mode dialog, System Mouse settings will invoke the Mouse settings for KDE and Gnome desktops, as shown in the following example:
Touch Utilities
Virtual Keyboards
A number of Virtual keyboards are available on the Web for Linux as detailed in the UPDD Virtual keyboard documentation.
Mouse Cursor
At the time of writing we are not aware of any specific end user utility to change the mouse cursor or turn it on/off. Please contact us if you find such a suitable utility that we can document for other users.
Current Limitations
UPDD was originally developed for Windows and has since been ported to other OS. Not all features have been ported to Linux, they include:
- Dynamic detection of system language.
- Serial port auto-detection
- Interactive touch – visual notification of right click count down
- Anchor mouse function
- Light pen calibration (the white lines on black mode)
- Toolbar actions
- Extensions
Contact
For further information or technical assistance please email the technical support team at technical@touch-base.com