|
|
||||||||||||||||||||||||||||||||||||||||||||||||||||||||||||||||||||||||||||||||||||||||||||||||||||||||||||||||||||||||||||||||||||||||||
|
|
||||||||||||||||||||||||||||||||||||||||||||||||||||||||||||||||||||||||||||||||||||||||||||||||||||||||||||||||||||||||||||||||||||||||||
Installation and running the toolTo utilise the Radial Menu tool in the Mac environment you need to simply download the appropriate.zip file for updd version 5.0.2 or 5.1.x and expand the compressed file to create the application file ‘UPDD Radial Menu’. Development history is here.
It is highly recommended that this file is moved to the standard utilities folder along with the other UPDD Mac applications. Simply click on the application to load the tool. When running, a menu bar item will be shown in the menu bar.
Currently, once the app is running, you can invoke the menu in one of the following ways:
It's also possible to invoke the menu via the command line once the app is running; this will be documented at a later date. Other methods, via touch, will also be made available. ConfigurationThe active functions are configured in the UPDD settings file, tbupdd.ini. If no settings are defined when the Radial Menu tool is invoked then it will display a blank menu with four sections. The current maximum number of buttons for both main and sub radial menus is 8.
The setting file is located in /Library/Preferences. The Radial Menu settings are held in section [updd\parameters].
A number of methods to add/import/update the Radial Menu settings within the updd settings files are available as follows:
1. Use
the Radial Menu Item Option Import Settings 2. File
Import a configuration using a command line option -l (lower case L) 3. Under
UPDD release 5.1.x use the UPDD Command Line
utility to merge the settings defined in an external file.
When importing settings, the radial tool will update to reflect the changes. When defined in an external file the first line of the file must contain the section header [updd\parameters] followed by the settings.
Currently invoked menus/sub menus will be shown on the current desktop. Settings definitionAll menu-related settings can be applied to submenus unless specified otherwise. The only settings that don't apply to submenus are the keystroke settings that invokes the main menu. Menu configurationThe menu can be full or a semi-circle in appearance and consist of 1 or 2 rings. The diameter can also be specified.
To specify multiple rows/rings for any menu (main or sub), use these settings:
Button ConfigurationEach button is configured as follows, where N is from 1
to the number of buttons defined above.
Notes: 1) Small menus with one ring will not display both icons and labels if both are defined as there is insufficient room.
Menu item actions Each menu item is configured to perform an action as described below:
Please note that for some features to work ‘Accessibility’ will need to be enabled.NotesClick activationA menu button can also associate actions to click sequences performed on the button, being single left or right, double left or right, therefore up to four click triggered actions can be associated with a button:
Button click notes If any of these are configured to use the performKeystroke action, additional settings can be used to repeat the keystroke while the button is held; e.g.:
touchtool.buttonNdoubleClickRepeatTime=<interval> touchtool.buttonNrightClickRepeatTime=<interval> touchtool.buttonNdoubleRightClickRepeatTime=<interval>
When using the RepeatTime setting with a double click, the action will start repeating when the mouse is held down on the second click.
Setting a double click action will cause there to be a slight delay when single clicking. The delay is equal to the system-wide double click time (maxing out at one second). This is to prevent the single-click action from being triggered when double clicking. This also applies to a double click with the right mouse button. Keystroke definitionA key string can be anything allowed by the QKeySequence class, as defined here with the following additions and caveats: "command", "cmd" and "option" can be used to allow for easier use of OS X modifier keys.
Given that keystroke configuration is based on that supported by QT and that the Qt documentation mentions that in OS X "control" will refer to the command key, and "meta" refers to control. Since this is awfully confusing, for use in tbupdd.ini "ctrl" will always refer to the control key, and "meta" will refer to the command key.
Keystroke actions can perform an unlimited number of keystrokes in sequence. Each keystroke is separated by a comma, e.g.: touchtool.keyboardmenu.button3parameter=Command+Shift+Right,Command+C,Right,Command+V,t,Ctrl+E The number of milliseconds between each keystroke is configurable like so: touchtool.keyboardmenu.button3 keystrokeDelay=0x0000017E. If it's not defined it defaults to 50 milliseconds.
If defining commands that involve commas or full stops then commas are written as 'comma', e.g. Shift+comma. Full stops / periods are written as 'period': command+period.
With version 8 we have added a pause to the keystroke action, as per the example below: touchtool.button3action=performKeystroke touchtool.button3parameter=ctrl+A,pause=500,ctrl+B,ctrl+C,ctrl+D touchtool.button3keystrokeDelay=0x000000FA The number after pause= specifies how many milliseconds will elapse between keystrokes. This will override how much time will usually elapse (as specified by the keystrokeDelay parameter). So in the example above there will be 500 ms pause after ctrl+A, and a 250 ms delay (0xFA = 250) after ctrl+B and ctrl+C.
To enter text into a string of key commands you need to separate out each character with a comma; e.g Logic Pro example:
shift+return = open text box area "drums" = name of instrument or track return = close text box
Becomes; touchtool.submenuB5.button6parameter=shift+return,d,r,u,m,s,return
Arrow keys should be represented by "down", "left" etc
Understanding the keyboard action… The action is simulating actual keystrokes rather than typing characters as they appear in the text file, so to type a particular key, you write out the actual sequence of key presses necessary to type it. To identify a key, generally you use the character it would type without any modifier keys.
Here's some examples (all assuming a US / UK keyboard layout): { shift+[ } shift+] ? shift+/ ∑ option+w + shift+= _ (underscore) shift+-
Some keys however don't type visible characters, and are referred to using special names. They are: Common keys: return, enter, backspace, home, end, tab, escape page up / down: pgup, pgdn function keys: F1, F2, F3 ...etc..., F11, F12 arrow keys: left, right, up, down Forward delete: del
A space can be either the word "space" or the space character itself " ".
Since comma is used to separate keystrokes, it is written out as "comma". So to type < you use: shift+comma
And to type characters like é, ü, ñ, ò, and so on, you write out the keystrokes for the standard Mac way of typing them as documented here: http://symbolcodes.tlt.psu.edu/accents/codemac.html
Examples: á option+e,a ñ option+n,n
The keystrokes listed on the link above can be used as is in the radial tool, since the formats match.
So, for example, to type "Thê quick browñ fox!" you could use the following: shift+t,h,option+i,e,space,q,u,i,c,k, ,b,r,o,w,option+n,n, ,f,o,x,shift+1
Typing a single quote can be difficult with a non English keyboard. It appears that the correct way to type it in that case is to hold option and press the ´ key, which is positioned in the same location as the = key on an English keyboard. Since the performKeystroke action is simulating actual keyboard presses, the correct way to write out a single quote is: option+´
Keystrokes on the numeric keypad are represented by prepending "num" or "numpad", e.g.: numpad0 num1 numpad5 numpad+ control+numpad* command+num=
All number pad keys should be the word "num" or "numpad" followed immediately by the character to type with no spaces or punctuation. Afterwards, there must be a comma if more keystrokes are going to be typed.
e.g. typing two characters in sequence, the first being + on the number pad and the second being 0, the proper string would be: numpad+,0 or numpad+,numpad0
Keystroke limitations Currently we can only handle keys represented in ISO-Latin-1 encoding, since the tbupdd.ini setting file uses this encoding; therefore Asian or Cyrillic characters won't be possible to type. We need to consider encoding the settings file in another format like UTF-8. SubmenusTo create submenus, specify "submenu" as the action for a menu item. parameter is the name of the submenu, e.g: touchtool.button1action=submenu touchtool.button1parameter=mySubmenu
The submenu is then defined thusly:
touchtool.mySubmenu.numberOfButtons=0x00000004 or
touchtool.mySubmenu.button1label=My Menu Item touchtool.mySubmenu.button1icon=/path/to/icon.png touchtool.mySubmenu.button1enabled=0x00000001 touchtool.mySubmenu.button1action=insert action here touchtool.mySubmenu.button1parameter=insert parameter for the above action here touchtool.mySubmenu.button2label=Another Menu Item touchtool.mySubmenu.button2icon=star.png touchtool.mySubmenu.button2enabled=0x00000001 touchtool.mySubmenu.button2action=insert action here touchtool.mySubmenu.button2parameter=insert parameter for the above action here ...etc... Menu item transparencyThe transparency is defined for a menu or button using a setting named alpha, whose value goes from 0 to 255, with 255 being fully opaque. e.g.: touchtool.menuName.alpha=192 touchtool.menuName.button1alpha=255 touchtool.alpha=128 (sets the alpha for the main menu)
To set the alpha value for all menus, use: touchtool.defaultAlpha=255
A menu's alpha setting will override touchtool.defaultAlpha, and a button's alpha setting will override a menu's alpha setting.
Furthermore, since it's possible to define a color with an alpha as well, a color with an alpha value will override the applicable alpha setting.
For example, with the following configuration: touchtool.mymenu.color=150,0,0 touchtool.mymenu.alpha=192 touchtool.mymenu.button1color=0,0,200 touchtool.mymenu.button2color=0,0,100,255 touchtool.mymenu.button3color=0,0,150 touchtool.mymenu.button3alpha=50
Button 1 will have an alpha value of 192, because it doesn't have its own alpha and therefore inherits its alpha from the menu. However, button 2 will have an alpha of 255 since its color setting does define an alpha (note there being four components to its color), and button 3 will have an alpha of 50 because it uses the alpha setting to define its alpha. Menu ColorsMenus, sub menus and menu buttons can be color coded
Colors can be configured as follows:
At the menu and submenu level, colors can be specified like this: touchtool.color=R,G,B[,A] touchtool.selectedColor=R,G,B[,A] touchtool.submenuButtonColor=R,G,B[,A] touchtool.centerButtonColor=R,G,B[,A] touchtool.centerButtonSelectedColor=R,G,B[,A]
or when using 2 ring configuration….
To pick the background color or selection color for buttons in a ring, use the following settings: touchtool.innerRingColor=R,G,B[,A] touchtool.outerRingColor=R,G,B[,A] touchtool.innerRingSelectedColor=R,G,B[,A] touchtool.outerRingSelectedColor=R,G,B[,A]
The previous color settings: touchtool.color=R,G,B[,A] touchtool.selectedColor=R,G,B[,A] will also still work and apply to both rings, so previous configurations will still work correctly.
where R,G,B[,A] is an RGB or RGBA color, with each component being between 0 and 255. The alpha (transparency) component is optional, and if omitted the default alpha value is used as described in the ‘Menu Transparency’ section above.
"color" is the background color of the menu, "submenuButtonColor" is the color of submenu buttons, "selectedColor" is the color of a button when pressed, "centerButtonColor" is the color of the center 'X' button, and centerButtonSelectedColor is the color of the center 'X' button when pressed.
So for example, to specify a dark blue background you use: touchtool.color=0,0,80 ...and to specify a bright red translucent X button for a submenu, you use: touchtool.submenuName.centerButtonColor=255,0,0,127
All of these colors are optional, and when omitted a suitable default color is chosen. For example, if touchtool.color is specified but not touchtool.selectedColor, the selected color will be set to a slightly lighter version of touchtool.color.
Individual buttons can be colored as follows: touchtool.buttonNcolor=R,G,B[,A] touchtool.buttonNselectedColor=R,G,B[,A]
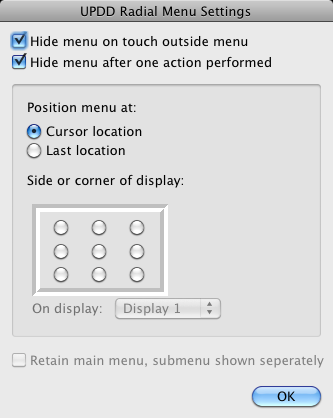
The first is the color of the button while unpressed, the second is the color of the button while pressed. These button-specific settings will override the colors for the menu. Position and usage settingsA number of settings control the position and usage of the menu that can be defined in the Settings dialog as follows:
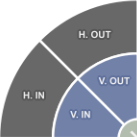
Important note: The position setting only applies to full-moon menus. Half-moon and quarter circles ‘snap’ to their defined position.
The above settings are held in the settings file thus:
touchtool.hideonactionperformed=0x00000001 If set, menu is hidden after an action is performed. Defaults to 1
touchtool.hideontouchoutsidemenu=0x00000001 If set, menu is hidden if a touch/click happens outside its window. Defaults to 1
touchtool.positionmenuat=value Value can be one of: cursor, last, left, top, right, bottom, topleft, topright, bottomleft, bottomright, center Controls where the touch tool will appear.
touchtool.positionmenudisplay=0x00000000 If touchtool.positionmenuat is set to a screen position (i.e. everything other than 'cursor' or 'last'), controls which display the menu will appear on. A value of 0 indicates whichever display contains the cursor (i.e. the current display), a value of 1 or more indicates a specific display, with 1=display 1, 2=display 2, etc. MovingYou can click/touch and hold on the centre cancel button and it will turn into a movement button to allow for the menu to be repositioned. ResizingDuring usage the menu can be resized between the maximum and minimum size range using the keyboard option modifier key or performing a Zoom action on the menu using UPDD Gestures (when using a touch screen) or an Apple multi-touch device (e.g. Magic Trackpad) with a configured Zoom function.
When using the keyboard modifier dragging the cursor towards the center shrinks the menu, dragging away from the center enlarges.
In order to resize a radial menu with UPDD Gestures using pinch and spread gestures, the following settings in Gestures must be used: Leave unchecked: "Pinch and spread cause different actions" Set gesture action for "Pinch and Spread" to "Zoom in and out" Line SeparatorsThe menu buttons are separated by a fading line. This line is not draw if the button is disabled using the ‘enabled’ setting: touchtool.buttonNenabled=0x00000000. This can be used to some good effects:
However, if all button components are defined but result in a ‘blank button’ i.e. no label (text), no icon and a completely transparent background then the lines are still drawn. ExamplesTo get started quickly, here are some pre-defined settings that demonstrate some of the available actions.
You can use these settings to create a file for import:
The first line is now optional (since version 8) as settings will always be placed in this branch.
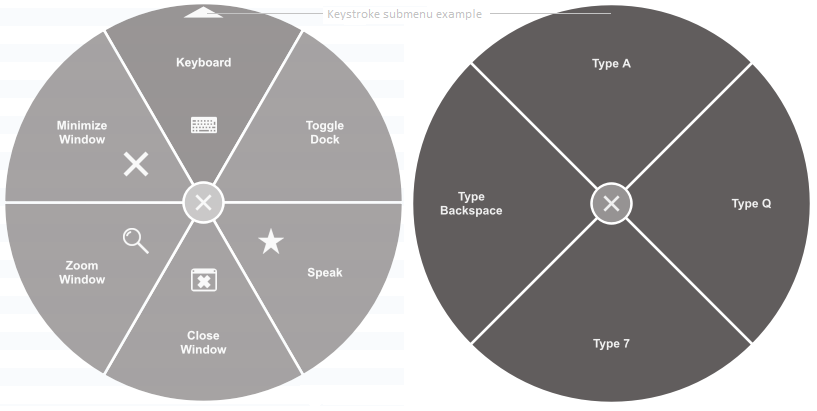
[updd\parameters] touchtool.numberofbuttons=0x00000006 touchtool.button1label=Keyboard touchtool.button1icon=keyboard.png touchtool.button1action=submenu touchtool.button1parameter=keyboardmenu touchtool.button2label=Toggle Dock touchtool.button2icon= touchtool.button2action=performKeystroke touchtool.button2parameter=command+option+d touchtool.button3label=Speak touchtool.button3icon=star.png touchtool.button3action=executeShellCommand touchtool.button3parameter=say "I'm using a shell command to produce speech." touchtool.button4label=Close Window touchtool.button4icon=close_window.png touchtool.button4action=closeFrontWindow touchtool.button4parameter= touchtool.button5label=Zoom Window touchtool.button5icon=zoom.png touchtool.button5action=maximizeFrontWindow touchtool.button5parameter= touchtool.button6label=Minimize Window touchtool.button6icon=cancel.png touchtool.button6action=minimizeFrontWindow touchtool.button6parameter= touchtool.keyboardmenu.numberOfButtons=4 touchtool.keyboardmenu.button1label=Type A touchtool.keyboardmenu.button1action=performKeystroke touchtool.keyboardmenu.button1parameter=a touchtool.keyboardmenu.button2label=Type Q touchtool.keyboardmenu.button2action=performKeystroke touchtool.keyboardmenu.button2parameter=q touchtool.keyboardmenu.button3label=Type 7 touchtool.keyboardmenu.button3action=performKeystroke touchtool.keyboardmenu.button3parameter=7 touchtool.keyboardmenu.button4label=Type Backspace touchtool.keyboardmenu.button4action=performKeystroke touchtool.keyboardmenu.button4parameter=backspace
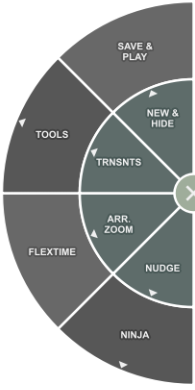
After the settings file has been modified and the driver and Radial tool restarted the menu will be presented thus:
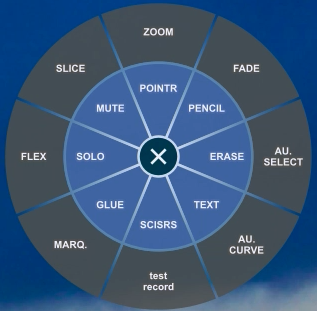
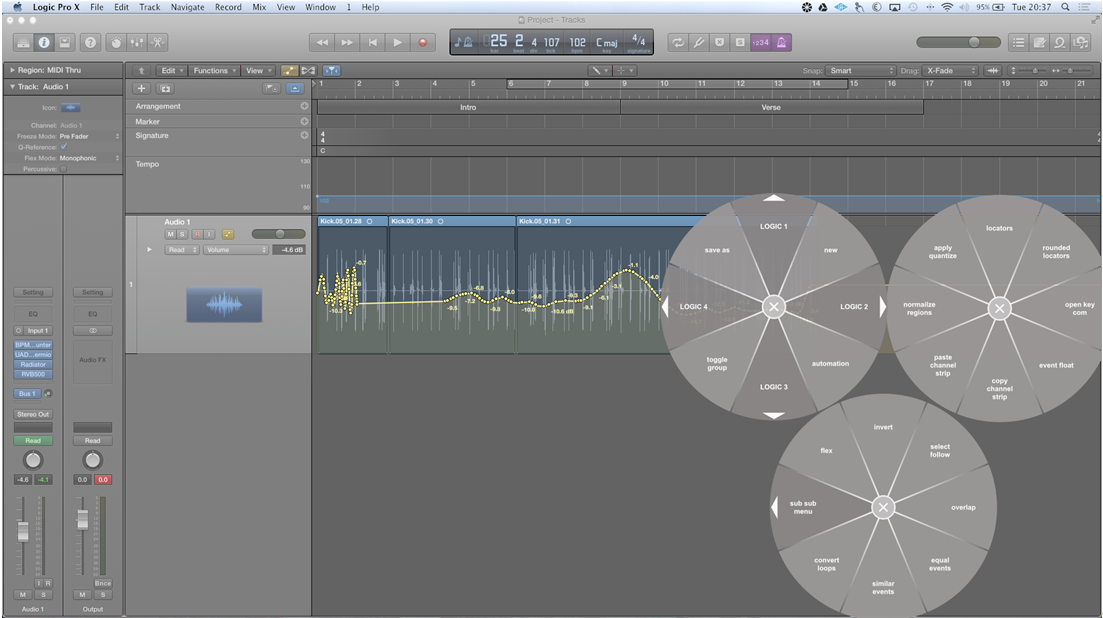
This example shows the tool in use with Logic Pro:
NotesMenus The menu can be relocated by clicking and holding the centre X and moving to the desired location.
To close the menu click on the centre X or, if configured thus, the next click/touch outside of the menu will close the menu.
On Screen Keyboard In testing across different versions of OS X, we've found that the on screen keyboard can't always be invoked if the feature is not set up to be accessible from the OS X Input menu. We think this may just affect OS X 10.6, but we are not 100% sure. It would appear that the on screen keyboard is normally only supposed to be available when the "Show Keyboard & Character Viewer" checkbox is checked in the Keyboard system preferences. (It can also be configured to be available in the "Input sources" section of the Language & Text preference pane.) That'll make it available in the Input menu. Invoking it when it's not normally available results in inconsistent behaviour. If you have trouble using this feature ensure the checkbox in the Keyboard preference pane is checked. ContactFor further information or technical assistance please email the technical support team at technical@touch-base.com.
|
||||||||||||||||||||||||||||||||||||||||||||||||||||||||||||||||||||||||||||||||||||||||||||||||||||||||||||||||||||||||||||||||||||||||||