|
|
|||||||||||||||||||||||||||||||||||||||||||||||||||||||||||||||||||||||||||||||||||||||||||||||||||||||||||||||||||||||||||||||||||||||||||||||||||||||||||||||||||||||||||||||||||||||||||||||||||||||||||||||||||||||||||||||||||||||||||||||||||||||||||||||||||||||||||||||||||||||||||||||||||||||||||||||||||||||||||||||||||||||||||||||||||||||||||||||||||||||||||||
|
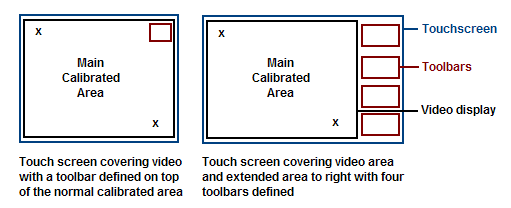
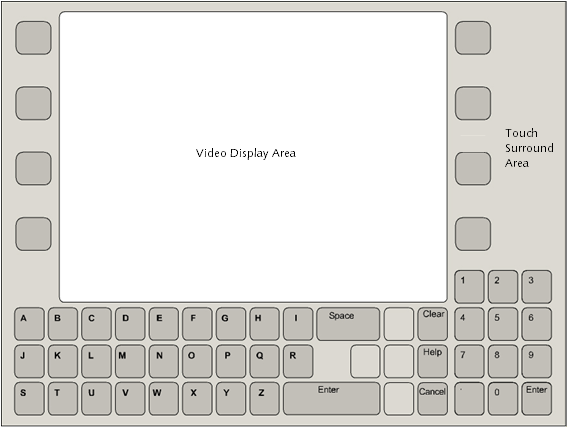
A toolbar is an area on the touch screen that acts independently from the main calibrated video area, as shown below;
Toolbars are utilised in all manner of pointer device type applications. A toolbar is sub divided into cells of equal size which are arranged into a specified number of rows and columns. They can simply be used to mask off areas of the calibrated video area or they can be used to trigger an event. They are particularly useful if a pointer device has both a calibrated, mouse emulation area and a non-mouse emulation area handled by an external application. A toolbar event can be associated with a UPDD Toolbar function or application functions. The cursor does not move from its current position when a toolbar is touched.
Toolbars can be positioned anywhere on a touch screen as suits requirements. Toolbars that reside outside the main touch screen / video display area are normally referred to as the touch surround area. Toolbars that reside within the video display area can also have visual attributes applied to give tactile feedback (Windows only at time of writing) within the cell to cater for an on-screen visual reference.
Toolbars can be calibrated individually or defined such their position is relative to the main video calibration area.
Please note: All toolbar functionality is initially developed in our Windows driver as Windows is our main development and customer base. Not all driver functionality is automatically made available in other supported OS and this is particularly true of toolbar features. This document describes the full toolbar functionality available in under Windows. For other OS the toolbar functionality may be limited or even unavailable. Toolbar DefinitionToolbars can be defined and configured in a number of ways:
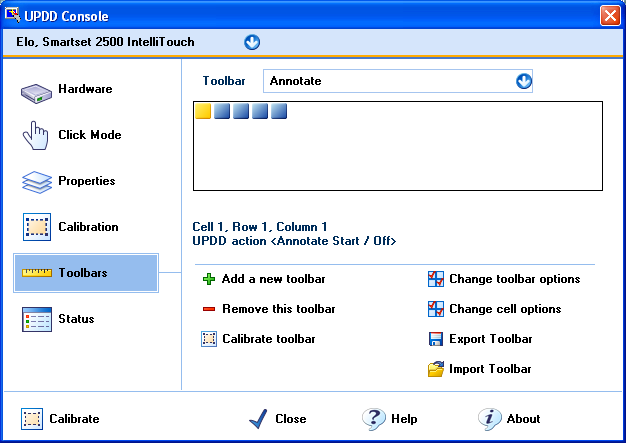
The separate definition methods are described below: UPDD Console, Toolbar option – New creationThe Toolbar dialog is used to define and configure toolbars. If the Toolbar option is not shown on the UPDD Console it can be enabled with the /tbr parameter when invoking the console:
Windows: dcu.exe /tbr Mac OS X 5.x.x: Applications/Utilities/UPDD\ Console.app/Contents/MacOS/dcu /tbr
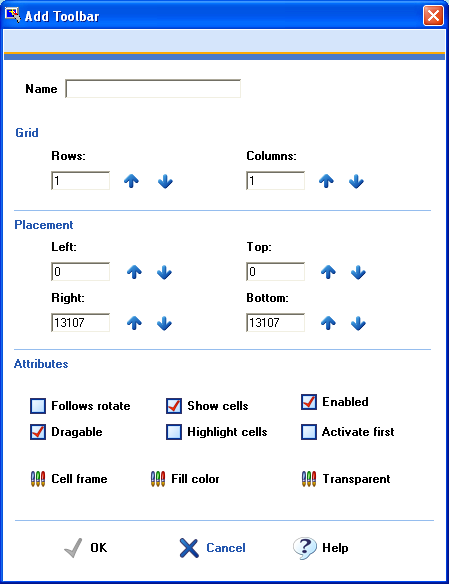
Choose “Add a new toolbar” to create toolbars as required.
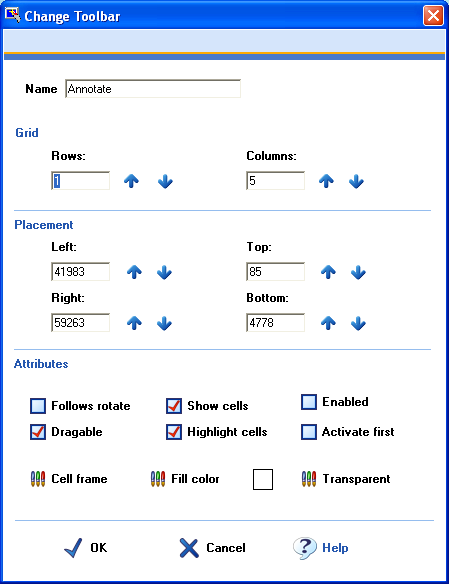
Specify the name and initial attributes. When a toolbar is initially created it automatically invokes toolbar calibration to allow the user to define the initial placement and size of the toolbar. If the calibration is bypassed (hit ESC or timeout) the toolbar is positioned as defined in the placement fields (default is the top left hand corner of the desktop). The default attributes given to the toolbar are Highlight and Drag-able so that its position is seen and it can be dragged to the desired position. UPDD Console, Toolbar option – Import toolbarThe Toolbar dialog is used to define and configure toolbars. Once defined the toolbars can be exported to a toolbar definition file to be imported at a later date. Production Pre-definedToolbars are created in a target system and the toolbar definitions files are supplied to us for inclusion in our software production system such that they are specified in the configuration files delivered as part of the software. Created by external applications using the UPDD APIToolbar API calls are available to create, delete and calibrate toolbars as required. Embedded configurationsFor embedded systems, such as Windows CE and XPe, where all elements of the system are built remotely into an embedded image, the toolbars can are defined in the embedded configuration files. In this environment, UPDD is supplied in embedded component form with preset configuration files and normally the toolbars will be pre-defined in the configuration files.
If the toolbars are not pre-defined in the delivered UPDD configuration files or they need to be updated or others need to be added then they need to be created system using the UPDD Console and then extracted into the UPDD embedded configuration files as described below: Win CEToolbars are supported in UPDD CE version 5.1.0 and above as documented here. Windows XpeCreate the toolbars as required using the toolbar dialog and utilize the tbupdd.ini file in subsequent XP embedded images. CalibrationOnce the toolbars are defined they can be calibrated in a number of ways:
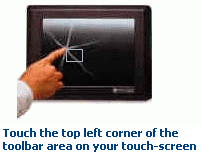
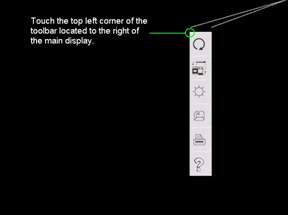
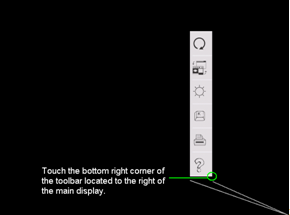
Calibrate via the Toolbar dialogSelect the
The above, default images, are used to request toolbar calibration touches. The toolbar may actually be outside the video area marked by some image under the touch screen. In some cases custom toolbar images may be utilised, as in the example below for a 6 celled toolbar to the right of the video image:
Customed toolbar calibration images are held as toolbar-0.png and toolbar-1.png. Calibrate via Tbcalib programInvoke Tbcalib to calibrate an individual toolbar or all toolbars Tbcalib {Parameters} The calibration program can accept a number of toolbar parameters, as follows:
Bundle={specify GUID} - only calibrate devices in a specific bundle Device=n - only calibrate the specified device and currently selected calibration mode. Toolbar=whatever - only calibrate toolbar whatever TOOLBAR - only calibrate toolbars
Please note parameters are case sensitive and must be defined as shown above.
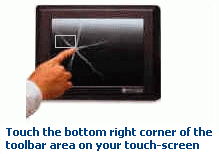
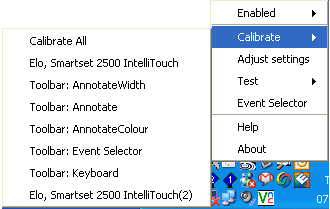
And follow the instructions to touch top left and bottom right corners of the toolbar. Calibrate via the UPDD system tray, calibrate optionThe UPDD System Tray, Calibrate option lists both the desktop calibration styles and toolbars. Select the Toolbar from the list to initiate calibration.
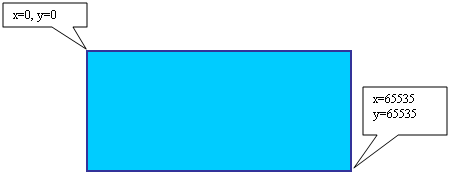
Defined relative to the desktop calibrationUPDD calibrated co-ordinates relate to the virtual video area being 0 to 65535 in both X and Y axis. Given this relationship it is possible to define toolbars relative to this co-ordinate system in fixed locations such that manual calibration is not required This option has been superseded with the ‘Off screen’ option in the toolbar setting dialog. Calculating the toolbar positionIn order to specify the position of a toolbar it is required to calculate the toolbar’s position relative to the desktop. UPDD works with a nominal video co-ordinate system which defines the primary display having a range of 0 – 65535 for x and y with the origin at the top left.
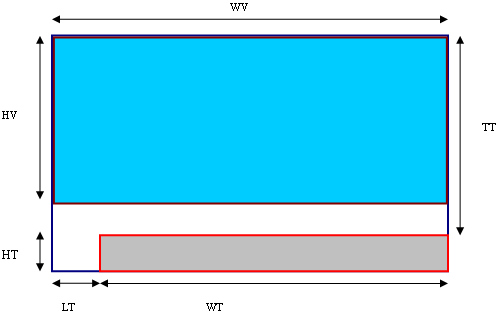
For each toolbar it is required to calculate the left to right and bottom co-ordinates of each toolbar. The following example illustrates how this is done for a toolbar outside the video area.
Firstly take physical measurements of the 6 values illustrated above.
WT=width of toolbar HT=height of toolbar WV=width of video area HV=height of video area TT=top of toolbar LT=left of toolbar
Next calculate left, top, bottom, and right offsets as follows. Left = LT / WV * 65535 Defining the toolbar positionHaving calculated the relative positions you need to associate these values with the toolbar. This can be performed through the UPDD Console, Toolbar dialog, Change Toolbar option or directly editing the configuration files (if you have embedded configuration files with toolbars currently defined)
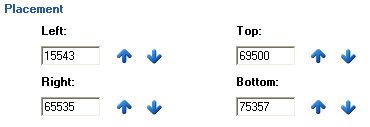
Change toolbar option Select the “Change toolbar options” function in the UPDD console, toolbar dialog and enter the 4 values calculated above: e.g
Negative values are used to define toolbars to the left or top of the video area.
Very important note: Toolbar touch accuracy relies on the main video area being accurately calibrated. The calibrated video area represents the virtual desktop of 65535 X and Y and all toolbars are relative to this calibrated area.
Embedded Configuration files
On a Windows desktop system, select the “Change toolbar options” function in the UPDD console, toolbar dialog and enter the 4 values calculated above and use the tbupdd.ini file in subsequent image creations. Toolbar Console dialogThe Toolbar dialog is used to create, configure and save Toolbar definitions and associate actions to the toolbar cells:
Toolbar SettingsToolbar options are defined in the Change Toolbar dialog.
Toolbar Cell ActionsToolbars cells can be associated with UPDD Toolbar functions or are useful for providing control input to an application program using the TBApiRegisterDataCallback API. UPDD Toolbar functionsThese functions, which are tailored to individual operating systems (Window, Mac OS X, Linux, CE), can be used to invoke UPDD utilities (such us on-screen annotation), generate virtual keys, invoke applications, to playback macros (recorded keystrokes and mouse usage), to rotate the display area, to display on-screen keyboards etc.
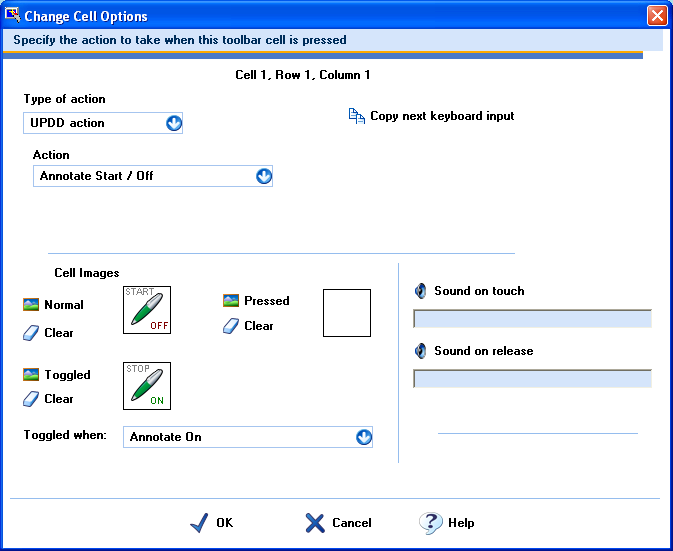
Selecting the UPDD Console, Toolbar dialog, Change Cell options invokes a dialog to configure the toolbar cell. Depending on the operating system in use the dialog and available functions will differ. The dialog and available functions for each OS is discussed below: Windows desktopUnder Windows the following cell dialog is used to define cell actions and settings:
The various settings are described below:
These settings are used to associate an action with the cell when it is selected.
The Copy next keyboard input option can be selected at any time such that the next keyboard input will be used to set up the desired ASCII or Virtual key, depending on the key sequence entered. Note that due to the odd dual mode behavior of the Windows modifier key the “copy next” option does not work with for this key.
Cell Images A toolbar cell can contain an image. Any colour defined in the image with an RGB of 254 will be deemed transparent when displayed on the desktop. Toolbar images are displayed ‘on top’ so that no other applications (even ‘on top’ applications) can cover the toolbar images.
Some images are shipped with the UPDD software. As an example of toolbar cell images, the following are used in the UPDD Annotate application which uses toolbar cells to invoke drawing, pause and erase functions. The mouse images are used in the Event Selector toolbar cell and the button is an example of a button image:
Cell Sound Defines the sounds, if any, that are associated to the cell press or release.
Example This example is shown in the Change Cell Option dialog image at the beginning of this section.
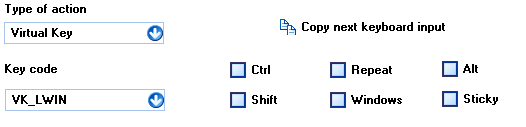
Create a 1 cell toolbar called Start. Select Change cell option and define the type of action as ‘Virtual Key’ and select the Key code ‘VK_LWIN’ and select OK. Now press the toolbar and see the Windows start menu appear. Mac OS XUnder Mac OS X the following cell dialog is used to define cell actions and settings: |
|||||||||||||||||||||||||||||||||||||||||||||||||||||||||||||||||||||||||||||||||||||||||||||||||||||||||||||||||||||||||||||||||||||||||||||||||||||||||||||||||||||||||||||||||||||||||||||||||||||||||||||||||||||||||||||||||||||||||||||||||||||||||||||||||||||||||||||||||||||||||||||||||||||||||||||||||||||||||||||||||||||||||||||||||||||||||||||||||||||||||||||

|
Type of Action |
Description |
|
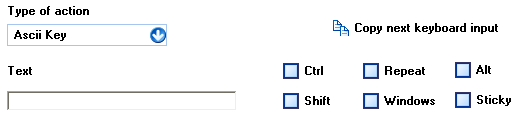
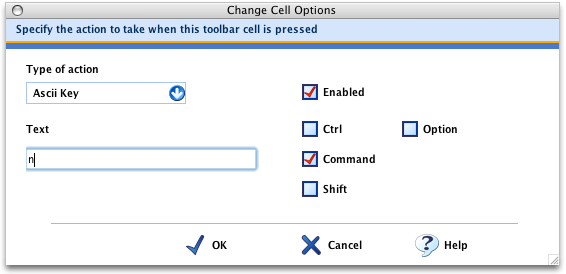
Ascii Key |
Generate an ASCII key(s). Enter the text that you want to be output when the toolbar cell is touched into the "Text" textbox. Controls keys Ctrl, Shift Command and Option can be set as required. For example this could be used to generate CTRL-C. The command option is a MAC “modifier” key - command + <any ascii character> will do whatever normally happens when the command key on the keyboard and the specified ascii key is pressed. E.g. if Finder is the active application then command + n will create a new finder window.
|
|
None |
No action defined. |
|
Virtual Key |
Generate a virtual key. |
Enabled - When checked indicates the cell is active.
Linux
To follow as no cell actions are currently available for the Linux environment.
Testing Toolbars
Once a toolbar is defined you should see no cursor movement when touching within a toolbar.
Under Windows you can also enable cell highlighting to see that the toolbar cell is reacting or define a simple action, say Virtual Key VK_LWIN to see the Windows start bar invoked when touching the cell.
Also under Windows you can run up the Draw and Test utility to view the cell information being passed thro’ the driver to receiving applications
Application functions
When a cell is touched this is reported to any application program that has registered an interest using the TBApiRegisterDataCallback function with the _ReadDataTypeToolbar or _ReadDataTypeToolbarEX (UPDD 5.1.0) option:
#define _ReadDataTypeToolbar 0x0010 // toolbar events
TBApiRegisterDataCallback(hd,0,_ReadDataTypeToolbar,CBFunc);
Function CBfunc will be called when a toolbar is touched.
void TBAPI CBFunc(unsigned long context, _PointerData* data)
or with UPDD 5.1.0 and above
The new option ReadDataTypeToolbarEX returns more
information, such as stylus id, touching / non-touching status, L/R info
allowing a client application to interacted in particular with multi-touch
events in a toolbar.
#define _ReadDataTypeToolbarEX 0x200000 // toolbar events extended info
TBApiRegisterDataCallback(hd,0,_ReadDataTypeToolbarEX,CBFunc);
Function CBfunc will be called when a toolbar is touched.
void TBAPI CBFunc(unsigned long context, _PointerData* data)
Integrating the toolbar settings
In order to replicate the toolbar settings on a Windows desktop system (e.g. Windows XP) use the UPDD Console, Status, Dump settings option to create a clone file and integrate this with your distributed installer as described in the Installation Notes document, Installation Options.
For Win CE and XPe see Embedded configuration section above.
Toolbar examples
A number of toolbar examples have been created to show toolbar usage as described below. Click on the link to see the examples in greater detail:
|
Application |
Description |
Download/Import |
|
Touch screen used in petrol pump with touch surround toolbars |
|
|
|
A general purpose monitor offering touch surround toolbars |
|
|
|
Annotate live on top of active Window desktop |
||
|
UPDD event selector in toolbar form - installed by UPDD >>>>>> |
Event Selector.ini |
|
|
Presentation tool |
Use the download option to download and save the embedded .ini file(s) and content to the updd\toolbar folder. The toolbar(s) can then be imported as required.
Touch petrol pump
In this project 4 toolbars were used to cater for the layout:
|
Toolbar |
Row |
Column |
|
|
|
|
|
Left |
7 |
1 |
|
Right |
7 |
1 |
|
Alpha |
3 |
13 |
|
Numpad |
4 |
3 |
An external application registered with the UPDD driver to be notified when toolbars were touched and act accordingly.
Example toolbar CE code is available as described in the UPDD Source Code examples document.
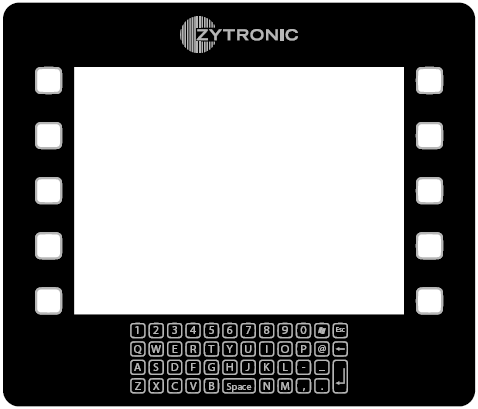
Generic touch monitor from Zytronic
Zytronic created a touch surround touch solution for general use utilising 3 toolbars as shown:
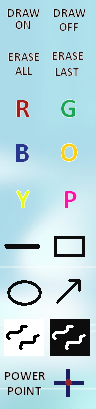
UPDD Annotate
Built into the UPDD Windows Daemon task are functions to perform desktop annotation on top of a live Windows desktop. UPDD cell actions are available to control UPDD Annotate settings and a Annotate toolbar has been created as a touch user interface to the annotate functions:
UPDD Annotate functionality was implemented some years ago as part of a television presentation project utilizing a very large touch system. The presenter had the same toolbar on the left and right side of the touch device such that annotation could be enabled, disabled, erased and paused. The toolbars did not use any visual feedback so were invisible to the viewers and presenter. However, the presenter knew where to touch to invoke the desired functionality!
In this example, the Annotate toolbar uses 5 cells to control annotation, as shown below.
|
|
Action: Assigned action is Annotate Start / Off. Different images are shown when Annotate is off / on. The Annotate on image is associated with the internal UPDD state setting Annotate = on. When Annotate is on drawing can be made on top of the active Windows desktop |
|
Action: Assigned action is Annotate Pause / Start. Different images are shown when Annotate is on/off or paused. The Annotate paused image is associated with the internal UPDD state setting Annotate = paused. When Annotate is paused, previous drawing remains on screen but the touch screen reverts back to normal operation. |
|
|
Action: Assigned action is Annotate Erase. Erases all current drawing.
|
|
|
Action: Assigned action is Toolbar on /off. Enables a AnnotateColour toolbar to change the current annotation pen colour.
|
|
|
Action: Assigned action is Toolbar on /off. Enables a AnnotateWidth toolbar to change the current annotation pen width.
|

Download the annotate toolbars from the download table above.
UPDD Event Selector
An Event Selector facility is supplied with UPDD to switch events associated with a device. Common usage is switch between the generation of left and right mouse emulation, as shown below:
|
Primary |
This toolbar implements the Event Selector functionality via a toolbar. The Event Selector is used to switch between the UPDD primary and secondary mouse click emulation modes and is normally used to switch between Left and right click generation.
The toolbar has a single cell with an action of Event Selector which effectively toggles between Primary and Secondary (alternative) modes. An internal state setting indicates to the driver if the Alt state is active or inactive.
Two images (with transparent background) are employed, one to indicate when the Primary click mode (alt state = inactive) is to be triggered and one to indicate when the Secondary click mode (alt state = active) is to be triggered, hence the toggled image is associated with the internal UPDD state ‘Alt state active’. Given that the two states are normally associated with click modes that invoke left and right clicks then appropriate images are used. Given the transparency of the images the desktop can be seen through the ‘transparent’ background.
|
|
|
|
|
Secondary (Alt) |
|
|
|


ZoomIt presentation tool
A very neat presentation tool call ZoomIt is available from system internals on the web. The ZoomIt functionality is normally triggered via keyboard and mouse strokes. This toolbar is used to generate the ZoomIt triggers via a touch screen where the utility is used on a large touch screen monitor or whiteboard:
|
Keystroke triggers |
Toolbar cell triggers |
Description |
|
|
|
This example shows how to take a keyboard driven utility and convert it to touch via cell actions.
Each of the cells shown ‘generates’ the same keyboard action as described in the ZoomIt draw instructions as shown.
The use of transparent background colours on the images means that most of the desktop under the toolbar is seen by the user.
The use of this toolbar has turned a very useful presentation utility to one that can be controlled via touch and shows the potential of toolbar utilization in the touch environment.
The two bottom cells have been configured to invoke PowerPoint and touch screen calibration. The PowerPoint command invoked when the cell is touched can be amended to invoke the desired presentation. |

Note: The zoom (magnify) option of ZoomIt cannot readily be used on a touch screen or whiteboard as calibration is inaccurate once the desktop is zoomed. We hope to update our driver at some future date to be able to cater for zoomed desktops such that calibration is automatically adjusted to compensate for the zoomed state.
Download the ZoomIt toolbar from the download table above.
Contact
For further information or technical assistance please email the technical support team at technical@touch-base.com