![]()
![]()

Important note: These instructions specifically refer to embedding UPDD supplied in component form into an XPe image. Since Sept 2011 it is our recommendation that the UPDD driver be installed during first boot and before locking down the image and we have documented this approach in a new embedded document here.
Software Delivery
In this environment UPDD will be supplied as a number of separate components. Software sent via email will be held in the file upddxpe.zip to avoid the rejection by many mail servers of .exe files. Touch-Base utilizes virus detection software on all of our systems but recipients of the software should pass the files thought their own virus checking software before proceeding with installation.
Overview
Windows XP Embedded referred to as XPe in this document, is an embedded operating system. Embedded operating systems are built from various components and then ‘embedded’ on the target hardware. This document describes how to add UPDD to an embedded image. These instructions assume that the user has previously installed Windows XPe Target Designer, and is familiar with using this tool to create Windows XPe images, and installing the resulting image on a target system.
With conventional Windows systems, such as 98 and 2000, software is installed via a setup procedure or via the plug and play manager that requests the various device driver files to be made available at the time the device is connected to the system. In a plug and play situation a control file (.INF) informs the system of the files to be installed and where they are to be placed along with details of registry entries.
In embedded environments similar component control files are employed and in the case of XPe this file is known as a Component Object Definition file and is held with a .SLD suffix.
Important notes
· If UPDD is installed on an XPe system using the standard setup.exe file, typically to test the driver prior to embedding, UPDD installation has certain dependencies that need to be present for successful installation. One of the less obvious dependencies is the use of RegEdit during install to set up the registry. If RegEdit is not present all selections and dropdowns are blank.
· If installing setup.exe on a XPe thin client system ensure virtual disk settings allow for sufficient space to install additional components. Typically if install issues any error between 31% and 38% progress this is due to failing copies.
· We created the SLD file as an ASCII text file and in our English XPe build environment the file was accepted without error. However, one customer using a German build environment reported that the import of the SLD file gave an error along the lines of "A change between current and specified coding is not supported". If you encounter a similar error you need to convert the ASCII format .SLD file to a UNICODE format. The easiest way to achieve this is to open the SLD file in Notepad on a system having the same default language as the target and change the line <?xml version="1.0" encoding="UTF-8"?> to read <?xml version="1.0" encoding="UTF-16"?> and then use the save as option to save the file as Unicode (select "Unicode" as the encoding option on the Save As dialog). You can now import the amended file. Once we fully understand why this error occurs we may change our system to distribute UNICODE format SLD files in the future.
· Some of the registry entries in the .SLD file use fixed pathnames to c:\program files\updd. If the software is installed in a different folder or hard disk location you will need to cater for this by changing the .SLD file prior to importing or editing the Registry Key data in the Component Designer after import. For UPDD 4.1.x only any references in the included tbupdd.ini file must also be updated.
· Dependency – The main UPDD 4.0.x modules have the following dependencies (bold = updd components):
|
TBUPDDWD (Driver) |
TBdaemon (System tray) |
TBcalib.exe (Calibration) |
Dcu.exe (UPDD Console) |
|
BOOTVID.DLL |
ADVAPI32.DLL |
ADVAPI32.DLL |
ADVAPI32.DLL |
|
HAL.DLL |
GDI32.DLL |
GDI32.DLL |
DCU.EXE |
|
NTOSKRNL.EXE |
HBUTTON.DLL |
IMM32.DLL |
GDI32.DLL |
|
USBD.SYS |
IMM32.DLL |
KERNEL32.DLL |
HBUTTON.DLL |
|
WMILIB.SYS |
KERNEL32.DLL |
MSVCRT.DLL |
IMM32.DLL |
|
|
MSVCRT.DLL |
NTDLL.DLL |
KERNEL32.DLL |
|
|
NTDLL.DLL |
OLE32.DLL |
MSVCRT.DLL |
|
|
OLE32.DLL |
QT-MT336.DLL |
NTDLL.DLL |
|
|
QT-MT336.DLL |
RPCRT4.DLL |
OLE32.DLL |
|
|
RPCRT4.DLL |
SHELL32.DLL |
QT-MT336.DLL |
|
|
SHELL32.DLL |
SHLWAPI.DLL |
RPCRT4.DLL |
|
|
SHLWAPI.DLL |
TBCALIB.EXE |
SHELL32.DLL |
|
|
TBDAEMON.EXE |
USER32.DLL |
SHLWAPI.DLL |
|
|
USER32.DLL |
WINSPOOL.DRV |
USER32.DLL |
|
|
WINSPOOL.DRV |
|
WINSPOOL.DRV |
|
|
|
|
|
· Dependency – The main UPDD 4.1.x modules have the following dependencies:
|
TBUPDDSU |
TBdaemon |
TBcalib.exe |
Dcu.exe |
Tbupddwu.exe |
|
(Driver) |
(System Tray) |
(Calibration) |
(UPDD Console) |
(Driver Daemon) |
|
BOOTVID.DLL |
ACE.DLL |
ACE.DLL |
ACE.DLL |
ACE.DLL |
|
HAL.DLL |
ADVAPI32.DLL |
ADVAPI32.DLL |
ADVAPI32.DLL |
ADVAPI32.DLL |
|
KDCOM.DLL |
GDI32.DLL |
GDI32.DLL |
GDI32.DLL |
CREDUI.DLL |
|
NTOSKRNL.EXE |
HBUTTON.DLL |
IMM32.DLL |
HBUTTON.DLL |
CRYPT32.DLL |
|
USBD.SYS |
IMM32.DLL |
KERNEL32.DLL |
IMM32.DLL |
GDI32.DLL |
|
WMILIB.SYS |
KERNEL32.DLL |
MSVCP60.DLL |
KERNEL32.DLL |
KERNEL32.DLL |
|
|
MSVCP60.DLL |
MSVCRT.DLL |
MSVCP60.DLL |
MSASN1.DLL |
|
|
MSVCRT.DLL |
MSWSOCK.DLL |
MSVCRT.DLL |
MSVCP60.DLL |
|
|
NTDLL.DLL |
NETAPI.DLL |
MSWSOCK.DLL |
MSVCRT.DLL |
|
|
OLE32.DLL |
NTDLL.DLL |
NETAPI.DLL |
MSWSOCK.DLL |
|
|
QT-MT336.DLL |
OLE32.DLL |
NTDLL.DLL |
NETAPI32.DLL |
|
|
RPCRT4.DLL |
QT-MT336.DLL |
OLE32.DLL |
NEWDEV.DLL |
|
|
SECUR32.DLL |
RPCRT4.DLL |
QT-MT336.DLL |
NTDLL.DLL |
|
|
SHELL32.DLL |
SECUR32.DLL |
RPCRT4.DLL |
OLE32.DLL |
|
|
SHLWAPI.DLL |
SHELL32.DLL |
SECUR32.DLL |
OLEAUT32.DLL |
|
|
STLPORT_VC645.DLL |
SHLWAPI.DLL |
SHELL32.DLL |
RPCRT4.DLL |
|
|
USER32.DLL |
STLPORT_VC645.DLL |
SHLWAPI.DLL |
SECUR32.DLL |
|
|
WINSPOOL.DRV |
USER32.DLL |
STLPORT_VC645.DLL |
SETUPAPI.DLL |
|
|
WS32HELP.DLL |
WINSPOOL.DRV |
USER32.DLL |
SHELL32.DLL |
|
|
WS2_32.DLL |
WS32HELP.DLL |
WINSPOOL.DRV |
SHLWAPI.DLL |
|
|
|
WS2_32.DLL |
WS32HELP.DLL |
STLPORT_VC645.DLL |
|
|
|
|
W2_32.DLL |
USER32.DLL |
|
|
|
|
|
WININET.DLL |
|
|
|
|
|
WS2HELP.DLL |
|
|
|
|
|
WS2_32.DLL |
· The default driver settings defined in the .SLD (4.0.x) / tbupdd.ini (4.1.x) file reflect the standard setting we have for the controller in our production system. In a normal Windows environment these setting can be changed after installation and saved. In an XPe environment it may be required to change these entries in the appropriate file prior to import. E.g. For a serial controller we may default the com port to be Com1 whereas it is actually plugged in to a different com port. We trust the registry entries are self-explanatory but further explanation is available in the UPDD SDK documentation.
· If the location of the UPDD components is not installed in "c:\program files\updd", the registry entries and tbupdd.ini (4.1.x) file entries will not find the executables for embedding. If this is the case, open up the .sld file in Component Designer and open up the tree view to "Components\Universal Pointer Device Driver\Registry Data" and scroll to the bottom. There will be a few references to "c:\program files\updd" which should be modified to point to the correct location of UPDD. Any references in "c:\program files\updd" in the tbupdd.ini (4.1.x) file should also be updated.
·
For PS/2 devices it is important that the image does not include a PS/2
mouse driver. Further, the controller’s PnP id as defined in UPDD’s INF file
(UPDDV3MO.INF) must match the PnP id of the PS/2 port.
e.g
[CONTROLLERS]
%UPDDNAME%=UPDD,*UPDDPNP
"Semtech, ScreenCoder, PS/2 (UPDD)"=UPDDn,*PNP0F13 <- this
entry may need changing if the PS/2 port is registering a different port, say
PNP0F03.
·
After creation of the XPe image it should be deployed and executed on
test hardware. During the first execution of the image the First Boot Agent
(FBA) will be started and will configure various system components. After
the FBA has completed and the UPDD driver is working as expected and the
machine has restarted, the resulting configured image should be deployed on the
target hardware. For more advanced image cloning and deployment methods see the
MSDN web page Configuring
System Cloning
If
using UPDD 4.0.x, in some circumstances we have found that the touch does not
work after the FBA has run and it may be necessary to reload the driver or
select ‘Redetect PnP device’ in the DCU to complete the UPDD registry settings.
If using UPDD 4.1.x, if a serial controller is being
used then it should be configured after the FBA but before the system is
cloned. The serial driver should first be installed by executing the following
command on the machine:
CD c:\program files\UPDD
rundll32.exe NonPnpIns.dll,?InstallNonPnpDevice@@YAXXZ
It should be possible to run ‘rundll32.exe “C:\Program Files\UPDD\NonPnpIns.dll”,?InstallNonPnpDevice@@YAXXZ’ but this does not always invoke the serial service so it is best executed when the UPDD folder is the current directory as above.
After this command has been executed, open the UPDD Console and add a serial device by clicking the “Add a New Device” button on the Devices tab
Build Process
Minor changes were made to the UPDD driver version 3.8.26 to cater for XPe so this version or greater should be used.
The following steps should be followed to add the UPDD driver into an XPe system:
Step 1
- Unzip "upddxpe.zip" to a temporary directory
- If this is the first time that UPDD XPe has been used on the target system then go to step 2 otherwise go to step 3
Step 2
- Open Component Database Manager
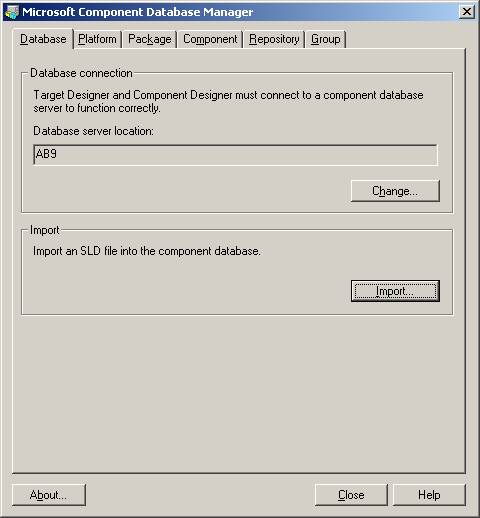
Figure 1 – Component Database Manager
- Click on "Import"
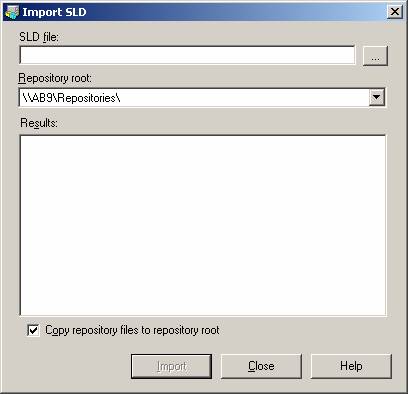
Figure 2 – Import SLD dialog
- Select "updd.sld" as the SLD file
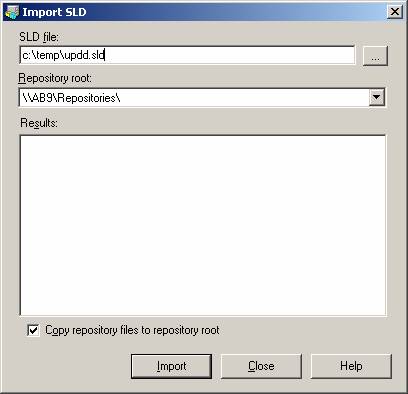
Figure 3 – Enter a filename
- Click on "Import"
- Go to step 4
Step 3
- Open "updd.sld" using Component Designer
- Expand the tree view on the left until "Universal Pointer Device Driver" is visible
- Click on "Universal Pointer Device Driver"
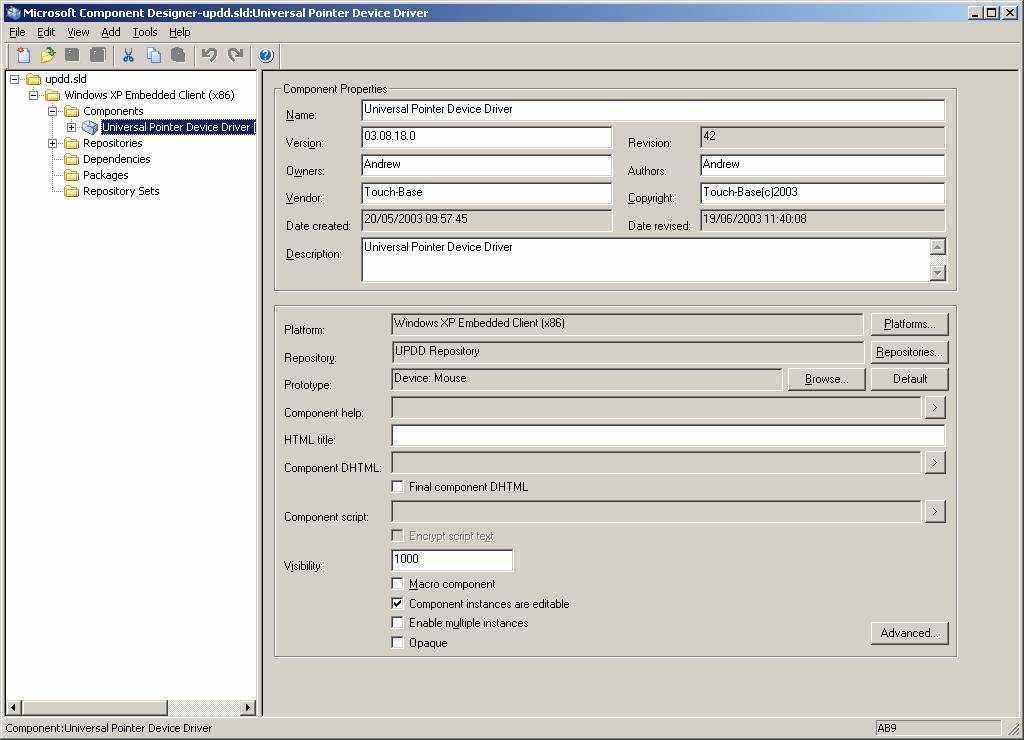
Figure 4 – Selecting “Universal Pointer Device Driver” in Component Designer
· Click "Edit", "Set to Latest Revision"
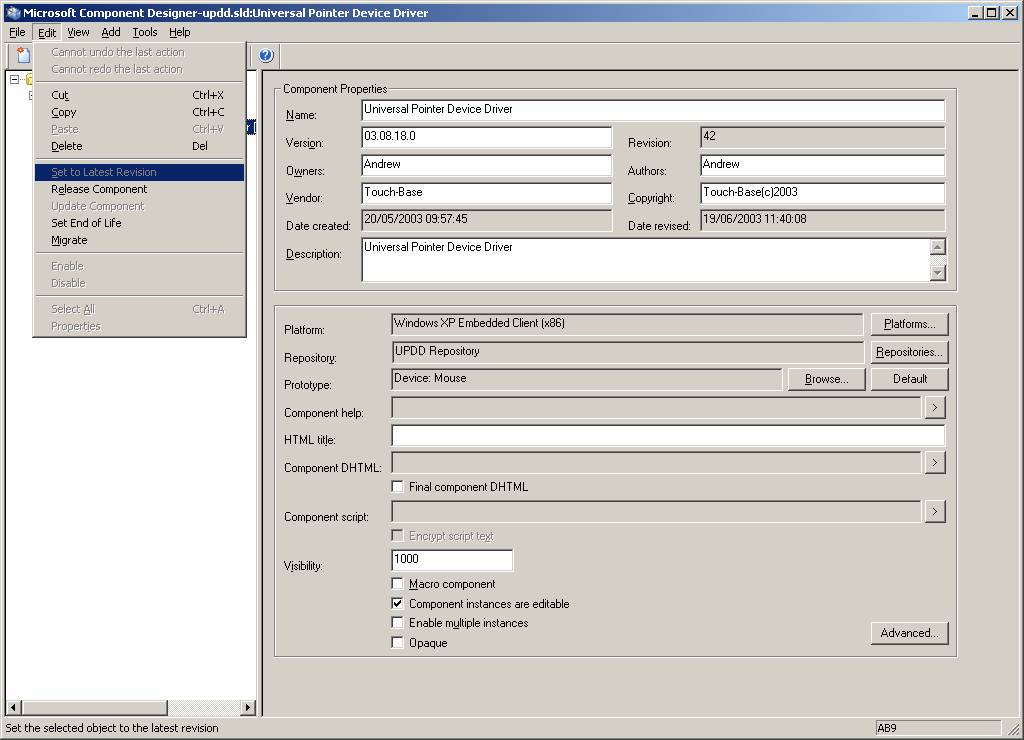
Figure 5 – Upgrading the driver to the latest revision
- Save and quit
- Go to step 2
Step 4
- Open your XPe project in Target Designer
- If you have not previously installed UPDD XPe then Drag "Universal Pointer Device Driver" from the Component Browser to your project.
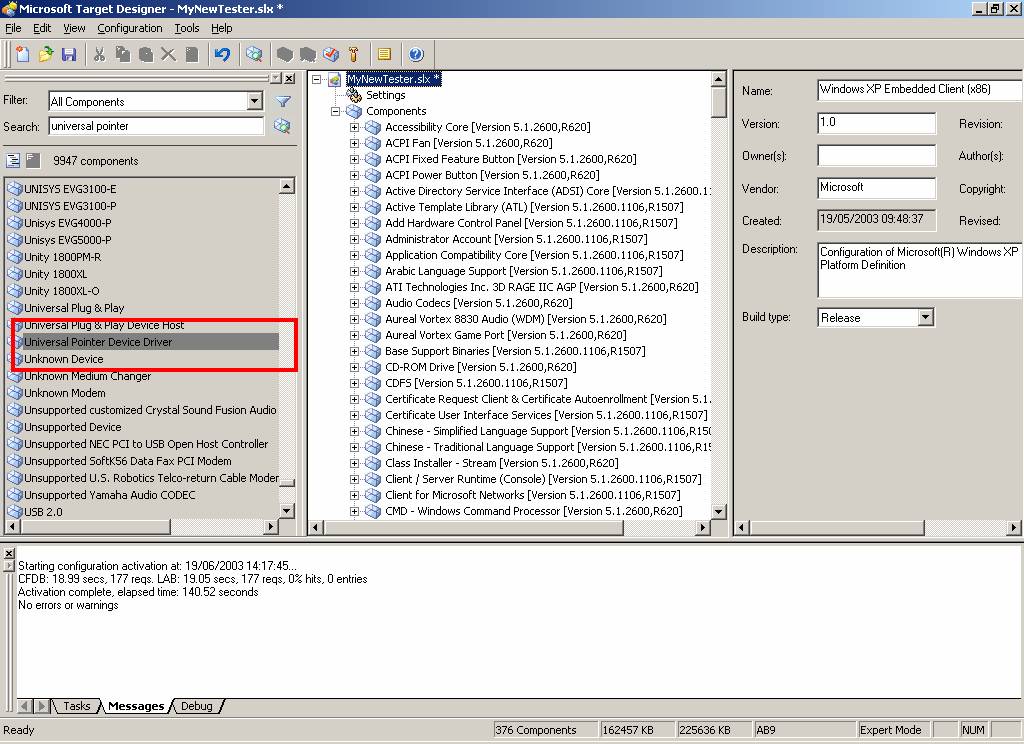
Figure 6 – The UPDD entry in the Component Browser
- If you have previously installed UPDD XPe the click the "Configuration" menu and select "Upgrade Configuration" and reply "Yes" to the prompt.
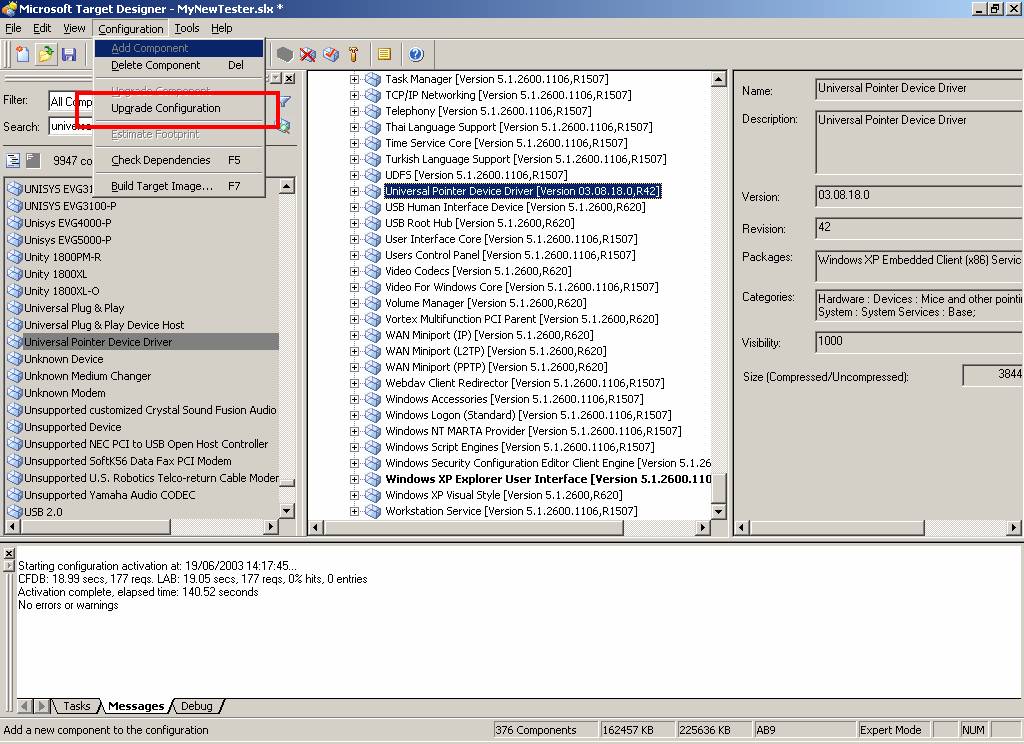
Figure 7 – Upgrading the platform configuration in Target Designer
- Click the "Configuration" menu and select "Check Dependencies"
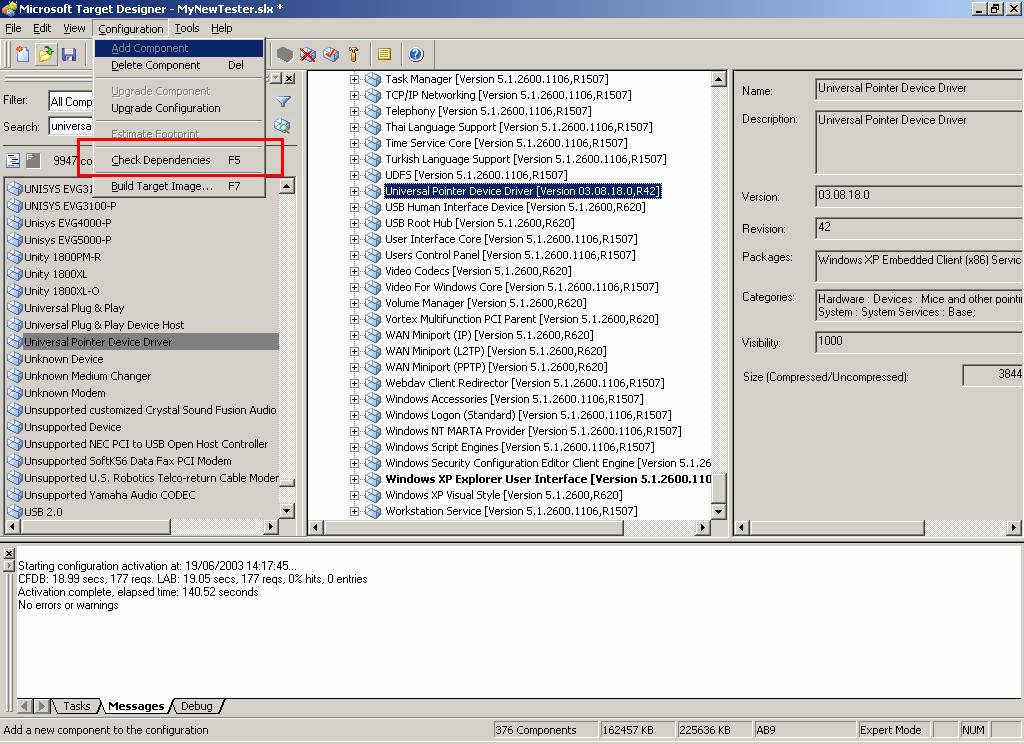
Figure 8 – Checking inter-component dependencies in Target Designer
- If all dependencies are present go to step 5
- UPDD SLD file defines all the dependencies that are required by UPDD so these should be loaded automatically and therefore UPDD should, in theory, not be listed as missing any dependencies. If the dependency check does fail a "manual resolve task" will be added to Target Designers task list
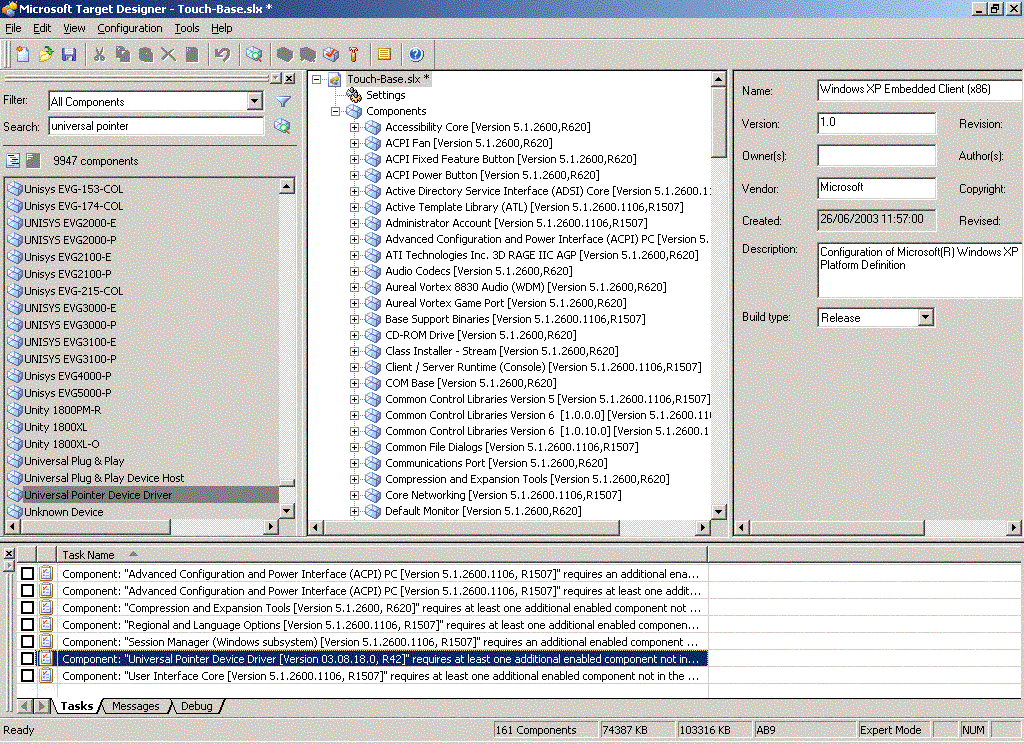
Figure 9 - Manual dependency resolve needed
- If UPDD is in the task list, then double click on the entry to bring up the Resolve Dependency dialog, used to identify missing dependencies.
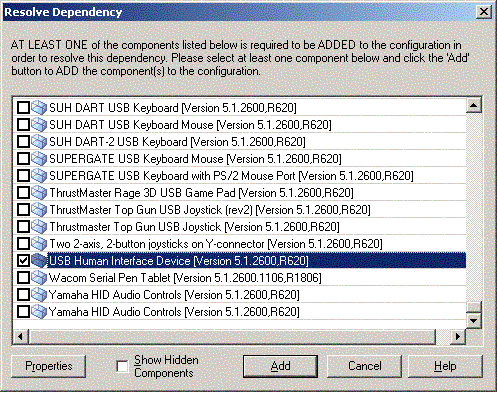
Figure 10 - Adding "USB Human Interface Device" as a dependency
The above missing dependency is shown as an example only as the USB HID item is now automatically loaded as a UPDD dependency
Step 5
- Click the "Configuration" menu and select "Build Target Image" and then click "Build"
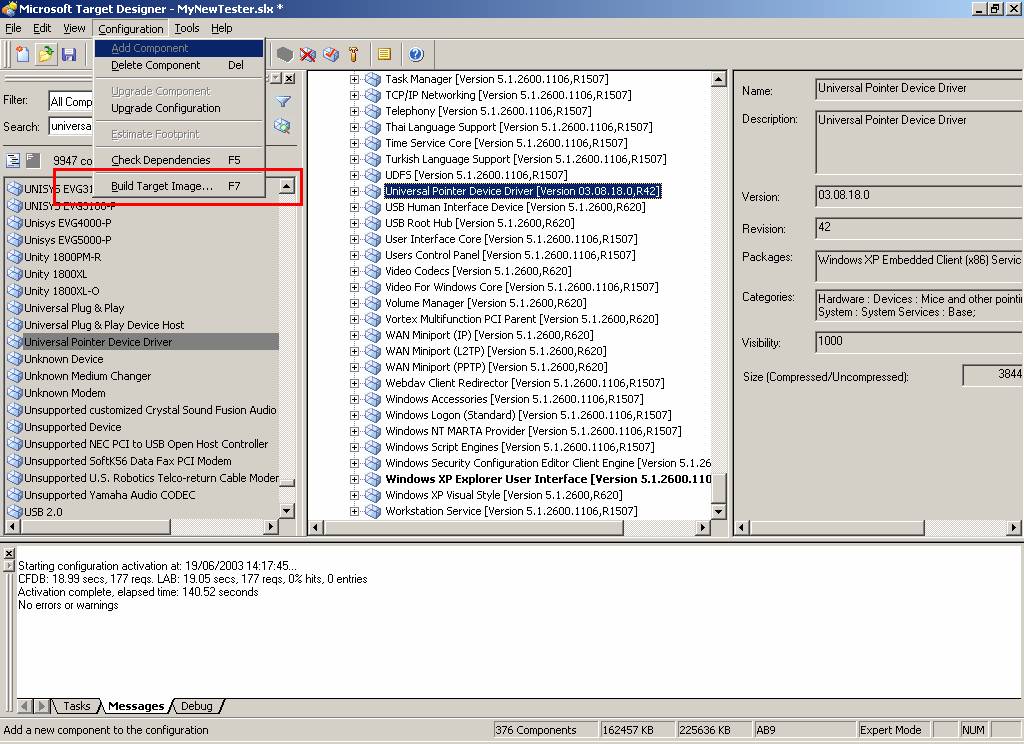
Figure 11 – Building the final platform image in Target Designer
Control Panel Entry
To place an entry in the System Control Panel the file tbctlpnl.cpl must be placed in <windows>\system32 and the file dcu.exe must be placed in the UPDD folder. The "UPDD Folder" entry needs to be set in the UPDD registry settings - but this should already have the correct value.
Minimal builds
When creating an XPe image the integrator has a great deal of flexibility to tailor the finished image through the inclusion and exclusion of various system components. We cannot therefore provide comprehensive advice for every possible scenario, it is assumed that anyone attempting to produce an unusual or non-standard image will have sufficient knowledge of the XPe tool set and be able to resolve any missing dependencies. In the cause of difficulty please consult the XPe builder documentation.
UPDD
The UPDD package supplied for use
with XP/e installs the complete UPDD package as it would be installed on a
standard Windows desktop system. If an integrator wishes to install a minimal
UPDD system which allows touch and calibration functions but otherwise operates
with default settings please follow the follow these instructions.
Use the installation instructions above, but edit the SLD file to contain only
the following modules:
tbcalib.exe
tbdaemon.exe
nonpnpins.dll
upddv3mo.inf
norma*.bmp - UPDD 4.0.x
tbupddwd.sys – UPDD 4.0.x
tbvkeymp.sys – UPDD 4.0.x
tbupddsu.sys – UPDD 4.1.x
tbupddwu.exe – UPDD 4.1.x
menuv4.txt
ace.dll – UPDD 4.1.x
qt-mt336.dll – UPDD 4.1.x
stlport_vc645.dll – UPDD 4.1.x
tbinf.dll – UPDD 4.1.x
tbupdd.ini – UPDD 4.1.x
Also edit the menu4.txt file leaving only the entry for tbcalib.exe
XPe
In order to build a minimal XPe image that will support
UPDD, create an XPe image with the following components
1) Your *.pmq file
2) WinLogon template
3) Add Hardware Control Panel (This
component adds 299kb to the size of the image)
Once these components are added then the standard XPe installation instructions
should be followed.
Additional XPe Information
Reference the Microsoft Windows embedded web site at http://www.microsoft.com/windows/embedded/xp/default.asp for more information.
Contact
For further UPDD technical information please contact technical@touch-base.com.