Instructions for manually installing UPDD 5.1.x under Linux
Sept 2015
UPDD Version 5.1.1430 and above
Standard Manual Installation
These instructions are not distribution-specific and locations of directories or files often differ between variants; for this reason use of the automated setup program is strongly recommended and manual installers should anticipate the need to adjust these instructions to account for these differences.
Several instructions will require root access so failed commands may require use of sudo.
With version 5.1 the architecture of the UPDD linux driver is significantly simplified compared to previous versions and this updated document supersedes all previous documents related to manual installation of the driver.
This document is organised into two main sections. The basic steps section is written as a quick start guide to allow an expert user to quickly deploy the UPDD driver via a manual installation. The remainder of the document expands on the basic steps giving further information and hints.
Basic steps
The basic steps to install the driver are as follows:
· Create a folder /opt/tbupddlx
· Extract the supplied tgz file to the folder /opt/tbupddlx (note that ./opt/tbupddlx is included in the archived paths so you should either extract to the root folder, or move the contents of ./opt/tbupddlx to /opt/tbupddlx recursively and retaining permissons.
· Add a valid checksum value to the settings file with the command: /opt/tbupddlx/upddenv tbutils fixini
· Execute /opt/tbupddlx/startupdd as root
This is all that is required to start the driver (tbupddwu).
At this stage you can start the UPDD console with the command /opt/tbupddlx/upddconsole to adjust setting.
There are a few other steps you might need or wish to take depending on your configuration and requirements.
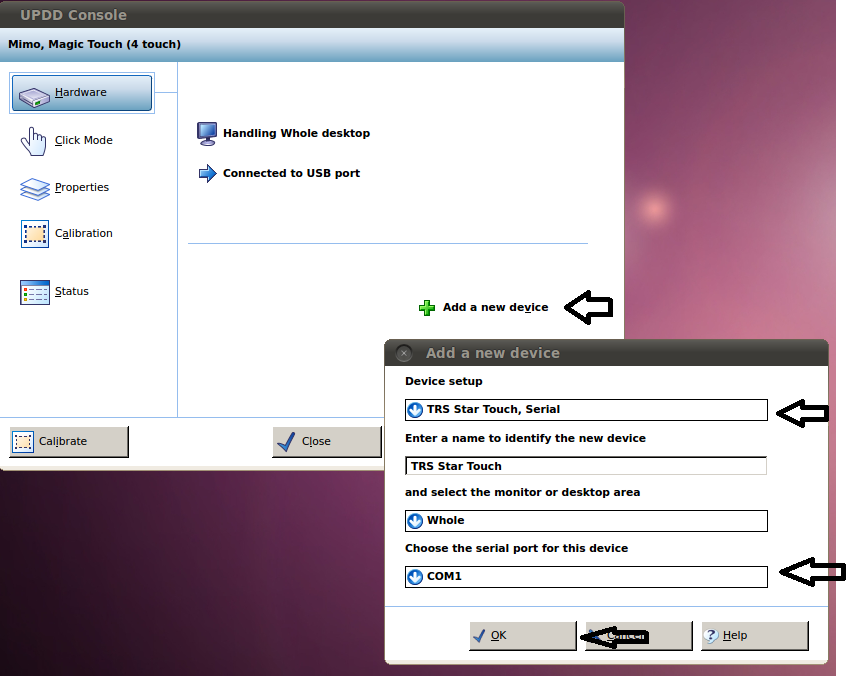
If using a serial (RS232) connected device you will need to add this manually using the add device option in the console.
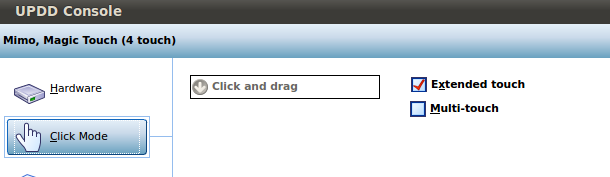
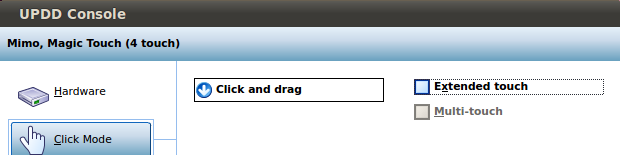
You might need to switch between using a virtual input device and an X interface to implement touch. Which to use depends on the capabilities of your target system and you exact requirements, the details of these interfaces are documented here. Select “extended touch” mode to use the virtual input device. If you are using the X interface (“extended touch” off) you will need to grant permission for the driver to use the X session. You can do this manually for example by entering the command
xhost SI:localuser:root
in a terminal window. If you run the driver’s background process (aidaemon – features describe in link) this permission is set automatically. To utilise certain extended features of the driver you will need to run aidaemon.
It is likely you will want to implement some form of autostart for the driver (and aidaemon if used) when your system starts.
Detailed Instructions
Extracting the software
The software will be delivered in a tgz package with a name like linuxupdd_05_01_1391_64.tgz. Copy this to your target system and execute the following commands

Adding a serial device
This step is only needed if using a serial (RS232) connected device.
USB devices are detected automatically
First start the updd console

Then,
· select add new device,
· select the controller type from the list
· select the appropriate COM port
· click OK
Selecting system interface
The driver utilises a number of system interfaces to post touch data, either a virtual touch device interface or user mode X interface.
If using a virtual device all that is necessary is to select the extended touch option in the UPDD console
The software will then search for an appropriate virtual input device (uinput) in standard locations
· /dev/uinput
· /dev/input/uinput
· /dev/misc/uinput
In the unlikely event that the system supports virtual input with uinput in a non-standard location a parameter is available to explicit specify the location as shown below

To utilise the X interface first de-select the extended touch option in the UPDD console.
The driver (process tbupddwu) must be able to connect to the X server. A simple way to achieve this is to execute the command
xhost+
in a terminal window. This does have security implications and if security is a concern you might wish to consider a more restrictive option such as
xhost SI:localuser:root
which only allows connections from processes on the local system running as root.
As noted above, when aidaemon is executed then this permission is set automatically. This is achieved by in turn executing the script /opt/tbupddlx/xhostenable, thus the automatic behaviour of aidaemon can be modified by altering this script.
Autostarting the driver
The driver module tbupddwu must be executed with adequate privileges to gain write access to usblib. Typically this means running as root.
You are free to start the driver in any suitable manner so long as this requirement is met. The methods available to do this vary widely with various distributions and if in doubt you should consult the documentation for your distribution.
You can also refer to the updd install extension scripts (*.xxns) which are perl scripts to perform distribution specify actions.
The scripts *_updddect.xxns (e.g. 500_centos6x_updddetect.xxns) are used to identify various distributions.
900_unknown_updddect.xxns is executed last and will match any system to provide a default installation.
Various addition scripts are used to perform the actual updates required,
For example
rc_local_action.xxns is used to configure autostart for systems based on “SysV”
s90_script_std_action.xxns is used to configure autostart for systems based on “upstart”
install_systemd_action.xxns is used to configure autostart for systems based on “systemd”
You can use these scripts as the basis for an autostart configuration for your target.
In most cases you can simply directly call one of these scripts to complete this requirement.
Autostarting aidaemon
The user mode module aidaemon must execute in the context of the X session to which it relates.
The methods available to do this vary widely with various distributions and if in doubt you should consult the documentation for your distribution.
The technique used by the updd installer is to create an autostart shortcut with the following command
cp /opt/tbupddlx/aidaemon.desktop /etc/xdg/autostart
Manual install - Embedded Linux systems
Given the nature of embedded Linux systems, such as those utilising Tinyx/Kdrive, it is possible that our standard install scripts may not set up the driver requirements correctly, especially the launching of the daemon processes.
A system integrator can adapt the install scripts, using the supplied *.xxns files as a guide. However in most cases a manual installation might be more appropriate.
The manual install process is described in detail in the full manual install section above, but there are some additional considerations noted below.
The driver has a dependency on libusb 1.0. If this is not installed you will need to install this on your system.
If your system does not support libusb 1.0 but only the older incompatible libusb 0.1 then you cannot use this UPDD version.
Older UPDD versions with this support are available.
In some embedded systems we have seen that the UPDD Console and its related test utility (updddraw) does not load due to missing font files. Only when the dependent modules are available will these programs load without error.